Consignment Sales – Process Flow
GOOMI application allows vendors / suppliers to manage sales on consignment basis with their customers (e.g. consignment retail shop). The supplier (consignor) transfers goods possession to their customer (consignee), but the consignor retains ownership of the goods until it is sold by the consignee.
GOOMI user can transfer the goods to a consignment store warehouse using “Sales – (Sell In) Consignment Order”
When consignee has sold the goods, user creates consignment sales order for the goods sold using “Sales – (Sell In) Sales Order”
Below is an example of a complete consignment sales process flow from the consignor’s perspective:
![]() User create consignment order to transfer goods to consignment store warehouse
User create consignment order to transfer goods to consignment store warehouse
![]() User process the transfer of the consignment order to fill up the consignment store warehouse
User process the transfer of the consignment order to fill up the consignment store warehouse
![]() Consignee sold the consignment goods and send the sales report to consignor (i.e. on a monthly basis)
Consignee sold the consignment goods and send the sales report to consignor (i.e. on a monthly basis)
![]() User creates sales order for goods sold by the consignee, taking inventory from the consignment store warehouse
User creates sales order for goods sold by the consignee, taking inventory from the consignment store warehouse
![]() User Updates The Consignment Warehouse Inventory with the Consignment Sales data
User Updates The Consignment Warehouse Inventory with the Consignment Sales data
![]() User creates sales invoice to bill the consignee
User creates sales invoice to bill the consignee
1. Click on “Create New” at the top right of screen of “Consignment Order List” tab, it will open“Consignment Order” tab with empty form

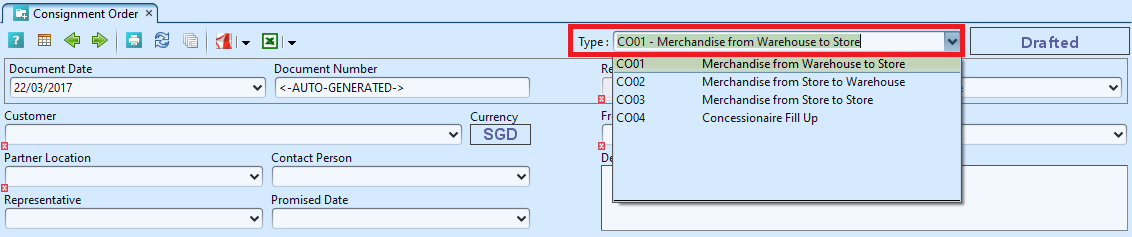
2. Select a document type from the “Type” drop-down list on top right side of screen. This will indicate the system to use the corresponding document sequence for the consignment order.
3. Select a customer from the “Customer” drop-down list on top left side of screen. It will fill up the form with the customer’s info. “From Warehouse” and “To Warehouse” list will filter out consignment warehouses that were not assigned to the selected customer. List of products will also be filter to only take products from Sales Price List / Trading Terms assigned to the customer.
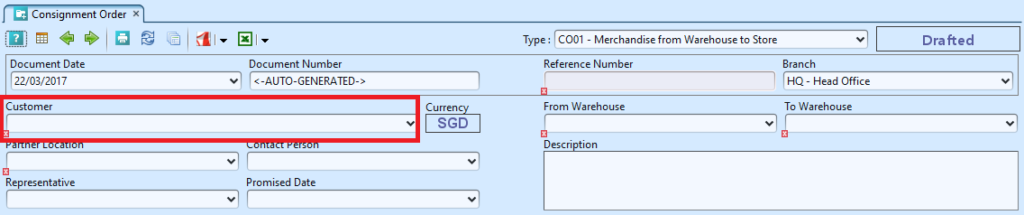
4. Fill up consignment order’ information on the top half of screen. Make sure a consignment warehouse record was created and assigned to the customer (use “Inventory module – (Masters) Warehouse“)
5. Click “Save” button at the bottom right side of screen to save the document
6. Filter the products list by selecting a brand from “Product Brand” drop-down list. Add product into the consignment order by searching for the product from the product drop-down list in the table on “Items / Articles” tab*
7. Enter the product’s info and click ” ![]() ” button to add the product into the consignment order*
” button to add the product into the consignment order*
Unit Price of the product is the Retail Sales Price (RSP) as defined in the application default sales settings.
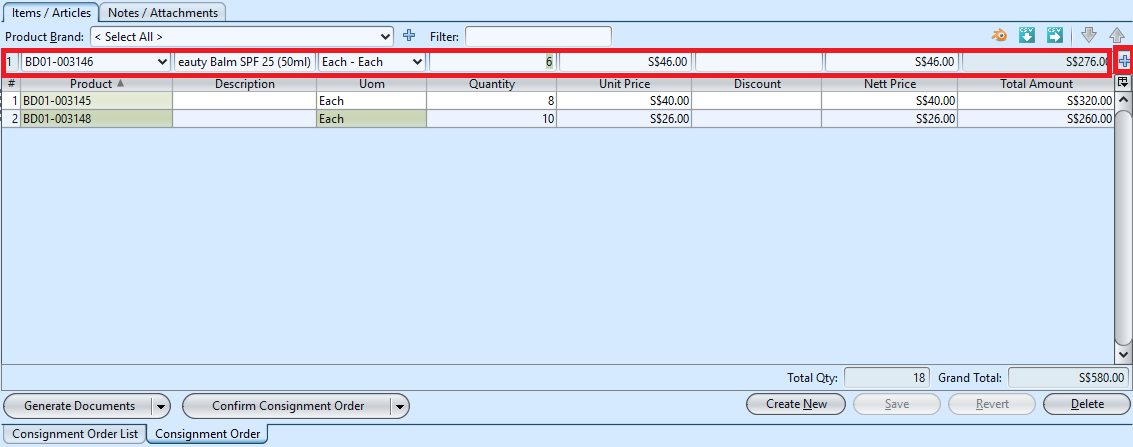
8. Repeat steps 6-7 to add more products into the consignment order*
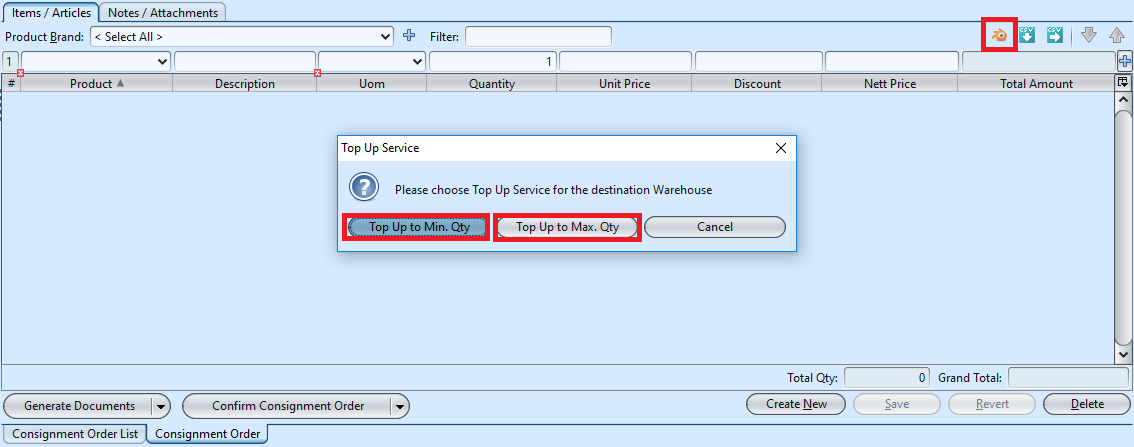
*Note: Alternatively, user can use the “Top Up” service to populate the item table with stock replenishment lines.
Click on the ” ![]() ” button on the right side of the screen, it will show “Top Up Service” dialog window.
” button on the right side of the screen, it will show “Top Up Service” dialog window.
Select “Top Up to Min. Qty” or “Top Up to Max. Qty“, this will fill up the item table with stock replenishment lines.
The quantity generated were based on the products and stock level defined in the “Store Model” minus the closing stock balance in the “Store Register” for the selected store’s warehouse.
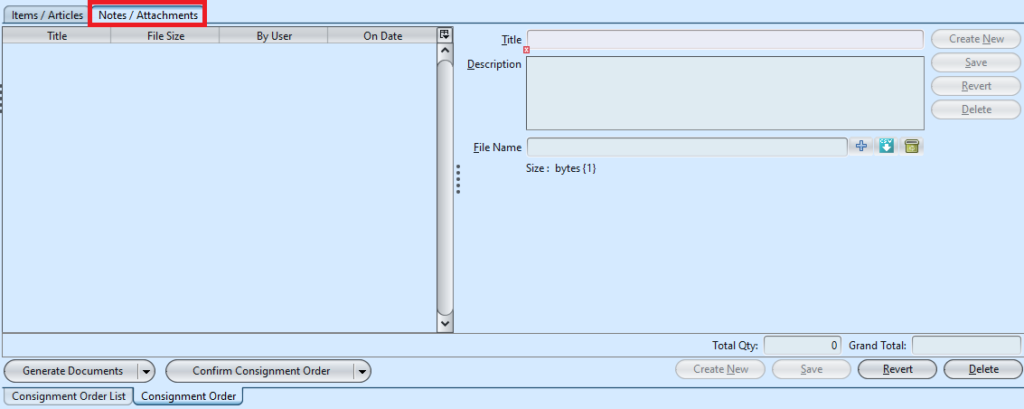
9. Click on “Notes / Attachments” tab at the middle of screen to add notes or files attachment for the consignment order
10. Click on “Save” button at the bottom right of screen to save
11. Click on “Confirm Consignment Order” button at the bottom of screen to confirm the consignment order
12. Click on “Approve Consignment Order” button at the bottom of screen to approve the consignment order
1. Open the approved “Consignment Order” (Sales module) or “Warehouse Order” (Purchase module) document to generate “Stock Transfer” for logistics
2. Click arrow on ![]() button and select “Generate Stock Transfer” option to generate a new “Stock Transfer” transaction (Inventory module – Logistics) to process delivery order for the consignment order. This process is to transfer the consignment products’ inventory between company’s warehouse to the consignment warehouse, or between 2 consignment warehouses
button and select “Generate Stock Transfer” option to generate a new “Stock Transfer” transaction (Inventory module – Logistics) to process delivery order for the consignment order. This process is to transfer the consignment products’ inventory between company’s warehouse to the consignment warehouse, or between 2 consignment warehouses
![]()
![]()
![]()
3. Click on “Confirm Stock Transfer” button at the bottom left of screen to confirm the stock transfer. A link to picking document will show up above “Post Stock Transfer” button after the confirmation. The status on top right of the corresponding stock transfer document will show “To Be Picked”
![]()
4. Click on the picking document link to start picking process and then post the picking of the stock. User may modify the selected product batch before start picking.
5. Go back to the source document (Stock Transfer). The status on top right of the corresponding stock transfer document will be updated as “Picked”
![]()
![]()
6. Click on “Post Stock Transfer” button at the bottom of screen to post the stock transfer. A link to Transfer Receipt document will show up above “Generate Report” button after the posting. “Postings” tab will be automatically fill up with journal entries of the stock transfer
![]()
![]()
7. In Stock Transfer, click on “Generate Button” button at the bottom left of screen to generate the stock transfer report, a window will come up showing print report options. User can print report, export the report as pdf or excel, or preview the report
![]()
8. Click on the Transfer Receipt document link to open and process stock receipt
![]()
9. Click on “Confirm Stock Receipt” button to confirm that stock have been received by the receiving party
![]()
10. Click on “Post Stock Receipt” button at the bottom left of screen to post the Transfer Receipt. A link to Putaway document will show up above “Generate Report” button after the posting. “Postings” tab will be automatically fill up with journal entries of the Transfer Receipt
![]()
11. Confirm and post the Putaway of the transfer receipt at the receiving warehouse. The transferred stock are now available for use in the receiving warehouse, in this case the consignment store warehouse.
![]()
![]()
Consignee sold the consignment goods and send the sales report to consignor (i.e. on a monthly basis)
When consignee has sold the goods in their possession, they will inform the consignor which goods were sold at what price and the quantity.
The consignor could then create sales order based on this information, to bill the consignee / record the consignment sales.
1. Click on “Create New” at the top right of screen of “Sales Orders List” tab, it will open “Sales Order” tab with empty form

2. Select a customer from the “Customer” drop-down list on top left side of screen. It will fill up the form with the customer’s info
3. Fill up sales order’s information on the top half of screen
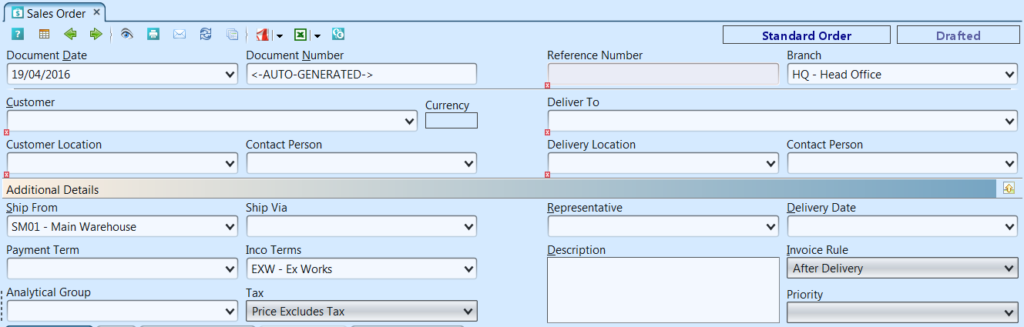
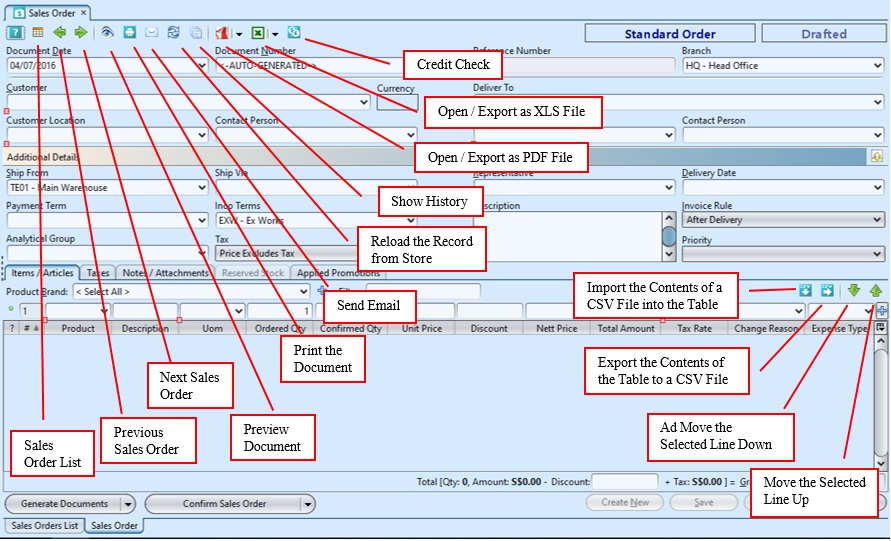
4. Click “Save” button at the bottom right side of screen to save
Products can only be entered when information in the top part (header) of the document has been properly entered. The credit check functionality will only be available when all the top part fields have been entered and the save button pressed.
5. Filter the products list by selecting a brand from “Product Brand” drop-down list. Add product into the sales order by searching for the product from the product drop-down list in the table on “Items / Articles” tab
6. Enter the product’s info and click ![]() button or press ENTER to add the product into the sales order
button or press ENTER to add the product into the sales order
![]()
7. Repeat steps 5-6 to add more products into the sales order
8. Optional: Click on “Notes / Attachments” tab at the middle of screen to add notes or files attachment for the sales order
9. Click on “Save” button at the bottom right of screen when completed
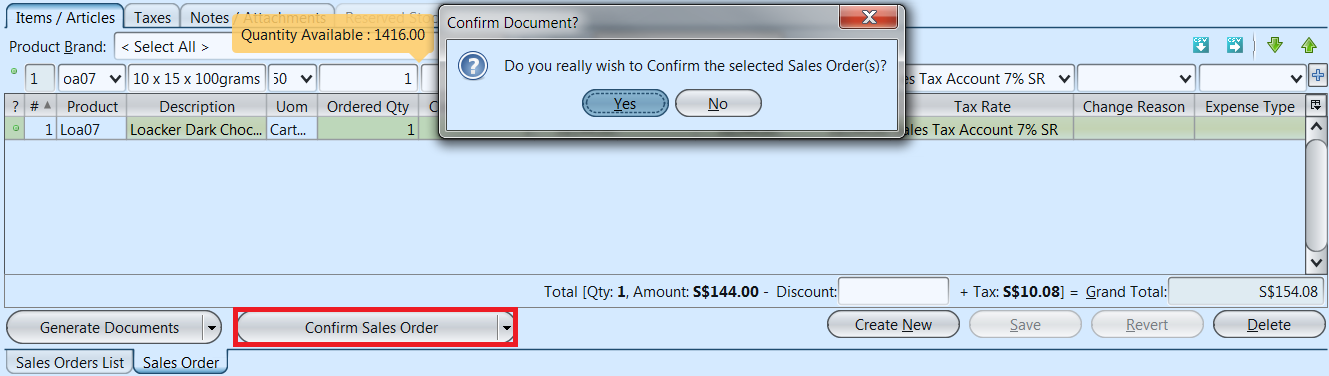
10. Click on “Confirm Sales Order” button at the bottom of screen to confirm the sales order
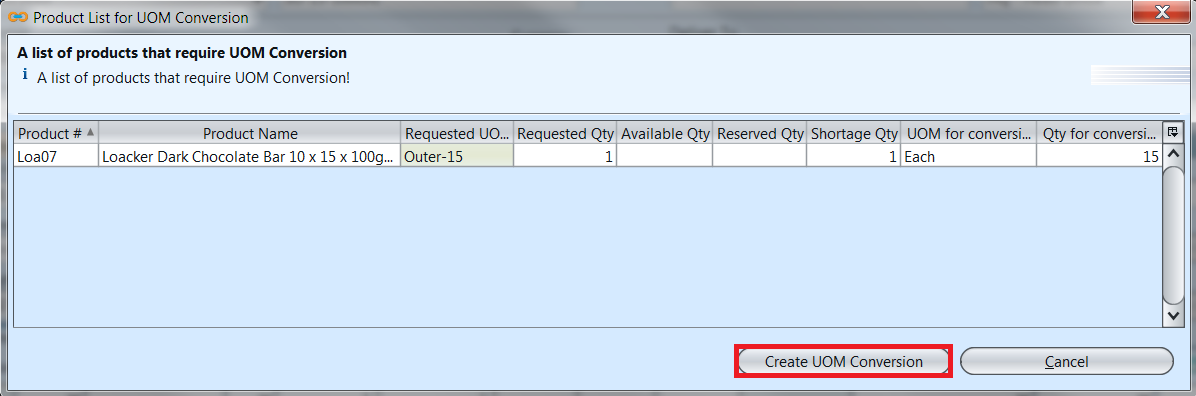
The system will check whether any UOM Conversion is needed for the ordered product(s). If so the system will generate UOM Conversion document, with list of product(s) to be converted, for user to process first to fulfill the Sales Order. After the UOM Conversion process is successfully completed, user to confirm the Sales Order document again.
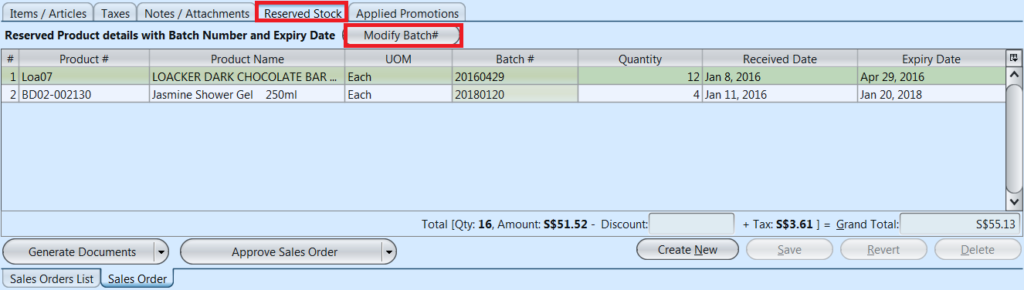
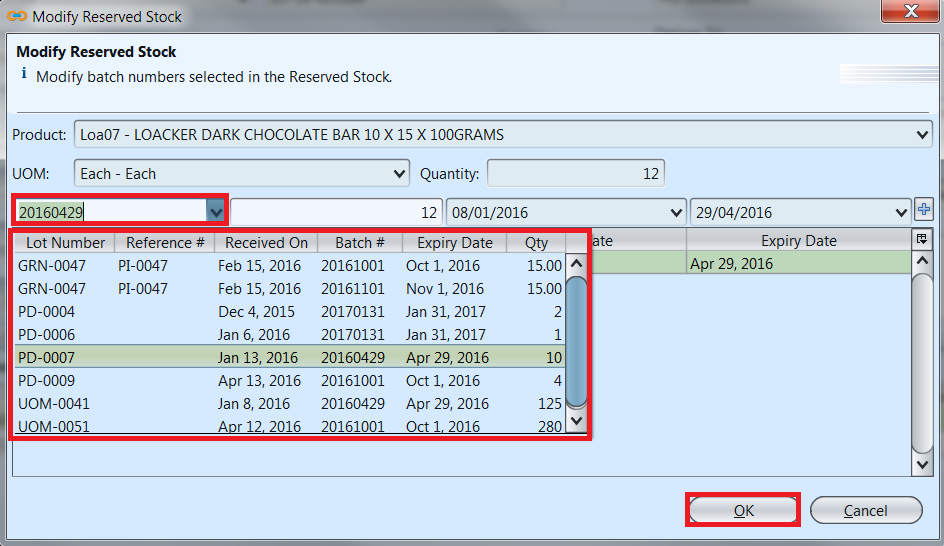
Optional: User may change the Reserved Stock for a particular product to a different batch if they wish to do so, after the Sales Order confirmation. On the “Reserved Stock” tab, click “Modify Batch#” button. It will open a window for user to select a different batch for ordered product. Click on a batch # from the list and press ENTER. Click OK button to commit the change.
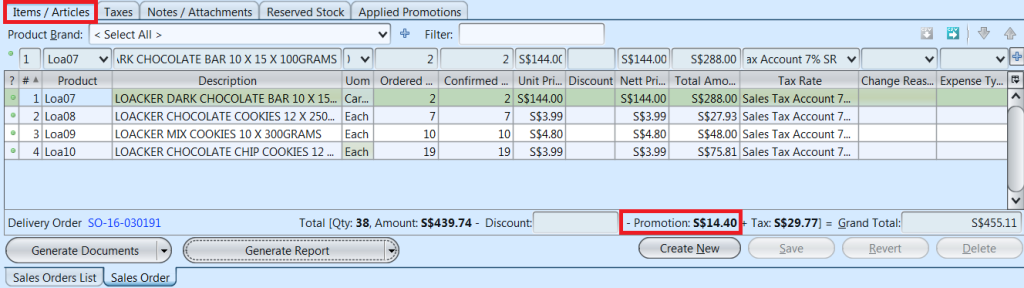
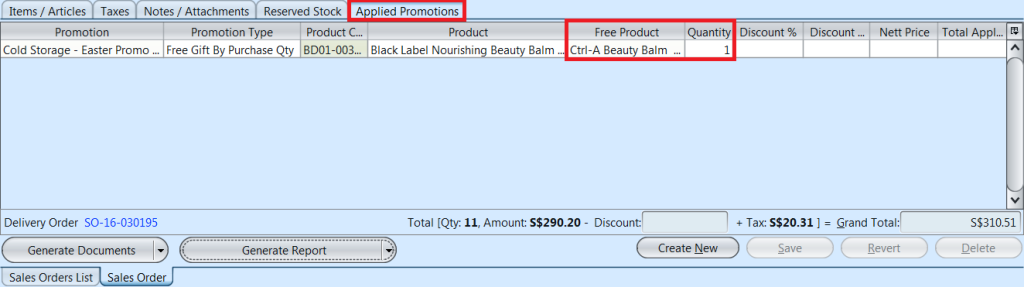
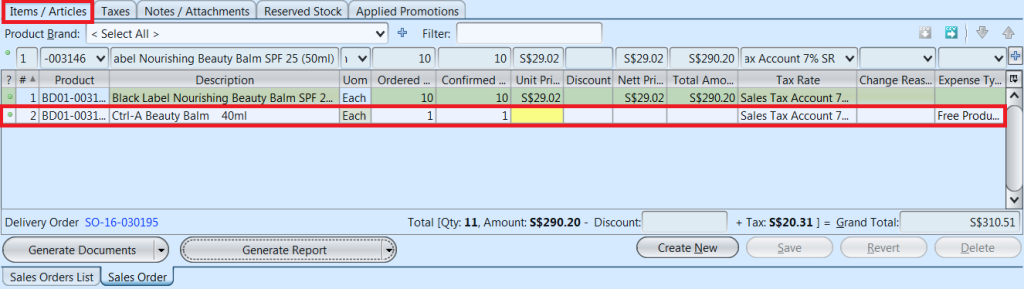
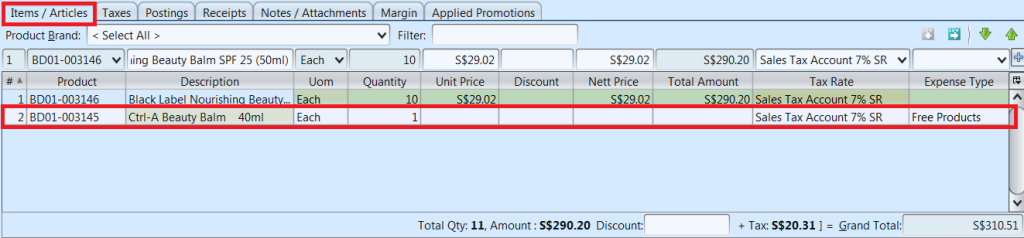
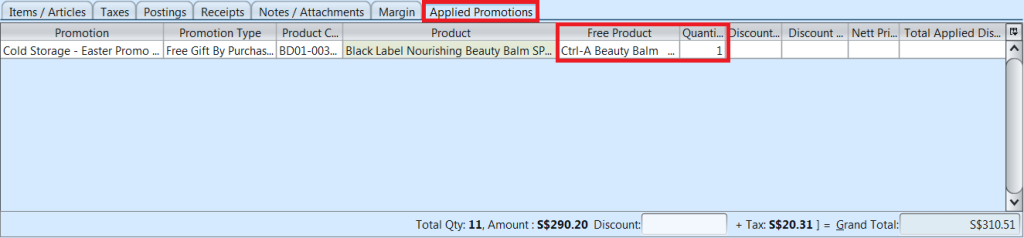
The system will automatically check if there is any promotion(s) applied for the customer for the period of the created Sales Order document date. If so, the promotion(s) will be displayed in the “Applied Promotions” tab, and any free gift / discount added in the “Items / Articles” tab.
Example 1: Allow Discount by X Spent promotion scheme

Example 2: Free Gift By Purchase Qty promotion scheme
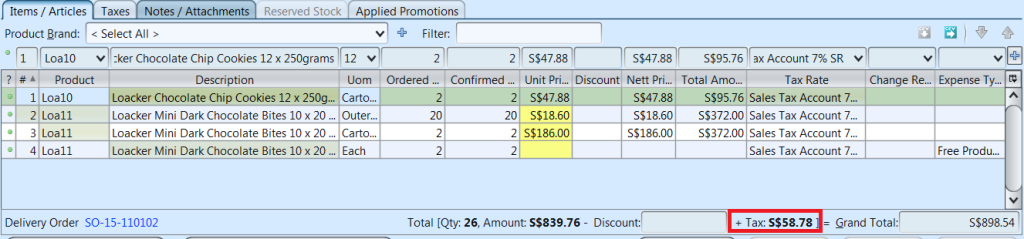
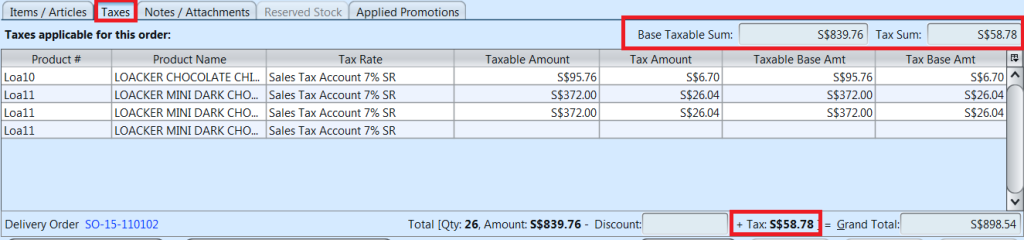
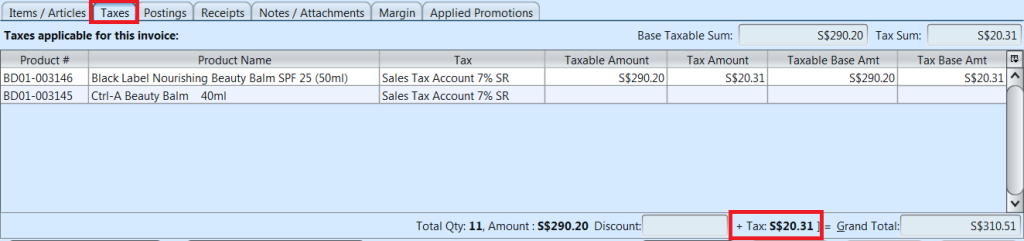
11. Click on “Approve Sales Order” button at the bottom of screen to approve the sales order. Tax entries applicable for the sales order will be automatically created under “Taxes” tab if any
12. If ”After Delivery” invoice rule was chosen, a link to “Delivery Order” transaction (Inventory module – Outbound) will be created at the bottom left of screen to process delivery order for the sales order.
User Updates The Consignment Warehouse Inventory with the Consignment Sales data
User updates their consignment warehouse inventory using the following process:
Delivery Order –> Pick –> Pack –> Goods Delivery
After posting the goods delivery document to accounts, user will need to generate the relevant sales invoice document from the goods delivery
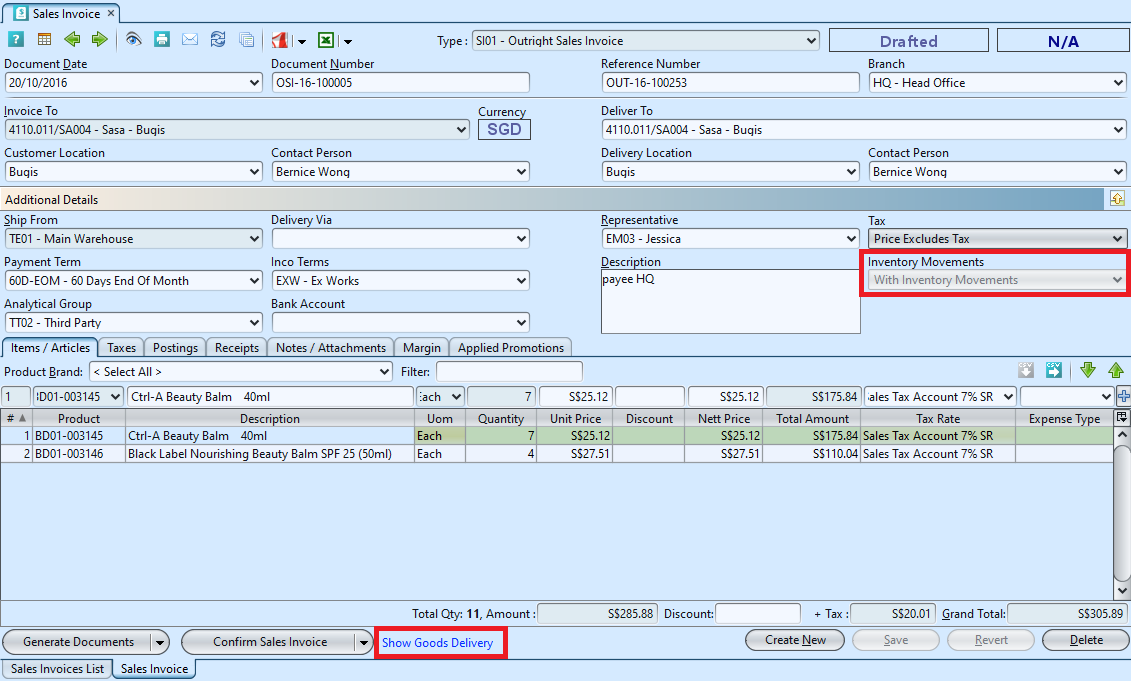
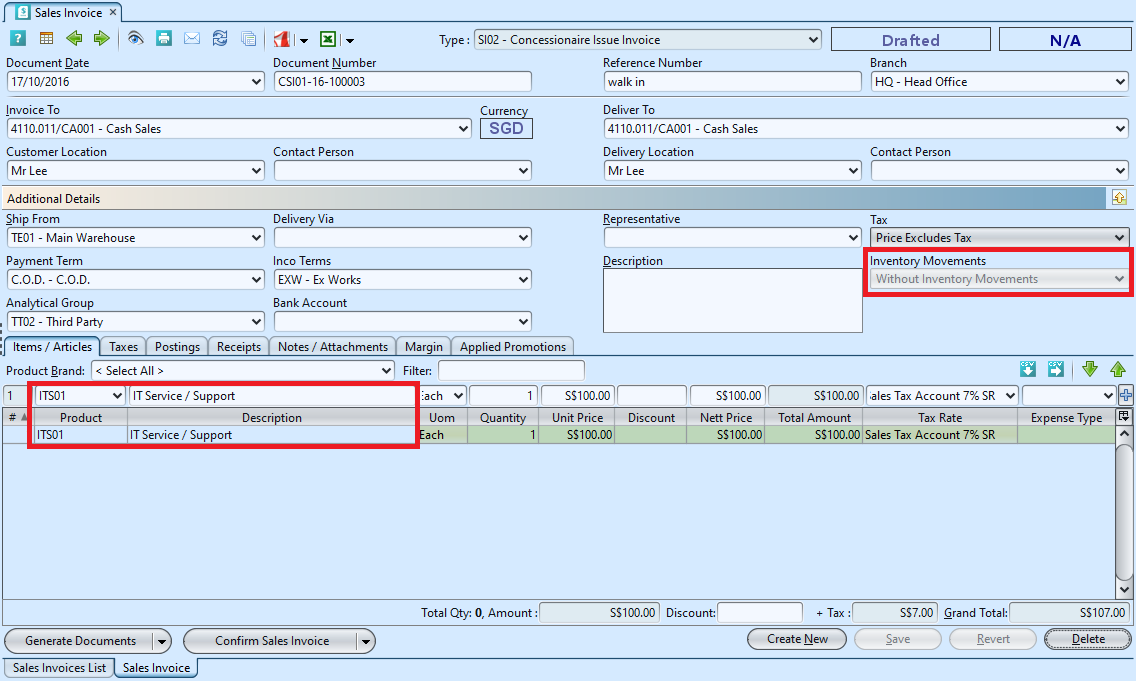
1. Create invoice from “Sales – (Sell In Transactions) Sales Invoice”. There are 2 options to create sales invoice:
- With Inventory Movement (sales of inventory product type)
- Without Inventory Movement (sales of non-inventory type, e.g. service). This can be use for Consignment Sales where customer did not provide detailed report with products quantity breakdown.

2. In the “Create Sales Invoice” pop up window, select:
- From Goods Delivery / Proof Of Delivery documents (sales of inventory product type), choose a document from the list and click OK button. When create new from the list view, user may select / tick multiple documents to create multiple Sales Invoices. Document type of Sales Invoice is inherited from the corresponding Sales Order’s document type; OR
- Create Sales Invoice without Inventory Movement (sales of non-inventory type, e.g. service and / or invoicing for products without inventory movement) and click OK button. User may select document type for the Sales Invoice.
Note: No stock movement nor posting to Inventory accounts for this type of Sales Invoice. This can also be use for Consignment Sales where customer did not provide detailed report with products quantity breakdown.
3. For Sales Invoice without Inventory Movement, enter product line info and click ![]() button.
button.
4. Optional: Click on “Notes / Attachments” tab at the middle of screen to add notes or files attachment for the sales invoice
5. Click on “Save” button at the bottom right of screen to save progress / changes
6. Any promotion scheme applied to this sales transaction (in the Sales Order document) will be inherited / shown in the Sales Invoice at the “Applied Promotions” tab
7. Click on “Confirm Sales Invoice” button at the bottom of screen to confirm the sales invoice

8. Click on “Post To Accounts” button at the bottom of screen to post the sales invoice to accounts

9. Click “Show Goods Delivery” link to open the corresponding Goods Delivery document (for Sales Invoice with Inventory Movement type)
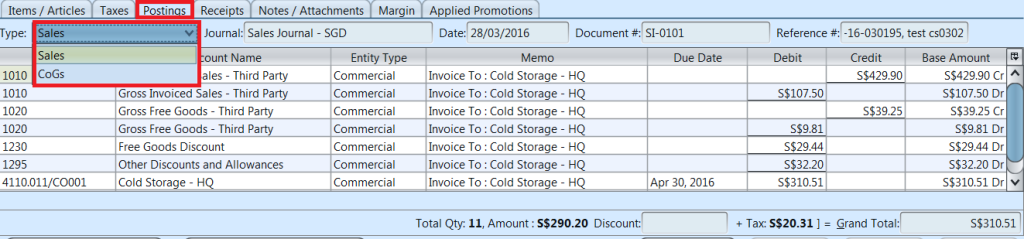
10. Tax entries applicable for the sales invoice will be automatically created under “Taxes” tab if any. Journal entries of the sales will be automatically created under “Postings” tab. User can select different type of postings to view for the selected Sales Invoice by changing the “Type” filter
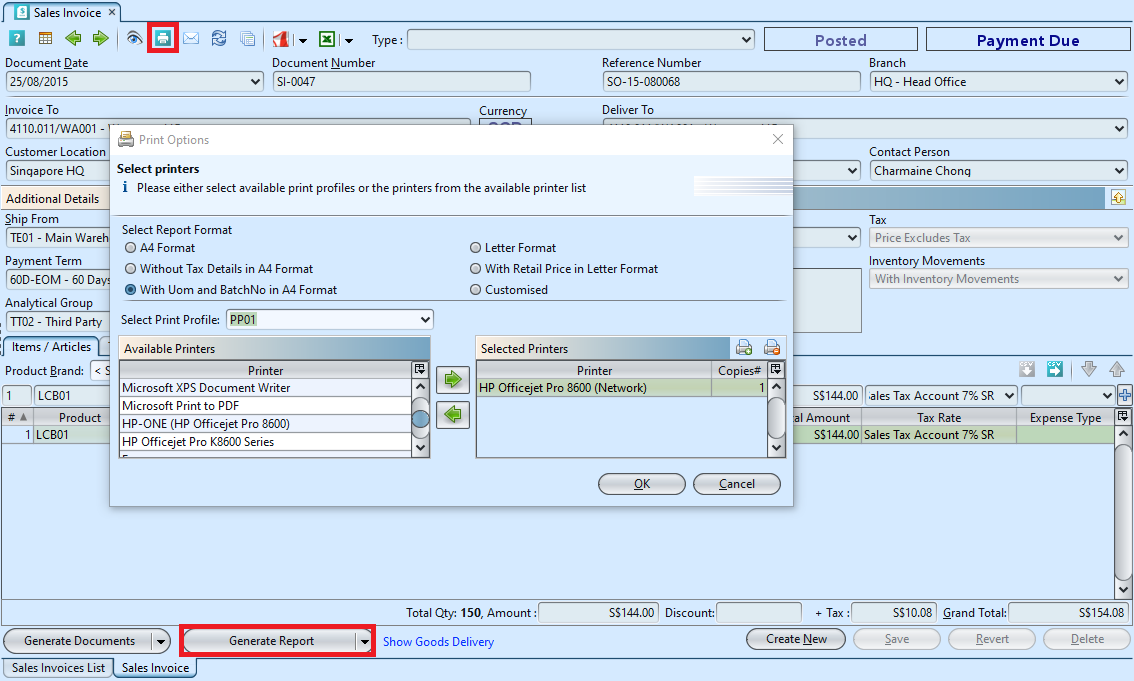
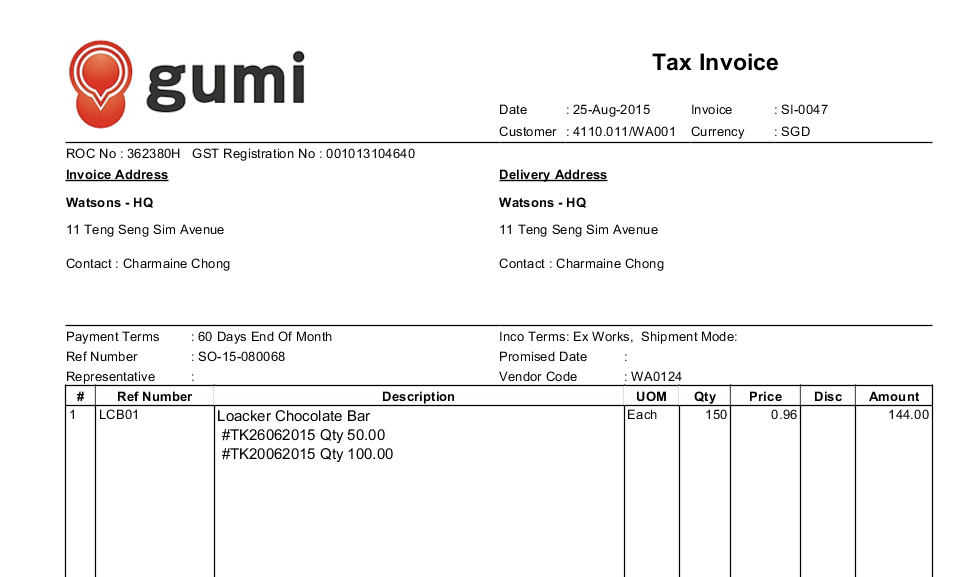
11. Click ![]() button or “Generate Report” button to print the sales invoice. Select a report format for the invoice
button or “Generate Report” button to print the sales invoice. Select a report format for the invoice
4. Send the sales invoice to bill the consignee.