Customers
Customers view allows the user to manage the company’s customers records. Below actions are available under “Customers”:
![]() Create new customer; update, delete, view and search for customer details
Create new customer; update, delete, view and search for customer details
![]() Import and export of Customers data
Import and export of Customers data
1. Export to CSV file
2. Import from CSV file
Field Name |
Description |
Mandatory Information |
| Customer Name | Name of customer |
Y |
| Customer Code | Custom code for the customer |
Y |
| Reference Code | Reference Code |
Y |
| Tax Number | Tax Number |
N |
| Currency | Currency used by the customer |
Y |
| Grouping Account | Account Group of the customer, i.e. Trade / Non-Trade |
Y |
| Language | Self-explanatory |
N |
| Payment Terms | Payment rules as per agreement with the customers. |
Y |
| Account Setting | Which account setting to use for sales transaction postings |
Y |
| Analytical Group | Analytical group of the customer (see Accounts – Analytical Group: Channels) |
Y |
| Customer Type | Types of customer, i.e. Trade Debtor / Other Debtor |
Y |
| Sales Representative | Internal representative to liase with the customer |
N |
| Payment Collector | Assign staff as payment collector |
N |
| Flat Discount | Flat rate discount to be applied for sales transaction with the customer |
N |
| Default Bank Account | Default company’s bank account for receiving payment from the customer |
N |
| Payee Customer | Another customer that will pay for the customer |
N |
| Invoice Rule | After Delivery or Immediate |
Y |
| Priority | Level of priority: Low, Medium, or High |
N |
| Commercial Note | Additional note added at footnote of documents to this customer |
N |
| Inter Company Organization |
Y |
|
| Entity Type | Entity type of the customer (see Accounts – Analytical Group: Entity Types) |
N |
| Risk Category | Self-explanatory |
Y |
| Price List Type | Type of the price list of items to use for sales transaction with the customer, i.e. (Sales) Price List / Trading Terms |
Y |
| Minimum Shelf Life (Days) | Products’ Minimum Shelf Life requirements from the customer (in Days); Default value 0 if not specified by customer |
Y |
| Customer’s Vendor Code | Vendor Code given to the company from this customer |
N |
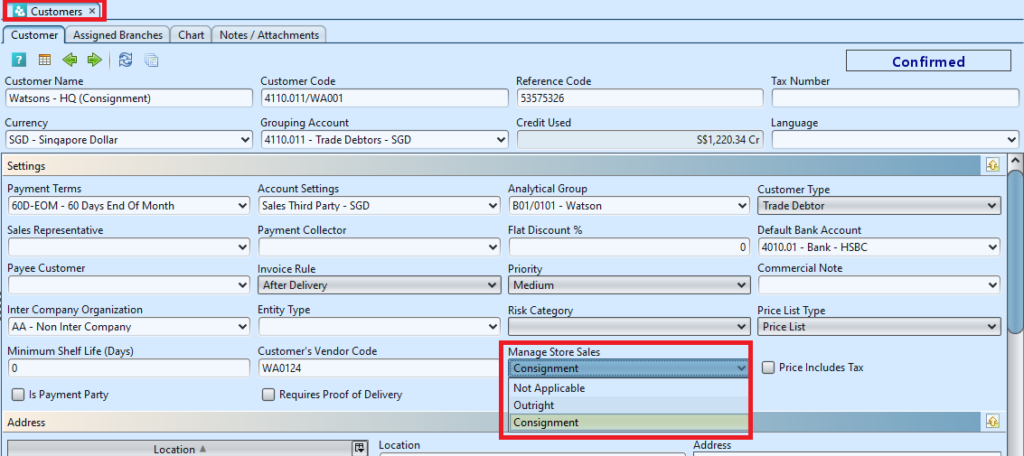
| Manage Store Sales | Whether the company track / manage Store Sales for the offtake customer; Default option is “Not Applicable” |
N |
| Price Includes Tax | Whether the price list for the customer to include tax |
N |
| Is Payment Party | Whether the customer can be payment party for another customer |
N |
| Requires Proof of Delivery | Whether the customer requires proof of delivery for their sales orders |
N |
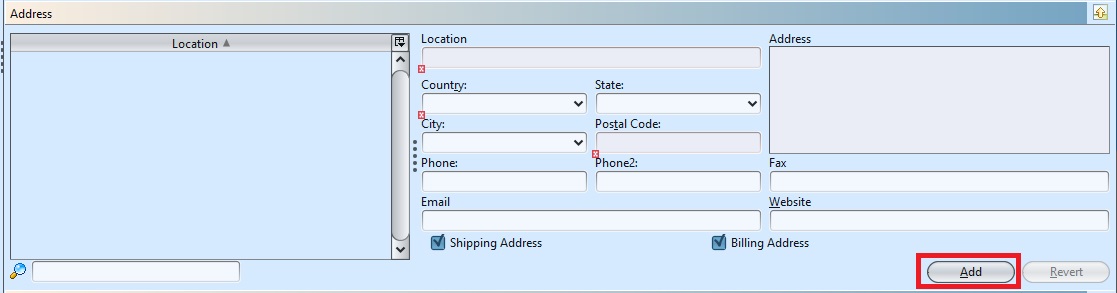
| Address – Location | Location name or code for the address |
Y |
| Address – State | A nation or territory considered as an organized political community under one government. |
N |
| Address – Country | Self-explanatory |
Y |
| Address – City | Self-explanatory |
N |
| Address – Postal Code | A series of letters and/or digits appended to a postal address for the purpose of sorting mail. |
Y |
| Address – Address | Self-explanatory |
Y |
| Address – Phone/Phone2 | Contact number |
N |
| Address – Fax | Fax number |
N |
| Address – Email | Email address of the company for this location |
N |
| Address – Website | Company website for this location |
N |
| Address – Shipping Address | Whether this location address is for shipping / delivery |
N |
| Address – Billing Address | Whether this location address is for invoicing / billing |
N |
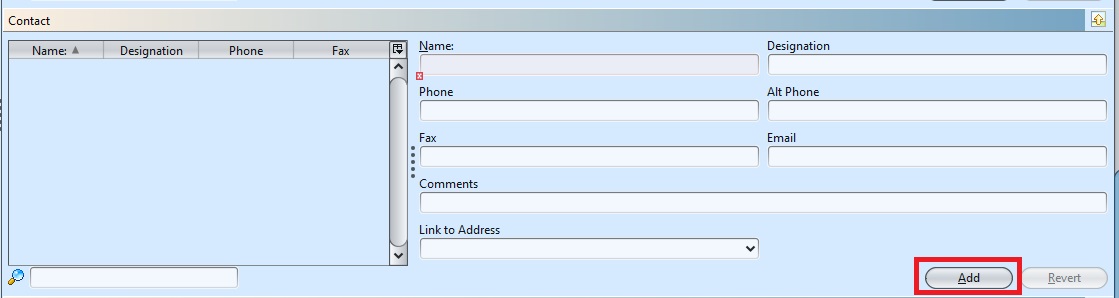
| Contact – Name | Name of the contact person |
Y |
| Contact –Designation | An official name, description, or title in the company |
N |
| Contact – Phone | Contact number |
N |
| Contact – Alt Phone | Alternate phone number |
N |
| Contact – Fax | Fax number |
N |
| Contact – Email | Email address |
N |
| Contact – Comments | Self-explanatory |
N |
| Contact – Link to Address | Which address (above) is the location of this contact person |
N |
| Credit Term Type | Types of credit term |
Y |
| Currency | Currency used by this customer |
Y |
| Credit Limit | The amount of credit extended to this customer |
Y |
| Grace Days | Allows payment to be received for a certain period of time after the actual due date |
N |
| From Date | Start date of credit term agreement |
Y |
| To Date | End date of credit term agreement |
Y |
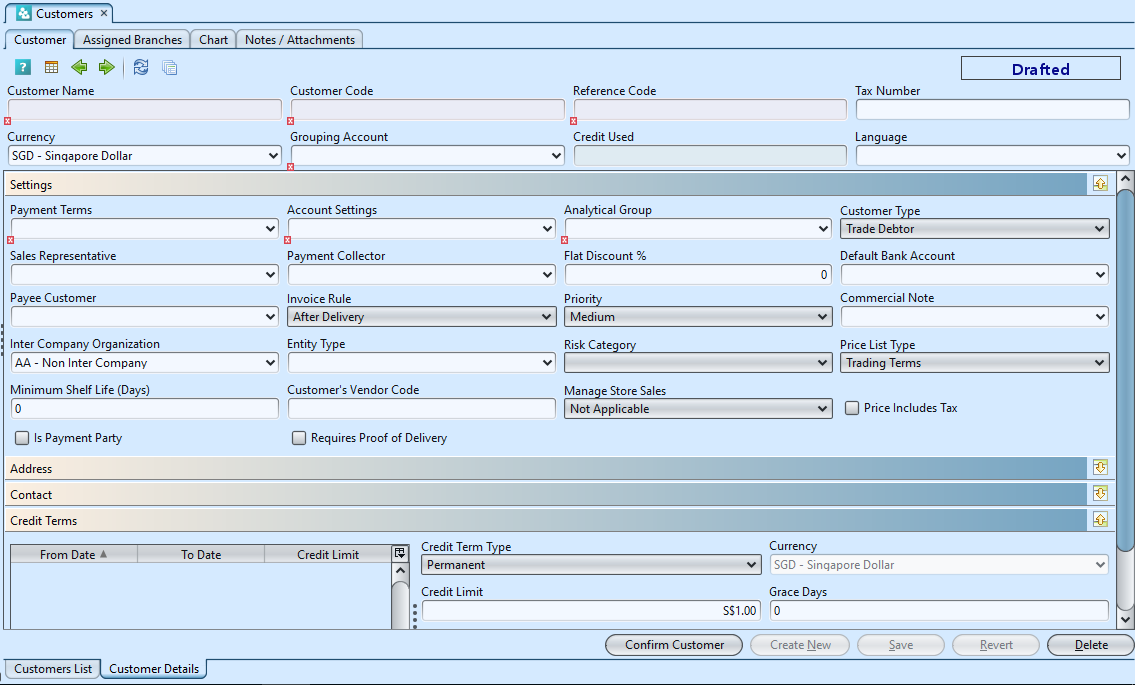
Create New Customer
1. Click “Create Customer” link on top right of “Customer List” tab to create another customer record, it will open “Customer Details” tab with empty form

2. Fill up customer’s information header and settings. Mandatory information is marked with x on the text field. For more information on each field please see the description table above.
*Note: User must select either “Outright” or “Consignment” option in the “Manage Store Sales” list for the customer to be available as selection for “Customer” in “Sales – Sell Out module”. Sell Out module is for tracking and managing offtake sales of the customer.
Under each of the “Address”, “Contact” and “Credit Term” section, click the “Add” button at each section after filled up the details to save the entry and create new empty form for the section. User able to enter multiple entries for “Address”, “Contact” and “Credit Term” for each customer record.

3. Click “Save” button at the bottom of screen when done
4. Click “Confirm Customer” button and click “Yes” button to confirm the customer record
Update Customer Details
1. On “Customer List” tab double click on customer to be updated, it will bring up the details on “Customer Details” tab for the selected customer
2. Make change(s) on the customer’s information
3. Click on “Save” button at the bottom of screen when done
4. Click on “Revert” button at the bottom of screen or refresh icon at the top of the screen to roll back the changes
Delete Customer
1. On “Customer List” tab double click on customer to be deleted, it will bring up the details on “Customer Details” tab for the selected customer
2. Click on “Delete” button at the bottom of screen
3. Click on “Yes” button on the pop-up window to confirm record deletion
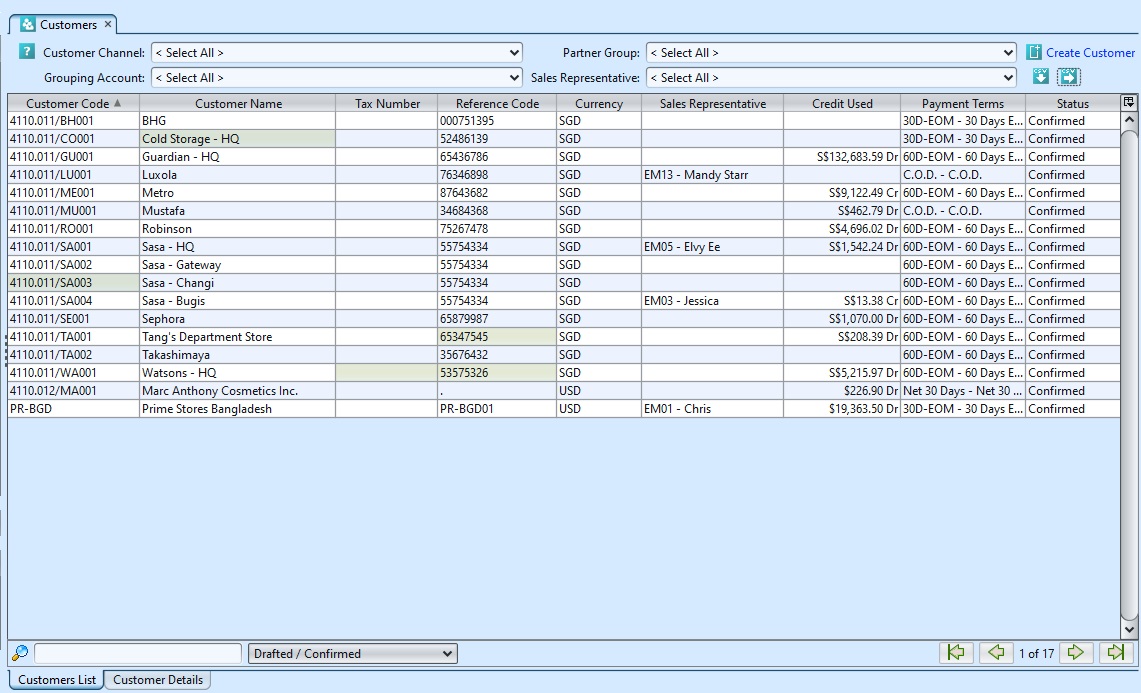
View and Search for Customer Details
1. On “Customer List” tab enter search parameter to filter the result, i.e. type in name of the sales representative in the “Sales Rep” textfield box or select from drop-down list
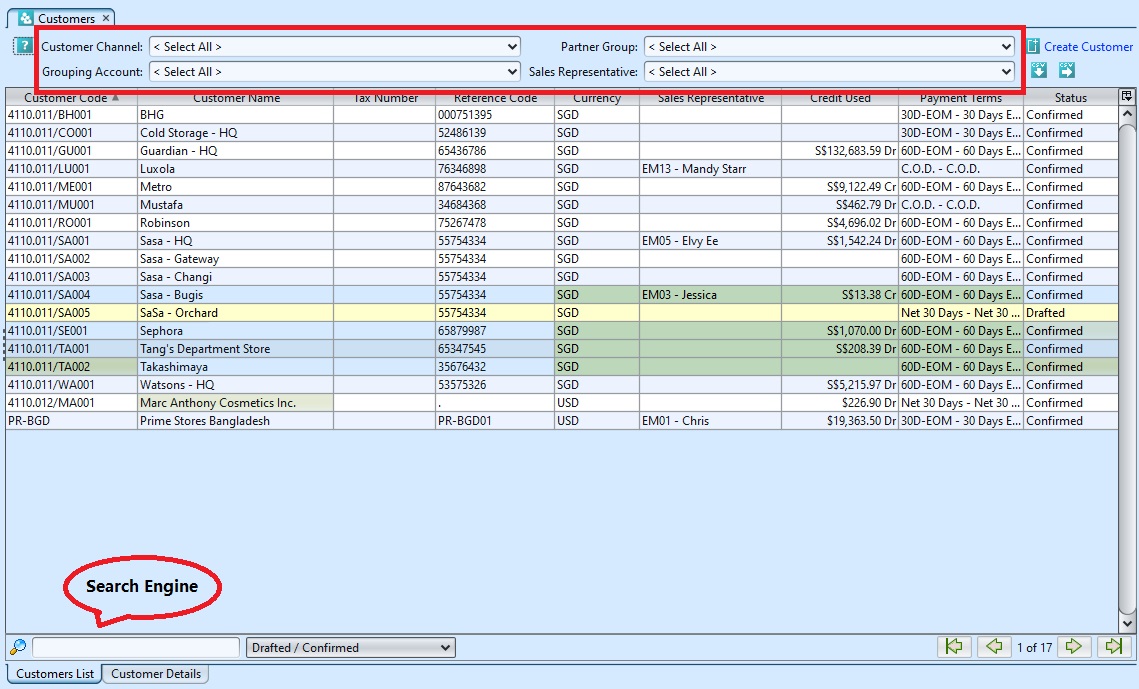
2. Result can be sorted alphabetically by clicking the fields’ columns.
3. Double click on customer to view full details of the customer, it will bring up the details on “Customer Details” tab for the selected customer
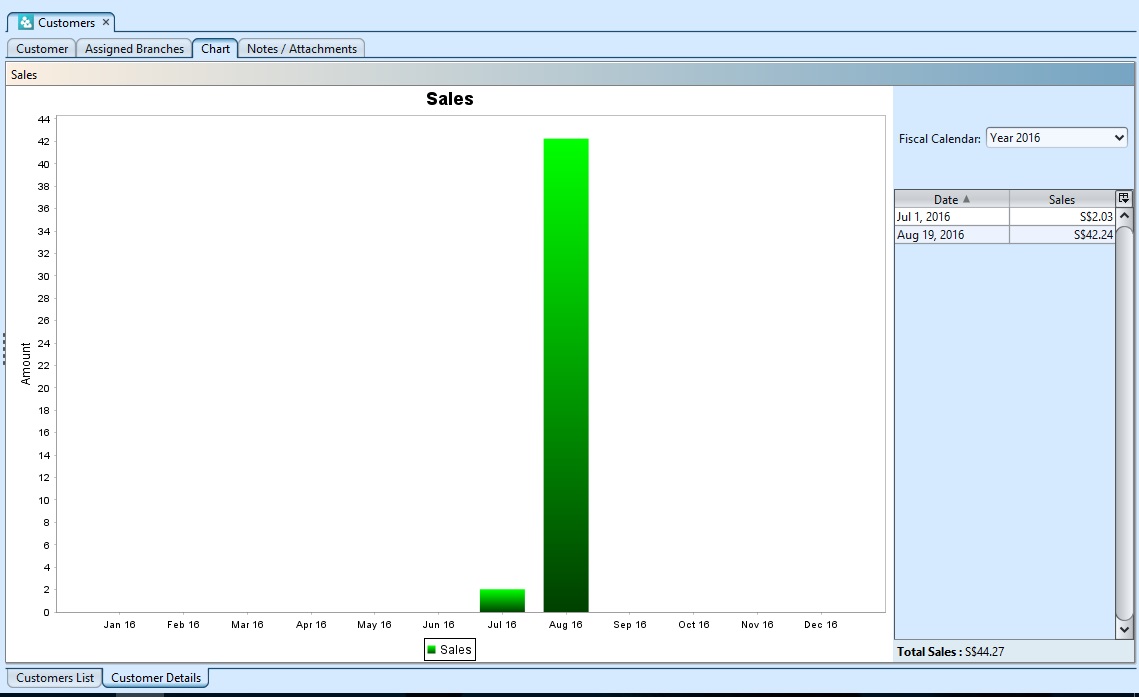
4. The “Chart” tab under “Customer Details” tab shows sales records & chart for the selected customer
Import and Export of Customer Data
1. Click on “Customer List” tab at the bottom of screen
2. Click “Export to CSV” ![]() button to export listed customer data, user can filter the list to only show data to be exported.
button to export listed customer data, user can filter the list to only show data to be exported.
3. Click “Import from CSV” ![]() button to import customer data. Use “Export to CSV” feature to get the file template with example.
button to import customer data. Use “Export to CSV” feature to get the file template with example.
