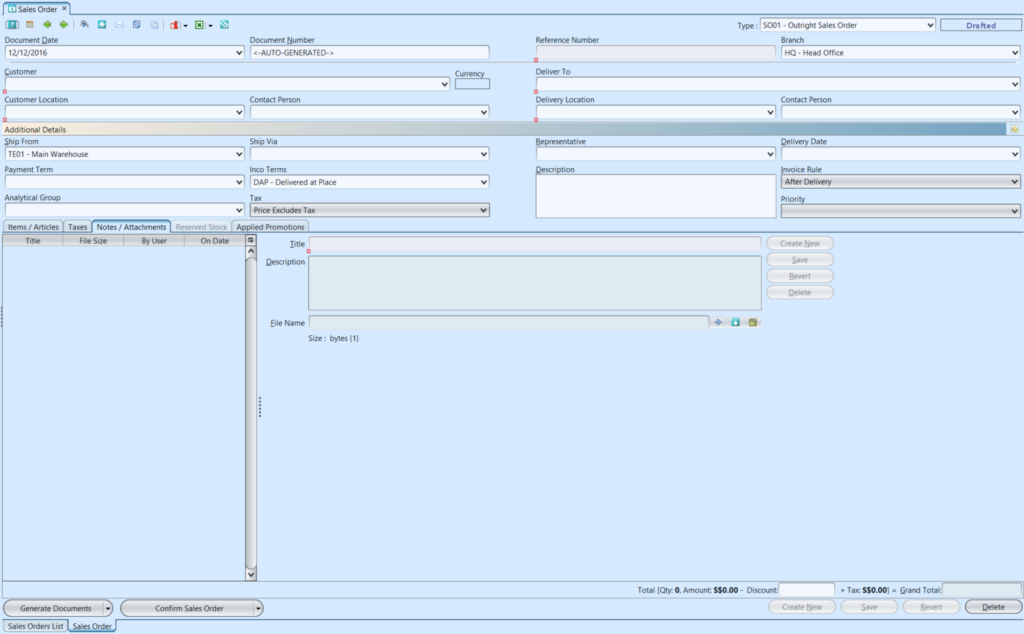
Sales Order
Sales Order view allows user to create and manage sales order documents.
Below actions are available under “Sales Order”:
![]() Create new sales order; update, delete, view and search for sales order details
Create new sales order; update, delete, view and search for sales order details
![]() Export and import sales order
Export and import sales order
Field Name |
Explanation |
Mandatory Information |
| Type | Document Type |
Y |
| Document Date | Date of the sales order |
Y |
| Document Number | Number of the sales order |
Y |
| Reference Number | A unique number on sales order |
Y |
| Branch | A location, other than the main office, where business is conducted. |
Y |
| Customer | Company’s customers |
Y |
| Customer Location | Company’s location |
Y |
| Contact Person | Person in charge |
N |
| Deliver To | Self-explanatory |
Y |
| Delivery Location | Self-explanatory |
Y |
| Ship From | Self-explanatory |
Y |
| Ship Via | Transportation method |
N |
| Payment Term | Payment rules imposed by suppliers on their customers. |
N |
| Inco Term | Commonly used in both international and domestic trade contracts. |
Y |
| Analytical Group | Trade type |
N |
| Tax | A compulsory contribution to state revenue, levied by the government on workers’ income and business profits, or added to the cost of some goods, services, and transactions. |
Y |
| Representative | Internal representative |
N |
| Delivery Date | The final date by which the underlying commodity for a futures contract must be delivered in order for the terms of the contract to be fulfilled. |
N |
| Description | Description |
N |
| Invoice Rule | Immediate or After Delivery |
Y |
| Priority | The fact or condition of being regarded or treated as more important than others |
Y |
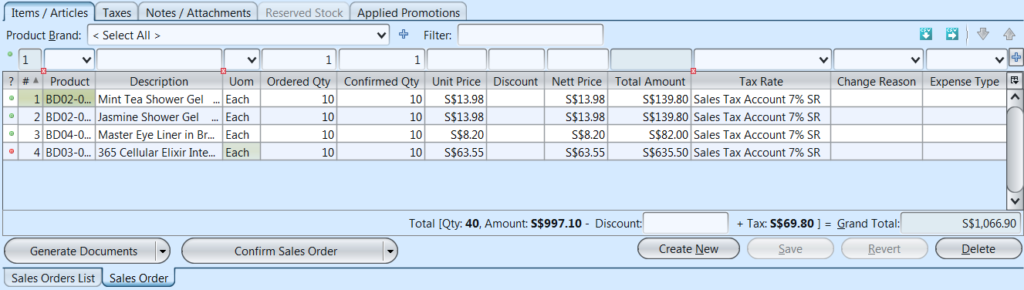
| Items/Articles – Product | Name of product |
Y |
| Items/Articles – Description | Description |
N |
| Items/Articles – UOM | Type of product – Unit of Measure |
Y |
| Items/Articles – Ordered Qty | Self-explanatory |
N |
| Items/Articles – Confirmed Qty | Self-explanatory |
N |
| Items/Articles – Unit Price | Self-explanatory |
N |
| Items/Articles – Discount | A deduction from the usual cost of something. |
N |
| Items/Articles – Nett Price | Self-explanatory |
N |
| Items/Articles – Total Amount | Self-explanatory |
Y |
| Items/Articles – Tax Rate | Self-explanatory |
N |
| Items/Articles – Change Reason | Change reason to be entered when confirmed quantity is less than ordered quantity (i.e Out of Stock, Limited Stock, etc) |
Depend on system setting / preference |
| Items/Articles – Expense Type | Expense type of free / gift / marketing product |
N |
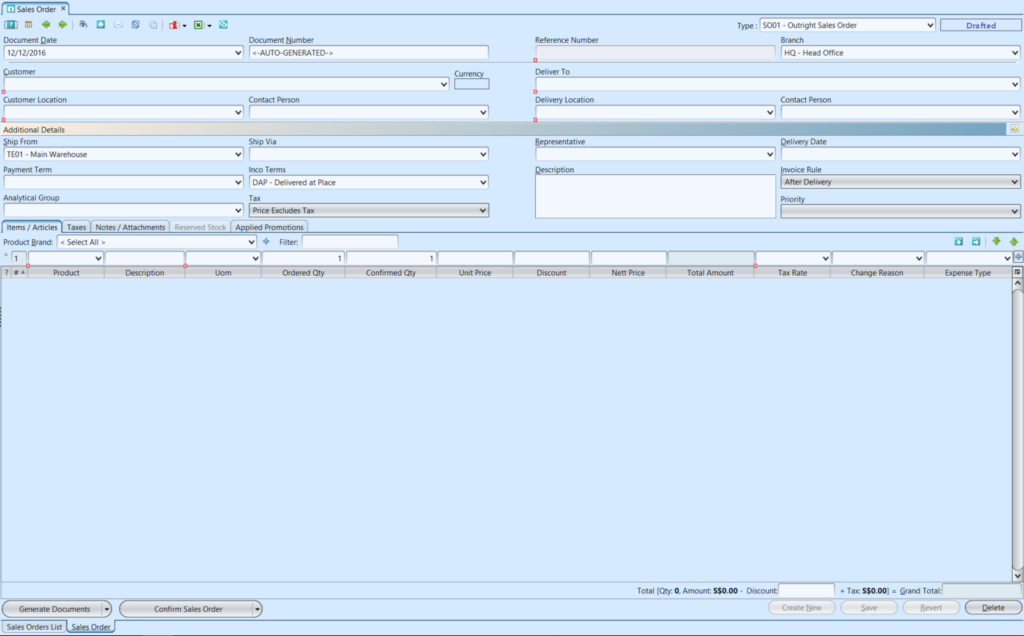
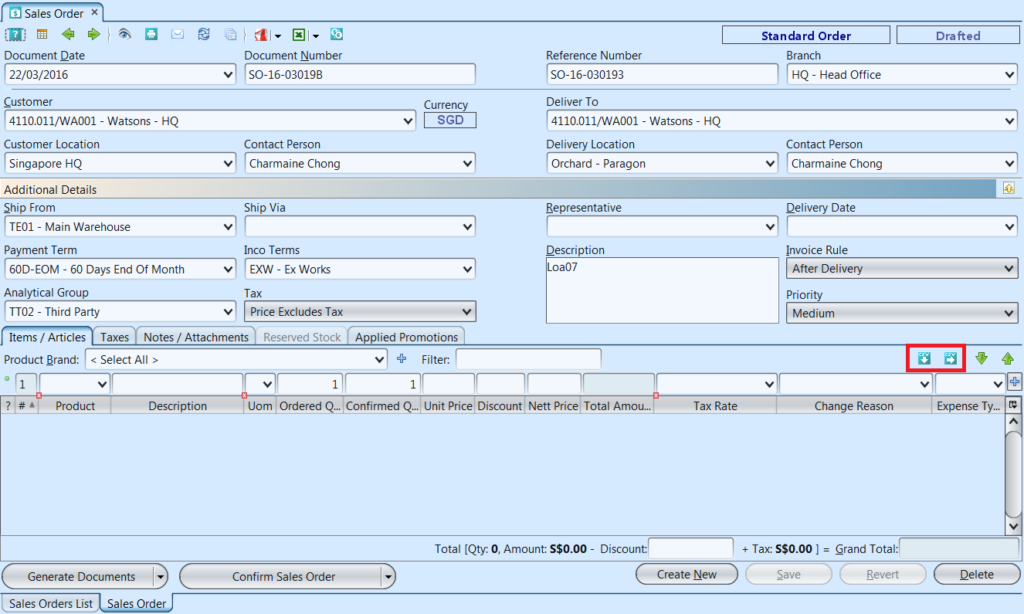
Create New Sales Order
1. Click on “Create New” at the top right of screen of “Sales Orders List” tab, it will open “Sales Order” tab with empty form

2. Select a customer from the “Customer” drop-down list on top left side of screen. It will fill up the form with the customer’s info
3. Fill up sales order’s information on the top half of screen
4. Click “Save” button at the bottom right side of screen to save
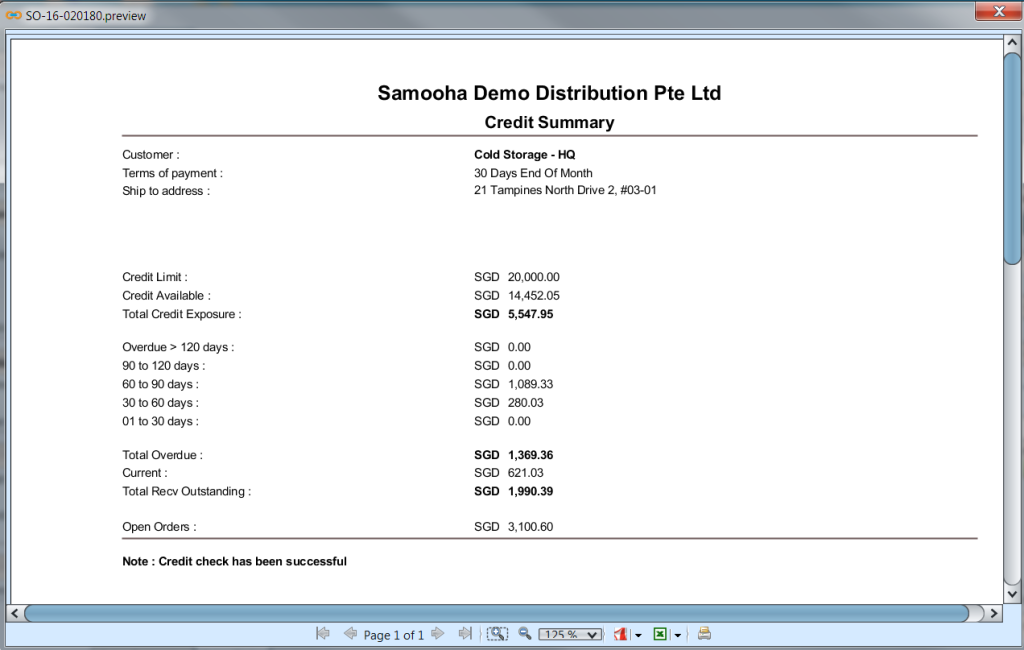
Products can only be entered when information in the top part (header) of the document has been properly entered. The credit check functionality will only be available when all the top part fields have been entered and the save button pressed.

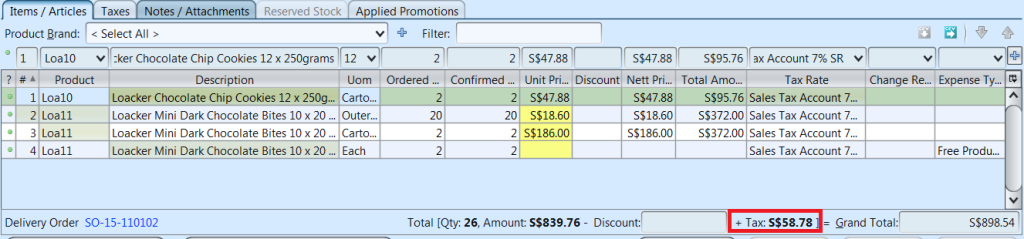
5. Filter the products list by selecting a brand from “Product Brand” drop-down list. Add product into the sales order by searching for the product from the product drop-down list in the table on “Items / Articles” tab
6. Enter the product’s info and click ![]() button or press ENTER to add the product into the sales order
button or press ENTER to add the product into the sales order
![]()
7. Repeat steps 5-6 to add more products into the sales order
8. Optional: Click on “Notes / Attachments” tab at the middle of screen to add notes or files attachment for the sales order
9. Click on “Save” button at the bottom right of screen when completed
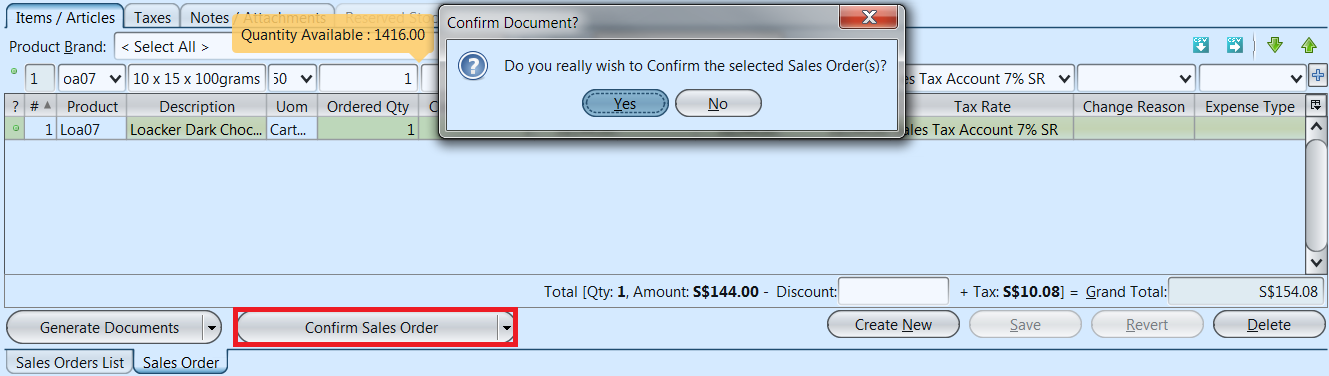
10. Click on “Confirm Sales Order” button at the bottom of screen to confirm the sales order
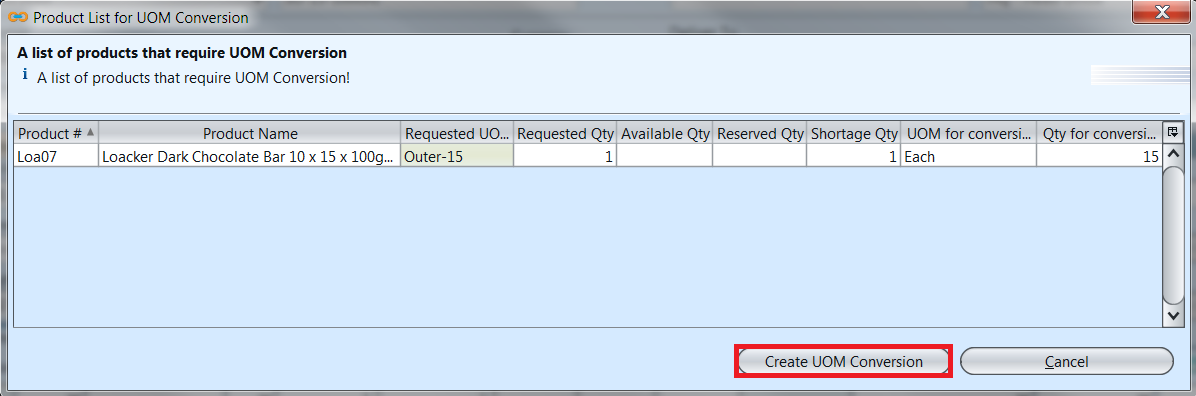
The system will check whether any UOM Conversion is needed for the ordered product(s). If so the system will generate UOM Conversion document, with list of product(s) to be converted, for user to process first to fulfill the Sales Order. After the UOM Conversion process is successfully completed, user to confirm the Sales Order document again.
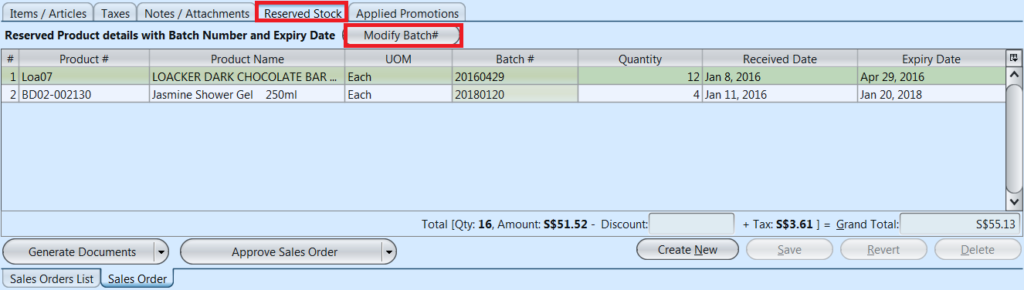
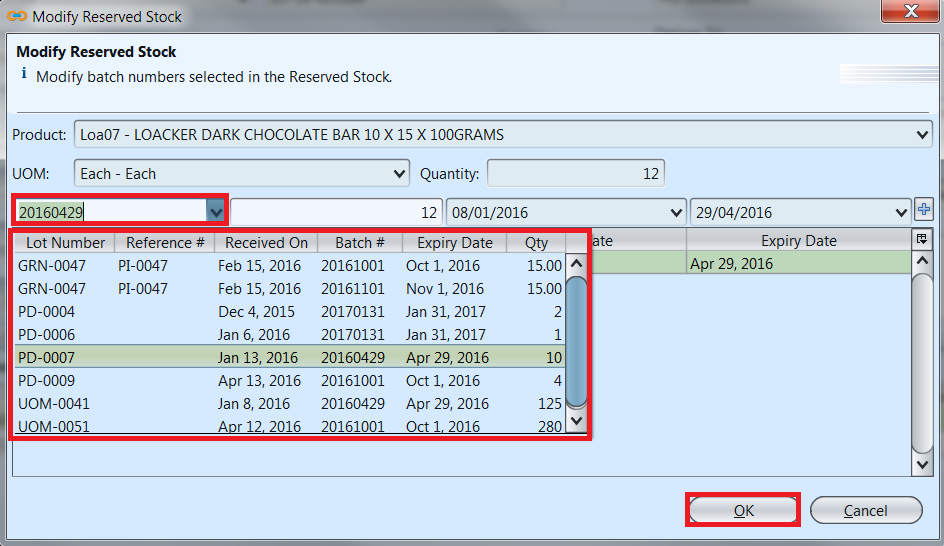
Optional: User may change the Reserved Stock for a particular product to a different batch if they wish to do so, after the Sales Order confirmation. On the “Reserved Stock” tab, click “Modify Batch#” button. It will open a window for user to select a different batch for ordered product. Click on a batch # from the list and press ENTER. Click OK button to commit the change.
Note: For “Immediate” invoice rule, user may modify batch at the corresponding Proforma Invoice document instead
The selection of batch / lot of products are based on the Picking Method as set in the Product master.
For example, FEFO (First Expired First Out) method will reserve expiring product batch / lot first. If expiry date was not entered for a product batch, but there is Shelf Life (In Days) defined in the Product master, system will calculate the product’s expiry date based on the Received On / Manufacturing Date plus shelf life and then reserve the first expiring product for the Sales Order.
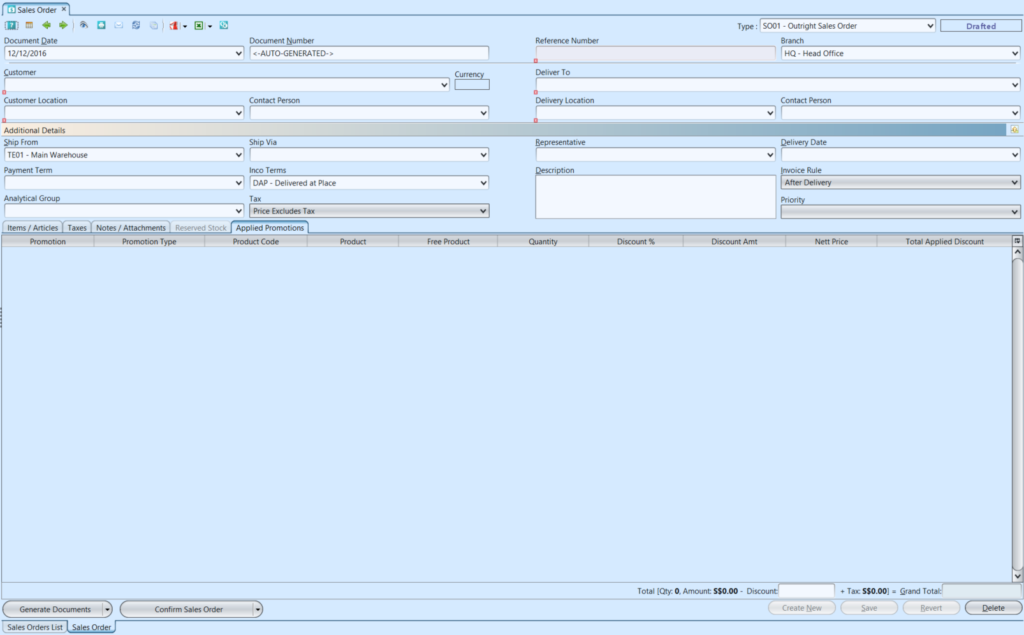
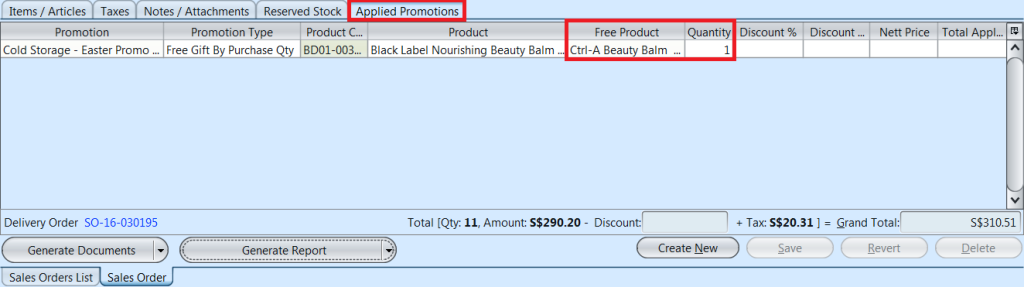
The system will automatically check if there is any promotion(s) applied for the customer for the period of the created Sales Order document date. If so, the promotion(s) will be displayed in the “Applied Promotions” tab, and any free gift / discount added in the “Items / Articles” tab.
Example 1: Allow Discount by X Spent promotion scheme

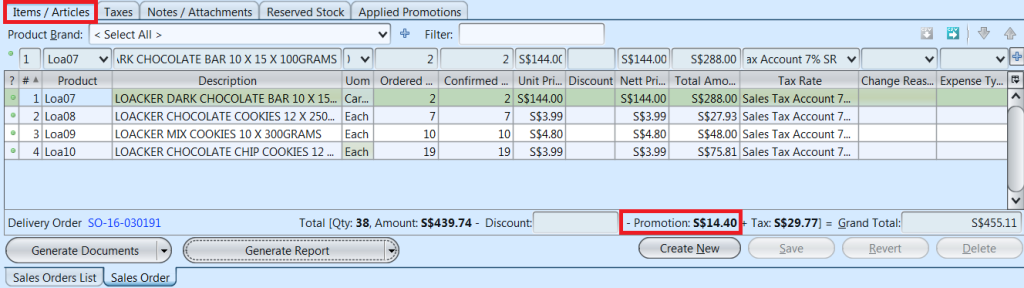
Example 2: Free Gift By Purchase Qty promotion scheme
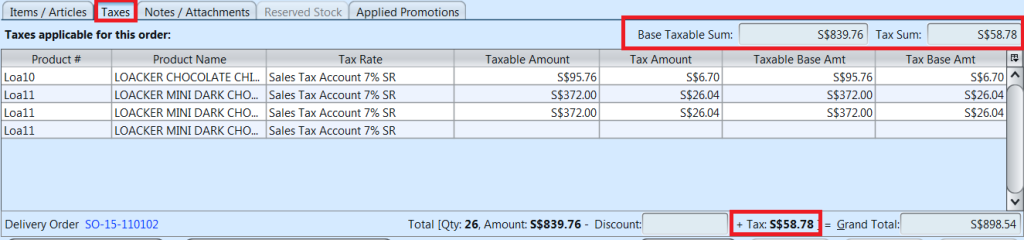
11. Click on “Approve Sales Order” button at the bottom of screen to approve the sales order. Tax entries applicable for the sales order will be automatically created under “Taxes” tab if any
12. If ”After Delivery” invoice rule was chosen, a link to “Delivery Order” transaction (Inventory module – Outbound) will be created at the bottom left of screen to process delivery order for the sales order.
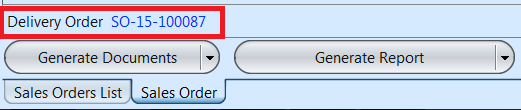
If ”Immediate” invoice rule was chosen, click arrow on ![]() button and select “Generate Proforma Invoice” option to generate a new proforma invoice. “Delivery Order” will be created from “Proforma Invoice” instead
button and select “Generate Proforma Invoice” option to generate a new proforma invoice. “Delivery Order” will be created from “Proforma Invoice” instead
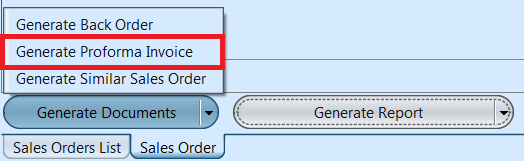
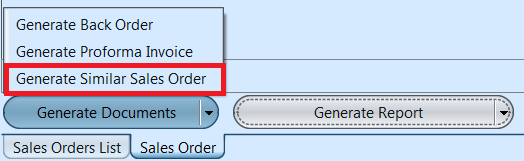
13. Click arrow on ![]() button and select “Generate Similar Sales Order” option to generate a new copy of the sales form
button and select “Generate Similar Sales Order” option to generate a new copy of the sales form
Update Sales Order Details
1. Click on “Sales Orders List” tab at the bottom of screen
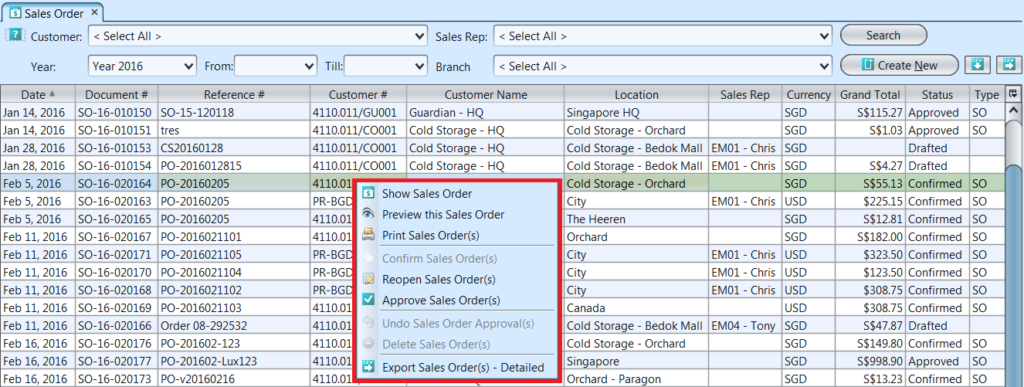
2. Double click on sales order to be updated, it will bring up the details on “Sales Order” tab for the selected order. If a sales order’s status is “Confirmed” or “Approved”, right click on the order and reopen / undo approval of the order first
3. Make change(s) on the sales order information
4. Click on “Save” button at the bottom right of screen to save
5. Click on “Revert” button at the bottom right of screen or refresh icon at the top of the screen to roll back the changes
6. Click on “Confirm Sales Order” button at the bottom of screen to confirm the sales order
7. Click on “Approve Sales Order” button at the bottom of screen to approve the sales order
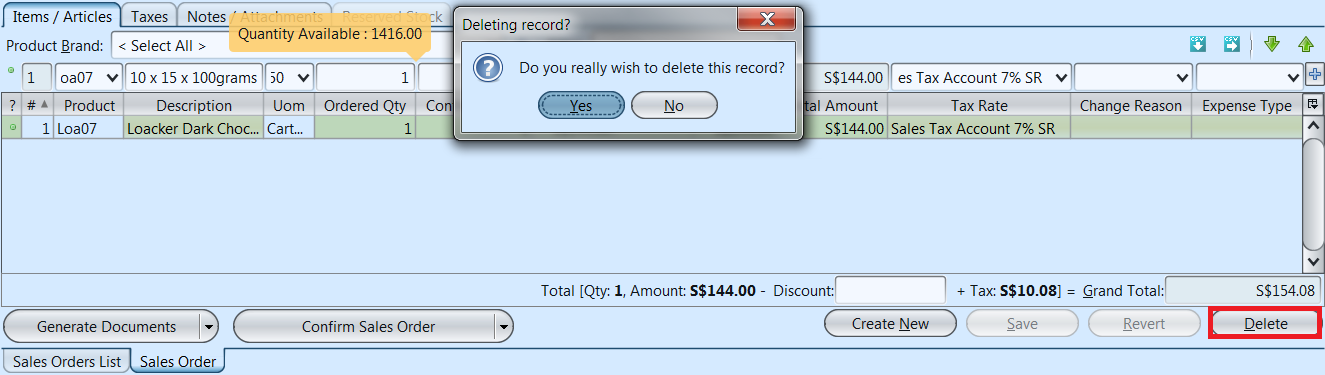
Delete Sales Order
1. Click on “Sales Orders List” tab at the bottom of screen
2. Double click on sales order to be deleted, it will bring up the details on “Sales Order” tab for the selected order. If a sales order’s status is “Confirmed” or “Approved”, right click on the order and reopen / undo approval of the order first
3. Click on “Delete” button at the bottom right side of screen
4. Click on “Yes” button on the pop-up window to confirm sales order deletion
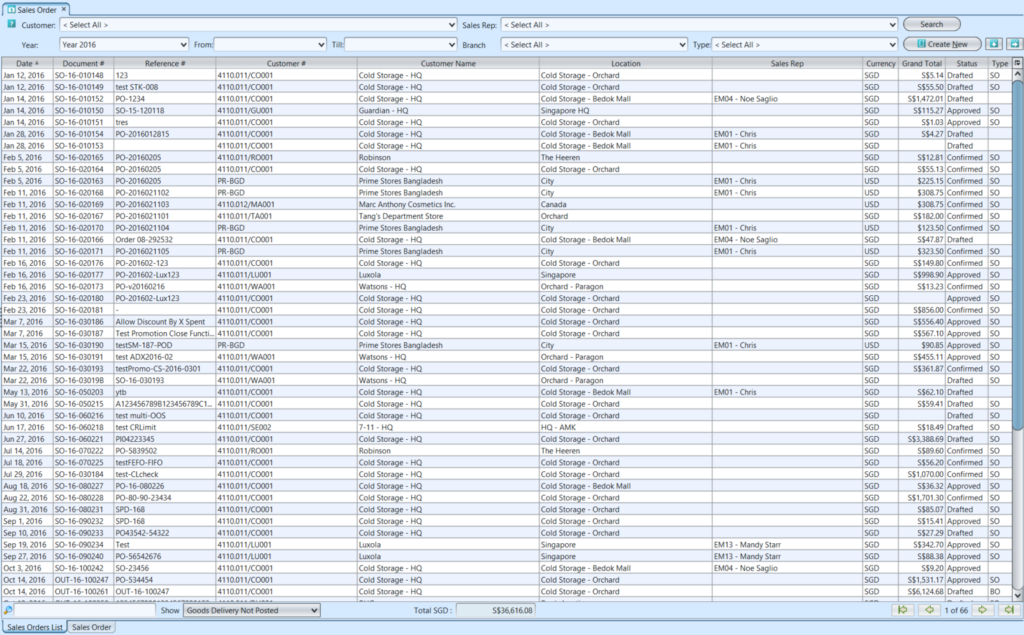
View and Search for Sales Order Details
1. Click on “Sales Orders List” tab at the bottom of screen.
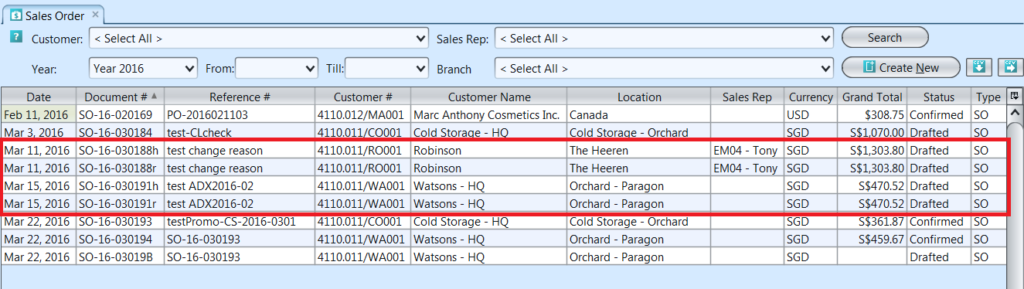
2. Enter search parameter to filter the result, i.e. type in which customer to search for in the “Customer” text field box or select from drop-down list

3. Result can be sorted alphabetically by clicking the fields’ columns
4. Double click on sales order to view full details of the order, it will bring up the details on “Sales Order” tab for the selected order
Export & Import Sales Order
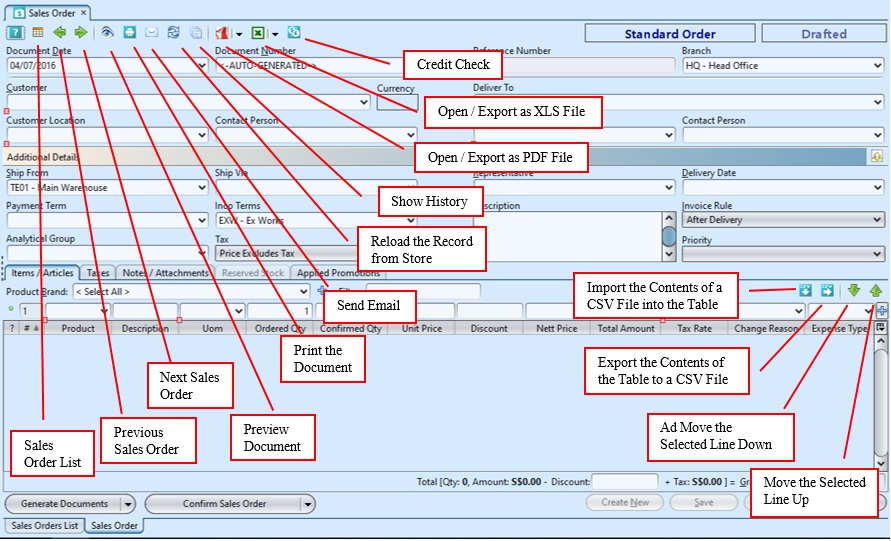
At many places within Samooha, user will see these 2 buttons ![]()
![]() which indicate that user is able to import / export data from / to CSV (comma-separated values) file for that document view. Data in CSV file can be viewed using Excel or Notepad program.
which indicate that user is able to import / export data from / to CSV (comma-separated values) file for that document view. Data in CSV file can be viewed using Excel or Notepad program.
There are 2 types of export & import feature for Sales Order in Samooha:
A. Document level
B. Product line level
Note: user is recommended to export data to a CSV file first and then use the exported file as import file template
A. Document level
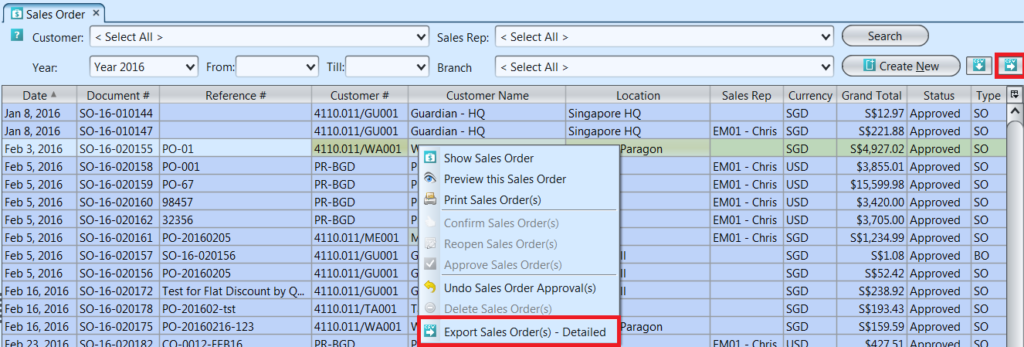
Click on “Sales Orders List” tab at the bottom of screen. At the top right of screen there are 2 buttons; ![]() button to export approved Sales Order documents as CSV file, while
button to export approved Sales Order documents as CSV file, while ![]() button to import CSV file into Samooha as drafted Sales Order documents.
button to import CSV file into Samooha as drafted Sales Order documents.

I. Export Sales Order to CSV File:
1. To export sales order, select approved Sales Order document row(s) from the list, then click ![]() button, or right-click on the Sales Order row to show options window then click on “Export Sales Order(s) – Detailed”. User can select multiple rows to export multiple Sales Order documents in a single CSV file
button, or right-click on the Sales Order row to show options window then click on “Export Sales Order(s) – Detailed”. User can select multiple rows to export multiple Sales Order documents in a single CSV file
Note: only approved Sales Order can be exported
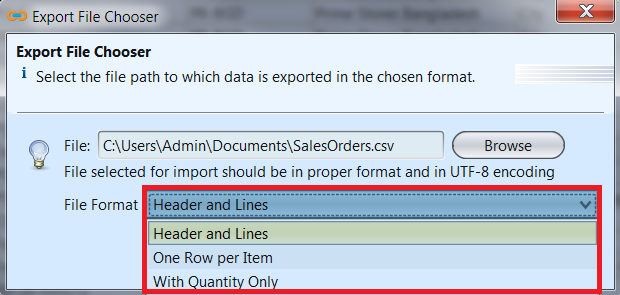
2. On the “Export File Chooser” window, click on “Browse” button to select file location and file name to save the exported data. User may select different format of the data to be exported:
- Header and Lines
- One Row per Item
- With Quantity Only (for sending data to 3PL)
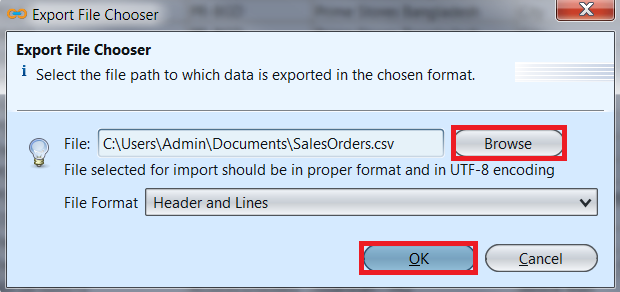
3. Click OK button to confirm and export the selected Sales Order document(s) to CSV file.
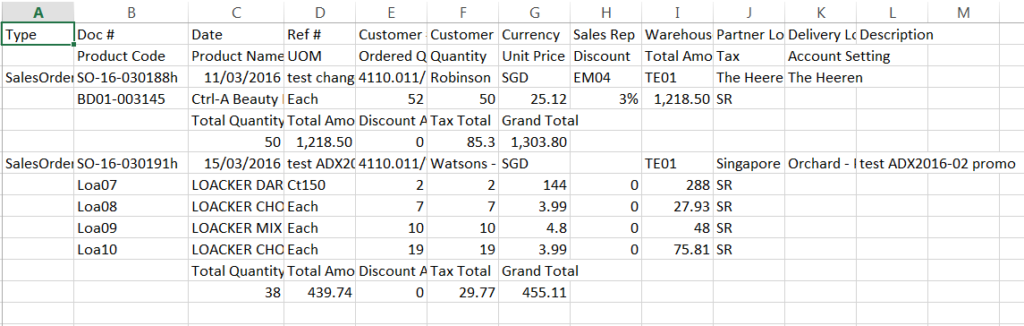
4. Open the folder where the file was saved. Below is example of the same Sales Order document exported as CSV file in different formats:
- Header and Lines

- One Row per Item
![]()
- With Quantity Only (for sending data to 3PL)

II. Import Sales Order from CSV File:
1. To import sales order, click ![]() button in the Sales Order list view. User can import multiple Sales Order documents in a single CSV file. Sales Order document will be imported into Samooha as drafted in status.
button in the Sales Order list view. User can import multiple Sales Order documents in a single CSV file. Sales Order document will be imported into Samooha as drafted in status.
Note: user to ensure there is no duplicate document number for the imported data, i.e. the document number is not already in Samooha list of Sales Order
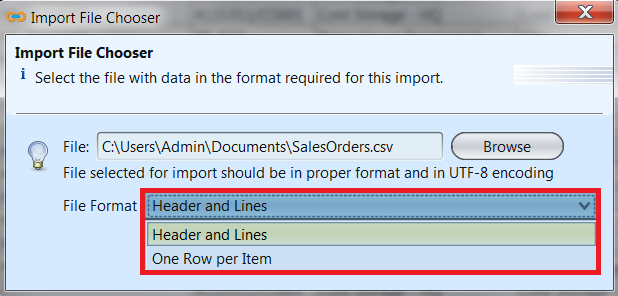
2. On the “Import File Chooser” window, click on “Browse” button to select file location and file name to load the import data from. User to select the correct format of the data to be imported:
- Header and Lines
- One Row per Item

Below is example of the same multiple Sales Order documents (with different document numbers), imported as CSV file in different formats:
- Header and Lines
- One Row per Item

3. Click OK button to confirm and import the selected CSV file as Sales Order document(s).
4. Click Search button on top right of the list view to refresh the list. If successfully imported, the document(s) status will be shown as drafted.
B. Product line level
In Sales Order view, user is able to export list of products in the sales order or import list of products to be part of the sales order.
I. Export Sales Order Product Lines Data to CSV File:
Scenario: Export list of products data from a sales order document to csv file
1. Open “Sales – (Sell In Transactions) Sales Orders” view
2. Double click on a sales order from the sales orders list, it will bring up the details on “Sales Order” tab for the selected order.
3. On right side of “Items / Articles” tab, click on ![]() button to export the list of products to csv file. It will pop up a window, select folder to save and enter the file name of the csv data file. Default file name is document#.csv
button to export the list of products to csv file. It will pop up a window, select folder to save and enter the file name of the csv data file. Default file name is document#.csv


Note: User may need to change numbers (e.g. “Product #“, “Barcode“) as custom type in the excel application, for it to show properly. This is due to excel application displaying long numbers as scientific notation (e.g. 1.2408E+12). To change data type in excel, select the column, right click, Format cells, select Custom category and choose type = 0
II. Import Sales Order Product Lines Data from CSV File:
Scenario: Import list of products data into a sales order document from csv file
Note: User is recommended to export data first to create a data template with example to use as data import creation template. This will help reduce likelihood of mistakes in preparing the data to be imported into GOOMI application
1. Open “Sales – (Sell In Transactions) Sales Orders” view
2. Double click on a sales order from the sales orders list, it will bring up the details on “Sales Order” tab for the selected order. User can only enter / import product lines data when the Sales Order document status is “Drafted“. If a sales order’s status is “Confirmed” or “Approved”, reopen / undo approval of the Sales Order first. This is to allow user to modify the document
3. On right side of “Items / Articles” tab, click on ![]() button to import the list of products from csv file. It will pop up a window, select folder to load and choose the csv file to *import the data from
button to import the list of products from csv file. It will pop up a window, select folder to load and choose the csv file to *import the data from
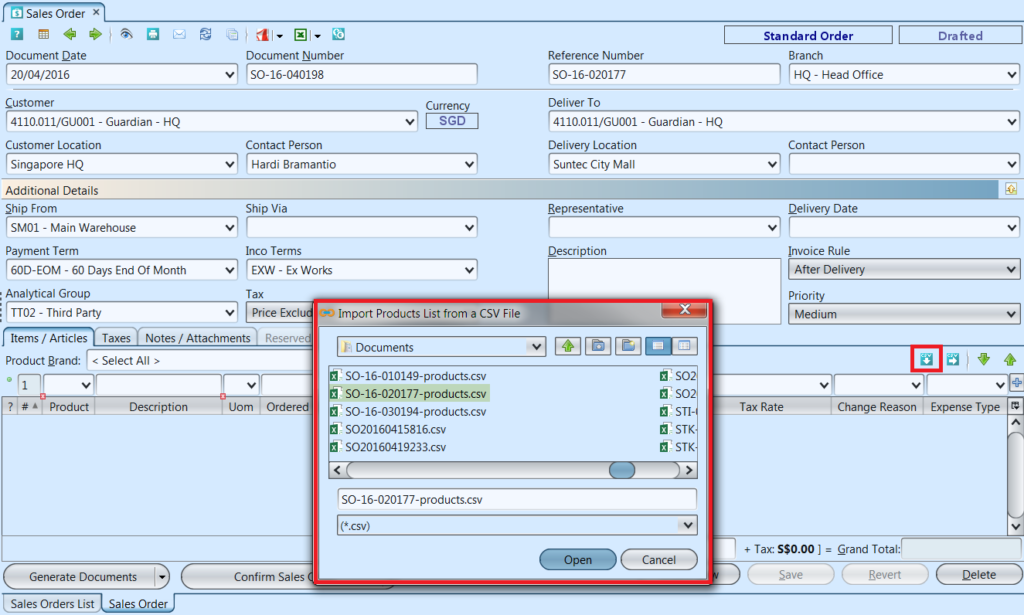
*Note: User may need to change numbers (e.g. “Product #“, “Barcode“) in the csv data file as custom type in the excel application, for it to save properly as csv file. This is due to excel application changing long numbers replacing it with zeros at the back (e.g. 45315060300881becomes 45315060300000). To change data type in excel, select the column, right click, Format cells, select Custom category and choose type = 0
4. Compare the imported data in the sales order against the csv file