Store Sales
Record and track offtake sales and returns for customer at sell out store; These transactions are for record purpose, no posting to inventory nor accounts was done.
User able to enter positive quantity to record store sales OR negative quantity to record store returns.
User also able to assign percentage of commission between sales representatives for record / report purpose. These data can be use for sales representatives’ commission calculation outside of GOOMI.
Below actions are available under “Store Sales”:
![]() Create new store sales for sell out store;
Create new store sales for sell out store;
![]() Update, delete, view and search for store sales / returns details for sell out store
Update, delete, view and search for store sales / returns details for sell out store
Field Name |
Explanation |
Mandatory Information |
| Document Date | Date of the document | Y |
| Document Number | Number of the document | Y |
| Reference Number | A reference number of the document | N |
| Branch | Company’s branch | Y |
| Customer | Company’s customer of which store sales is managed | Y |
| Sell Out Store | Offtake store of the customer | Y |
| Contact Person | Person in charge | N |
| Description | Description | N |
| From Date | Start date of the offtake store sales / returns | Y |
| Till Date | End date of the offtake store sales / returns | Y |
| Sales Representative 1 & 2 | Internal representative(s) (default value – no representative) | N |
| Sales Percentage % 1 & % 2 | Internal representative(s) percentage share of the total sales Total value from both fields must be equal to 100 |
Y |
| Items/Articles – Product Code | Product Code | Y |
| Items/Articles – Description | Description | Y |
| Items/Articles – UOM | Type of product – Unit of Measure | Y |
| Items/Articles – Quantity | Quantity of the product sold / returned to the store User can only enter either + qty (sales) or – qty (returns) for each document, but not both within the same Store Sales document |
Y |
| Items/Articles – Unit Price | Self-explanatory | N |
| Items/Articles – Discount | Discount value / percentage (%) | N |
| Items/Articles – Nett Price | Self-explanatory | N |
| Items/Articles – Total Amount | Total amount for the line | Y |
Create New Sales / Returns for Sell Out Store
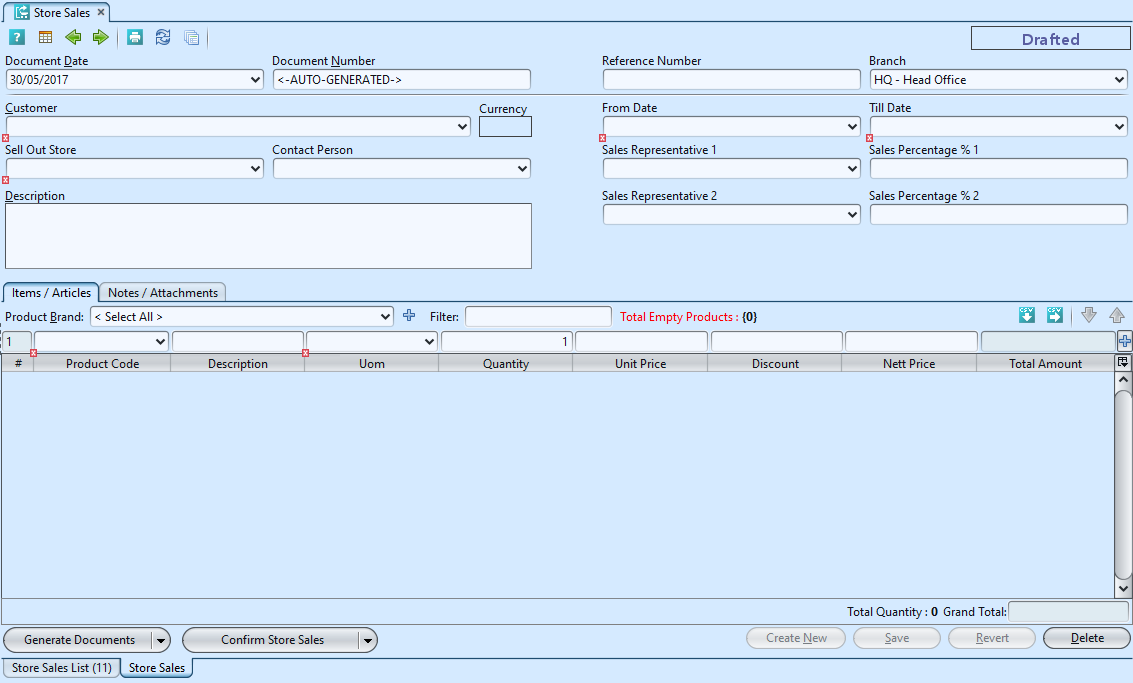
1. Click on “Create New” at the top right of screen of “Store Sales List” tab, it will open “Store Sales” tab with empty form

2. Select a customer from the “Customer” drop-down list on top left side of screen. It will fill up the form with the customer’s info.
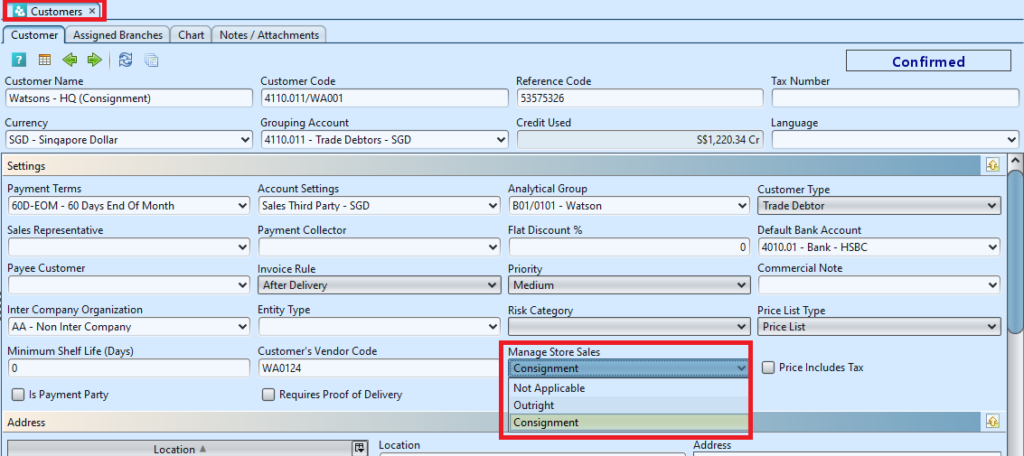
*Note: During customer’s record creation using “Accounts – (Masters) Customers”, user must select either “Outright” or “Consignment” option in the “Manage Store Sales” list for the customer to be available as selection for “Customer” in “Sales – (Sell Out Transaction) Store Sales”
3. Fill up header information on the top half of screen. “Sell Out Store” are stores created in “Sales – (Masters) Sell Out Store” and linked to the customer of which offtake store sales were managed.
*Note: if user enter sales representative and percentage, the total sales percentage % 1 and sales percentage % 2 must be equal to 100
4. Click “Save” button at the bottom right side of screen
5. Filter the products list by selecting a brand from “Product Brand” drop-down list. Add product into the store sales by searching for the product from the product drop-down list in the table on “Items / Articles” tab
6. Enter the product’s info* and click ” ![]() ” button button to add the product into the store sales.
” button button to add the product into the store sales.

*Note:
a. User can only enter either + qty (sales) or – qty (returns) for each document, but not both within the same Store Sales document.
b. Unit Price by default will be the retail selling price (as defined in the system sales settings). User able to manually change this value.

7. Repeat steps 5-6 to add more products into the store sales
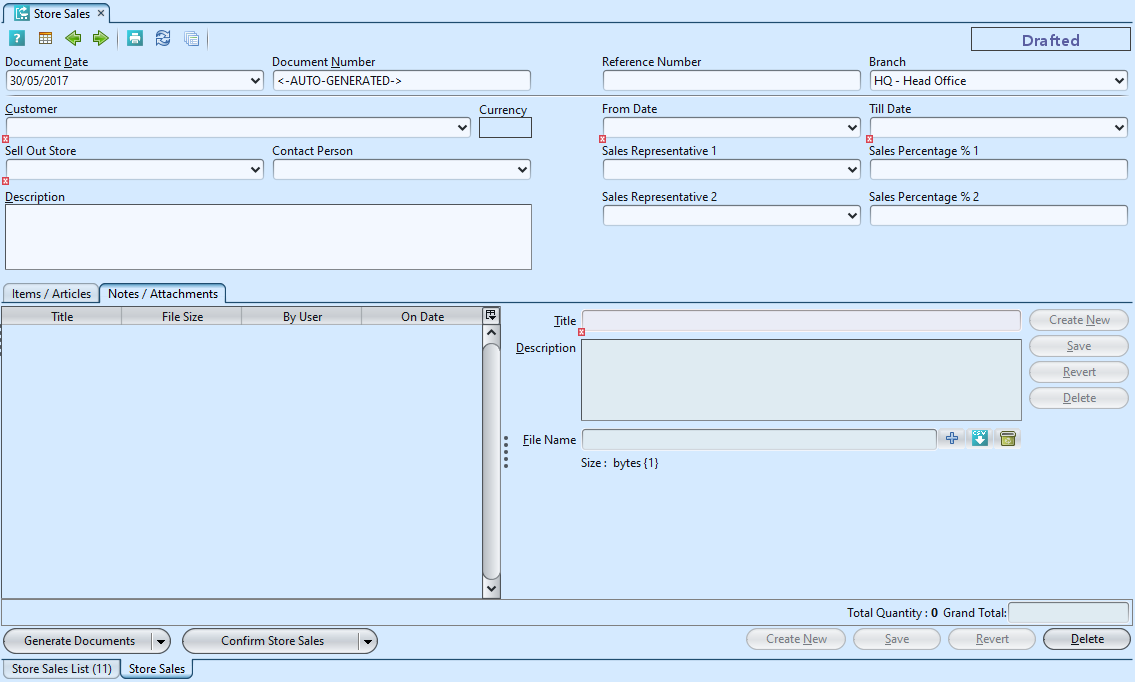
8. Click on “Notes / Attachments” tab at the middle of screen to add notes or files attachment for the store sales
9. Click on “Save” button at the bottom right of screen when completed
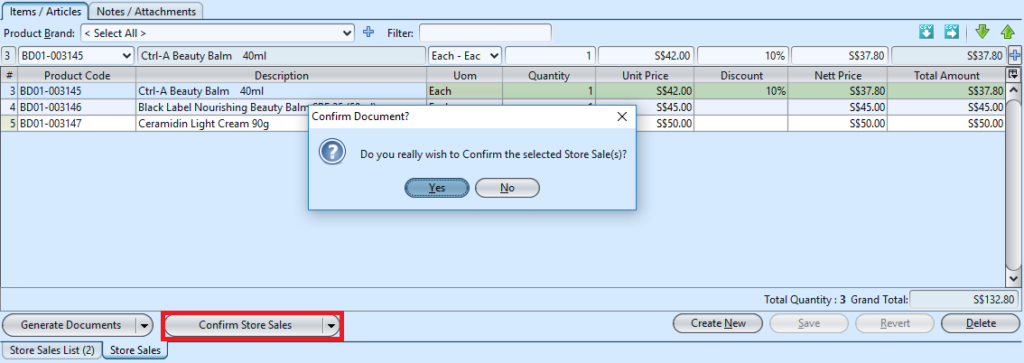
10. Click on “Confirm Store Sales” button at the bottom of screen to confirm the store sales
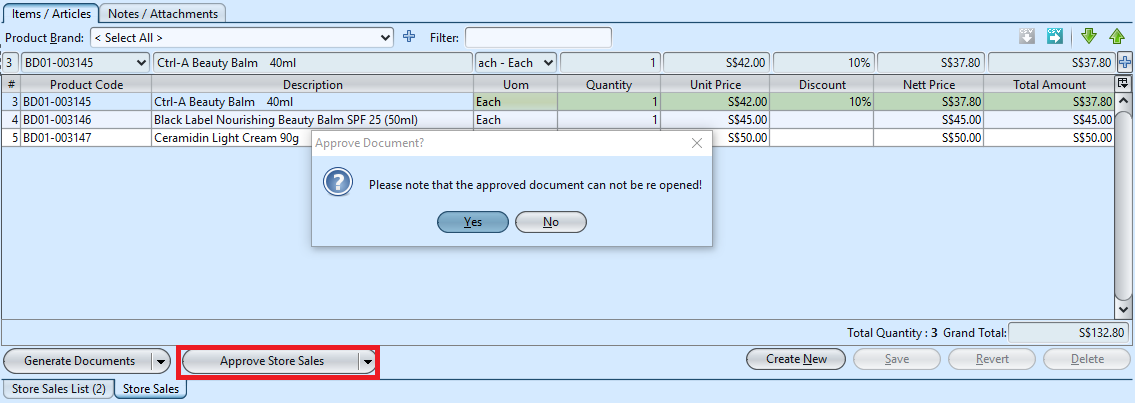
11. Click on “Approve Store Sales” button at the bottom of screen to approve the store sales
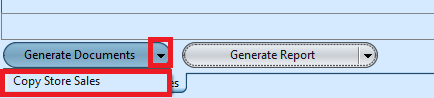
12. Click arrow on ![]() button and select “Copy Store Sale” option to generate a new copy of the sales form
button and select “Copy Store Sale” option to generate a new copy of the sales form
Update Sales / Returns Details for Sell Out Store
1. Click on “Store Sales List” tab at the bottom of screen
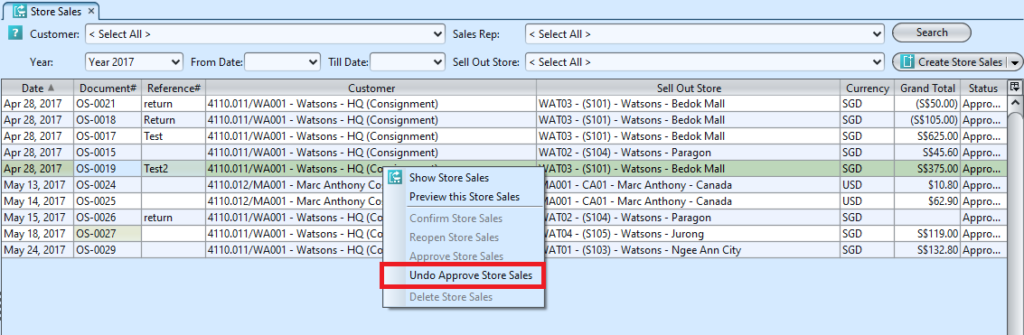
2. Double click on store sales to be updated, it will bring up the details on “Store Sales” tab for the selected document. If a store sales status is “Confirmed” or “Approved”, right click on the document and reopen / undo approval it first
3. Make change(s) on the store sales information
4. Click on “Save” button at the bottom right of screen when done
5. Click on “Revert” button at the bottom right of screen or refresh icon at the top of the screen to roll back the changes
6. Click on “Confirm Store Sales” button at the bottom of screen to confirm the store sales
7. Click on “Approve Store Sales” button at the bottom of screen to approve the store sales
Delete Sales / Returns for Sell Out Store
1. Click on “Store Sales List” tab at the bottom of screen
2. Double click on store sales to be deleted, it will bring up the details on “Store Sales” tab for the selected document. If a store sales status is “Confirmed” or “Approved”, right click on the document and reopen / undo approval it first
3. Click on “Delete” button at the bottom right side of screen
4. Click on “Yes” button on the pop-up window to confirm sales order deletion
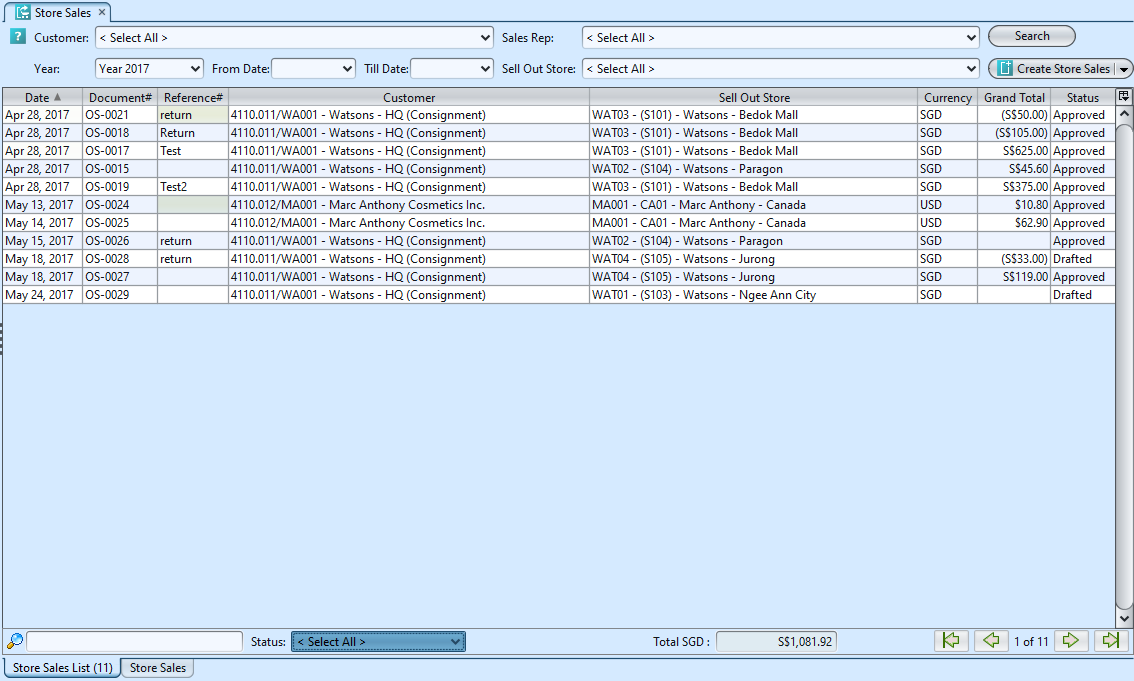
View and Search for Sales / Returns Details for Sell Out Store
1. Click on “Store Sales List” tab at the bottom of screen
2. Enter search parameter to filter the result, i.e. type in which customer to search for in the “Customer” text field box or select from drop-down list
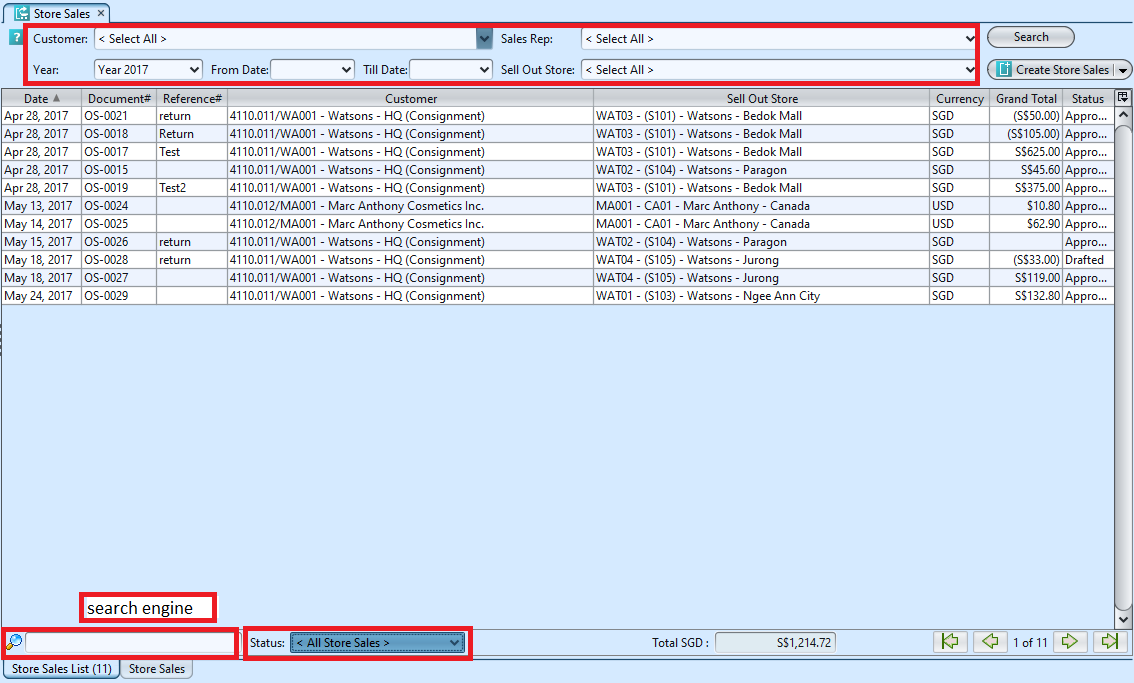
3. Result can be sorted alphabetically by clicking the fields’ columns
4. Double click on store sales to view full details of the document, it will bring up the details on “Store Sales” tab for the selected document