


In the purchase forecast application there are two folders: Purchase Forecast List and Purchase Forecast. Below are available actions for the user from “Purchase Forecast”:
![]() Create new purchase forecast, update, save, revert and delete it
Create new purchase forecast, update, save, revert and delete it
![]() Have detailed view of the forecast purchase
Have detailed view of the forecast purchase
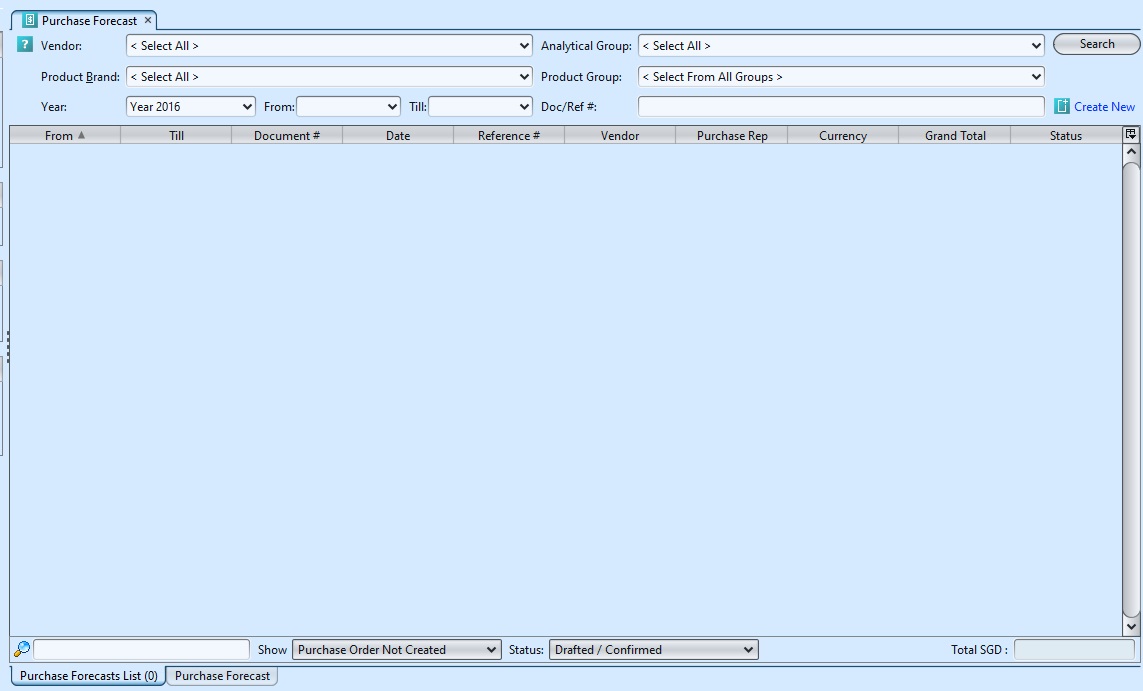
Purchase Forecasts List:
Field Name |
Explanations |
| Vendor | Select the Vendor |
| Analytical Group | Select the Analytical Group |
| Product Brand | Select the appropriate Product Group |
| Product Group | Select the Product Group |
| Year – From – Till | Self-explanatory |
| Doc/Ref# | Any relevant document references number |
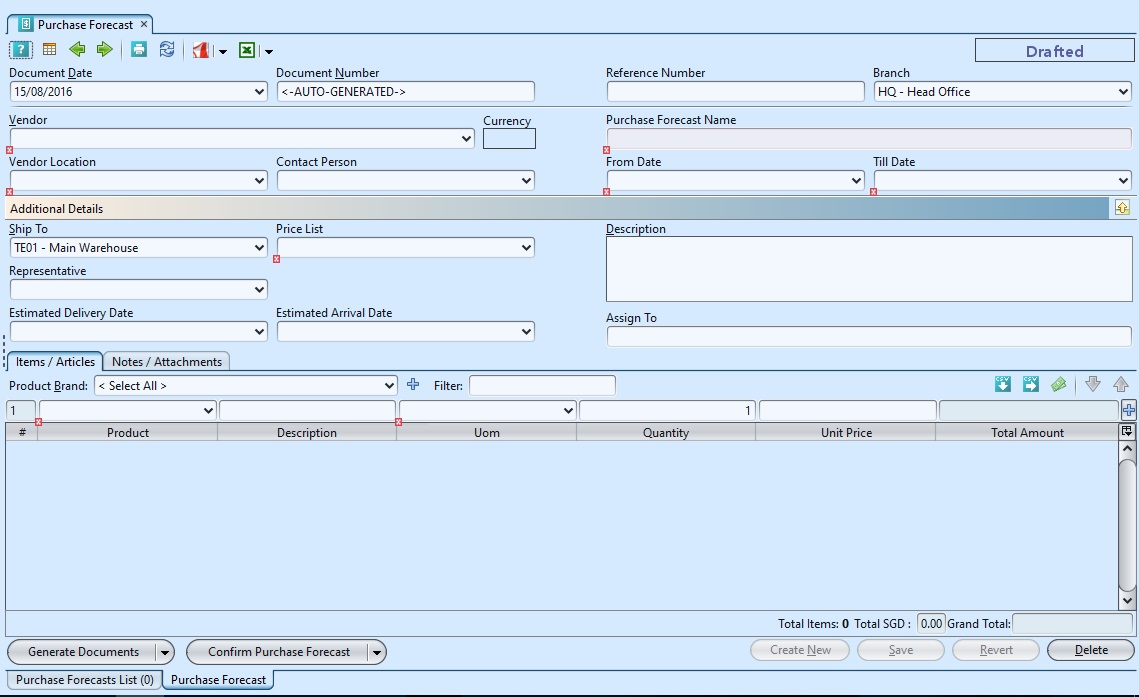
Purchase Forecast Details:
Field Descriptions |
Explanations |
Mandatory Information |
| Document Date | Select the Date |
Y |
| Document Number | Auto generated |
Y |
| Reference Number | Supporting documents reference number |
N |
| Branch | Select the Branch |
Y |
| Vendor | Select the Vendor |
Y |
| Currency | Self-Explanatory |
_ |
| Purchase Forecast Name | Self-Explanatory |
Y |
| Vendor Location | Select vendor location |
Y |
| Contact Person | Select Contact Person |
N |
| From Date | Self-Explanatory |
Y |
| Till Date | Self-Explanatory |
Y |
| Ship To | Self-Explanatory |
Y |
| Price List | Self-Explanatory |
Y |
| Description | Self-Explanatory |
N |
| Representative | Self-Explanatory |
N |
| Estimated Delivery Date | Self-Explanatory |
N |
| Estimated Arrival Date | Self-Explanatory |
N |
| Assign to | Person responsible for the purchase. |
N |
Create New Purchase Forecast:
1. Click on “Create New” at the top right of screen of “Purchase Forecast List” tab, it will open“Purchase Forecast” tab with empty form

2. Fill up the information on the top half of screen then click “Save” button at the bottom right side of screen.
3. Filter the products list by selecting a brand from “Product Brand” drop-down list. Add product into the purchase order by searching for the product from the product drop-down list in the table on “Items / Articles” tab
4. Enter the product’s info and click ![]() button or “Enter” to add the product into the purchase forecast
button or “Enter” to add the product into the purchase forecast

5. There is also a tab for Notes and Attachments. Click on “Notes / Attachments” tab at the middle of screen to add notes or files attachment for the purchase forecast.
6. Click on “Save” button at the bottom right of screen when completed
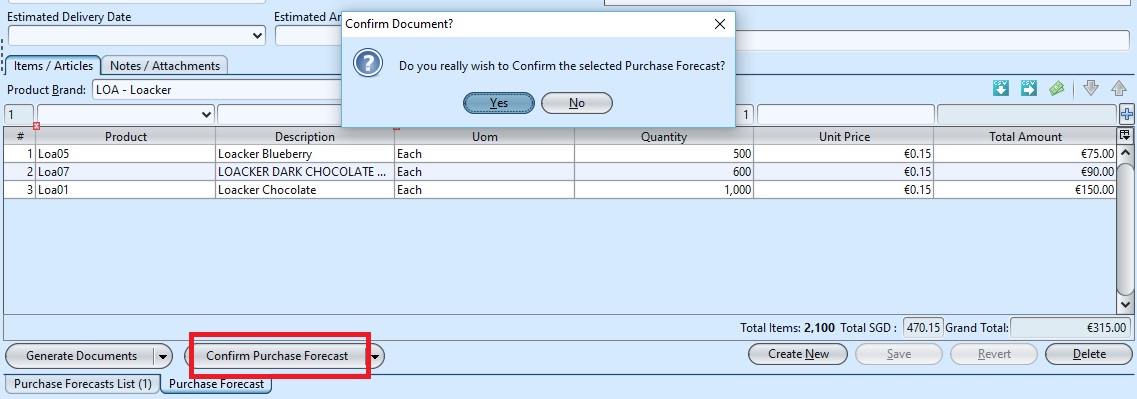
7. Click on “Confirm Purchase Forecast” button at the bottom of screen to confirm the purchase forecast
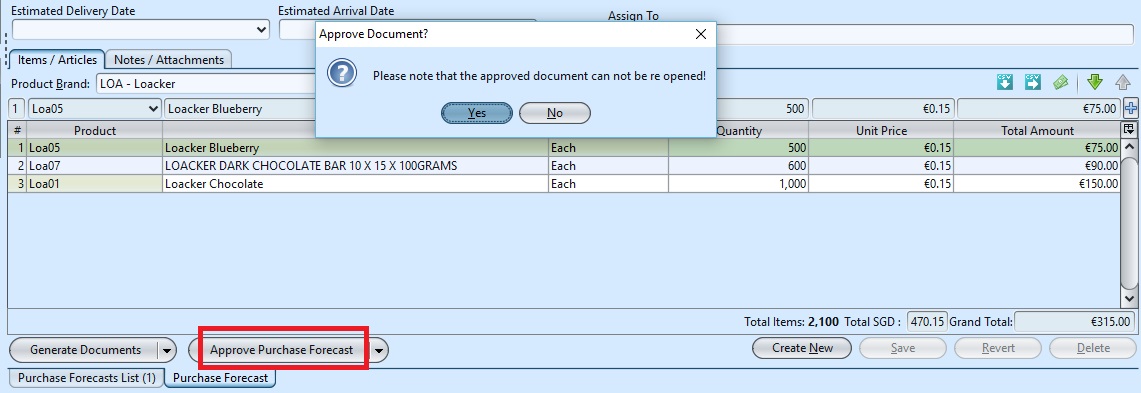
8. Click on “Approve Purchase Forecast” button at the bottom of screen to approve the document.
9. The user must Confirm the Purchase Forecast and has the ability to Generate the following documents : Generate Similar Forecast and Generate Purchase Order.


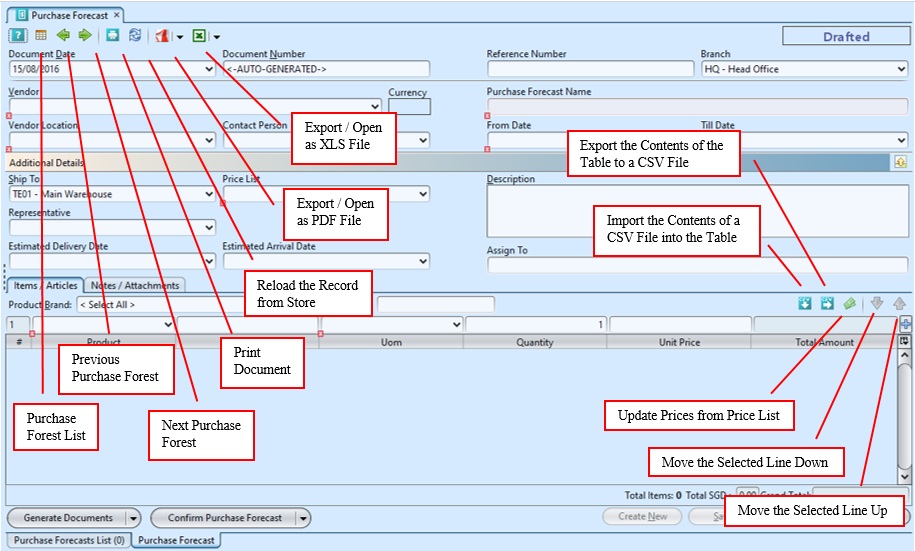
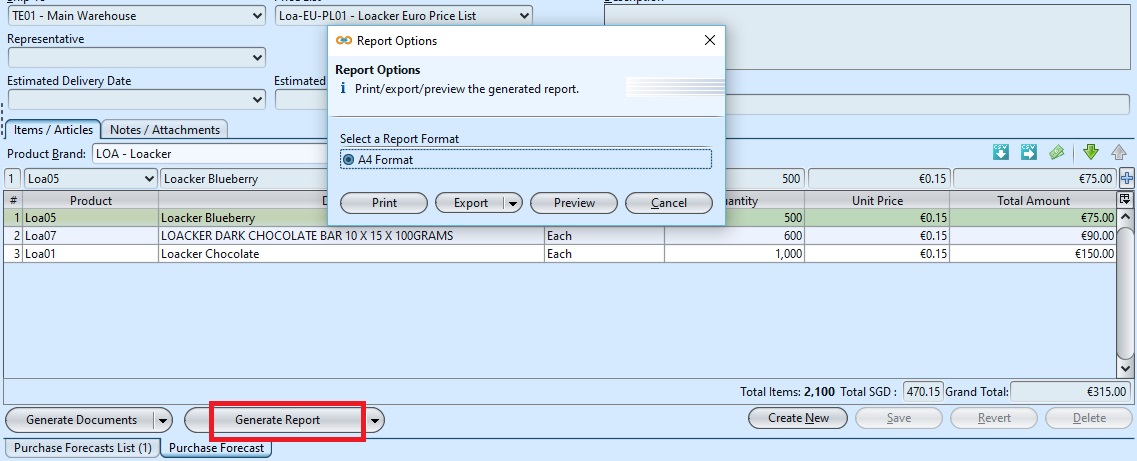
10. Click arrow on ![]() button at the bottom left of screen to generate the purchase forecast report.
button at the bottom left of screen to generate the purchase forecast report.
Update Purchase Forecast Details:
1. Click on “Purchase Forecast List” tab at the bottom of screen
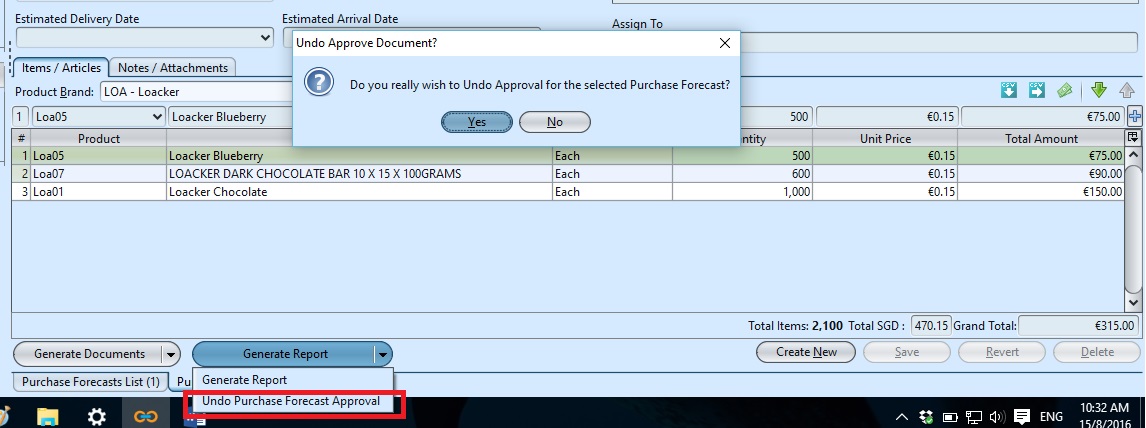
2. Double click on purchase forecast to be updated, it will bring up the details on “Purchase Forecast” tab for the selected document. If a purchase forecast’s status is “Confirmed” or “Approved”, click arrow on the ![]() button and select reopen / undo approval of the purchase forecast first.
button and select reopen / undo approval of the purchase forecast first.
3. Make change(s) on the purchase forecast information
4. Click on “Save” button at the bottom right of screen when done
5. Click on “Revert” button at the bottom right of screen or refresh icon at the top of the screen to roll back the changes
6. Click on “Confirm Purchase Forecast” button at the bottom of screen to confirm the purchase forecast
7. Click on “Approve Purchase Forecast” button at the bottom of screen to approve the document.
Delete Purchase Forecast:
1. Click on “Purchase Orders List” tab at the bottom of screen
2. Double click on purchase forecast to be deleted, it will bring up the details on “Purchase Forecast” tab for the selected document. If a purchase forecast’s status is “Confirmed” or “Approved”, click arrow on the ![]() button and select reopen / undo approval of the purchase forecast first.
button and select reopen / undo approval of the purchase forecast first.
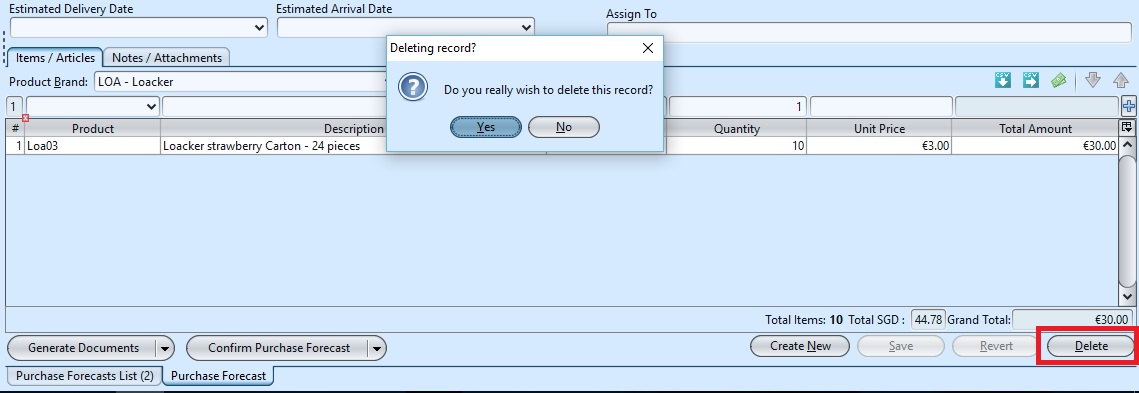
3. Click on “Delete” button at the bottom right side of screen
4. Click on “Yes” button on the pop-up window to confirm the deletion.
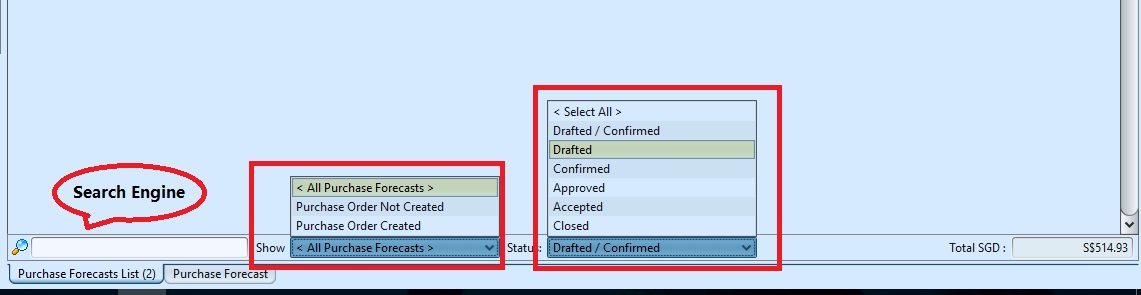
View and Search for Purchase Forecast Details:
1. In the purchase forecast list the users are able to view the lists of Purchase Forecast, which have different statuses i.e in the Show: Purchases Order Not Created and Purchase Order Created. In the Statuses they can select Draft/Confirm, Draft, Confirm,Approved, Accepted and Closed.
2. Enter search parameter to filter the result, i.e. type in which vendor to search for in the“Vendor” text field box or select from drop-down list

3. The user can double Click on any line item which will take them into the full detailed document list in Purchase Forecast.