


Projects application allows user to create and manage projects, and to define activities and specifications for CRM and SCM. It is the center of project management. From this application, user can generate project proposals to send to customers, issue invoices, issue delivery order, create purchase orders, and generate purchase voucher (invoice) for payment to vendors. User also able to define retention terms for the project and track retention claim invoices.
As on cut off dates, quarter closing or year closing, user may need to realize part of project. Accounts user can realize the project using this application. Before realizing, ensure that the invoices are raised and confirmed.
When all project’s services are delivered and invoiced, user will then need to close / complete the project document.
Below are available actions for the user from “Projects”:
![]() Create, edit, and complete projects
Create, edit, and complete projects
![]() Issue proposal / quotation
Issue proposal / quotation
![]() Issue proforma invoice
Issue proforma invoice
![]() Issue delivery order
Issue delivery order
![]() Issue purchase order
Issue purchase order
![]() Issue purchase voucher / invoice
Issue purchase voucher / invoice
![]() Project realization – accounts only
Project realization – accounts only
![]() View and search for project details
View and search for project details
*Note: to issue retention claim invoice: see “Project – Invoices”
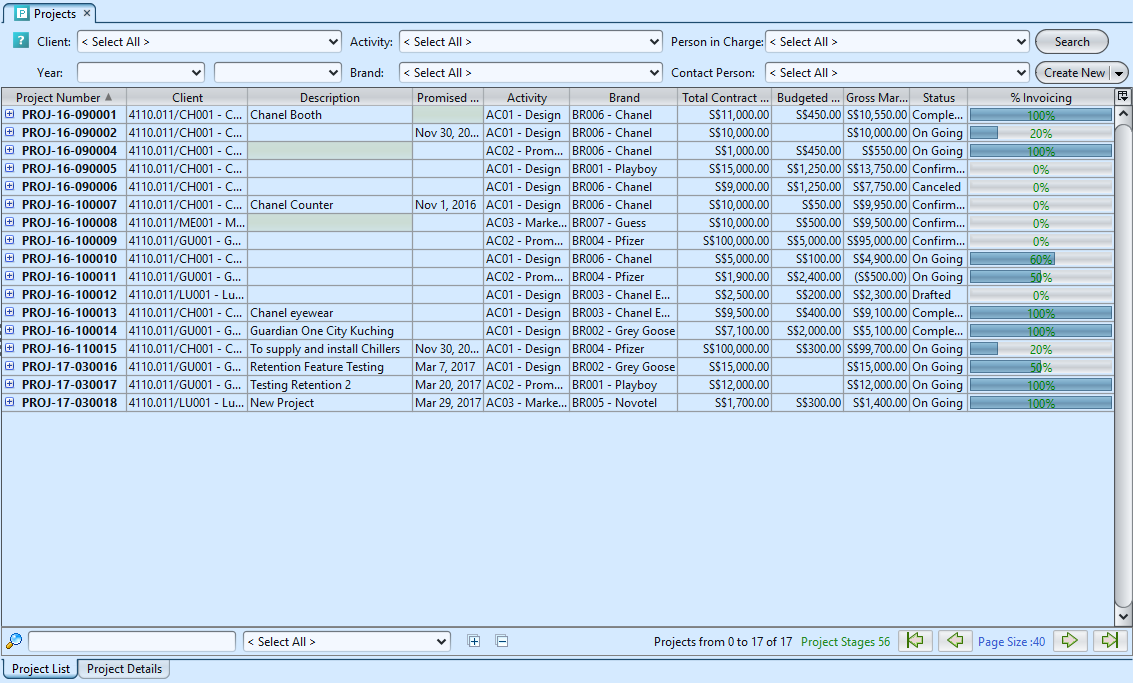
Project List Fields
| Field Name | Explanation | Mandatory Information |
| Client | Select a client | N |
| Activity | Select an activity | N |
| Client Manager | Select a client manager | N |
| Year | Select from and till dates for time period to filter the list of project documents | Y |
| Brand | Select a brand | N |
| Contact Person | Select a contact person | N |
| Project Number | Project documents code / number | Y |
| Client | Client code and name | Y |
| Description | Description of the project | N |
| Promised Date | Promised delivery date of the project | Y |
| Activity | Type of activity of the project | Y |
| Brand | Brand of customer’s of the project | Y |
| Total Contract Value | Project total contract value | Y |
| Budgeted Cost | Project total (budgeted) cost value | N |
| Gross Margin | Project total gross margin | Y |
| Status | Status of the project | Y |
| % Invoicing | % of project total contract value invoiced to date | Y |
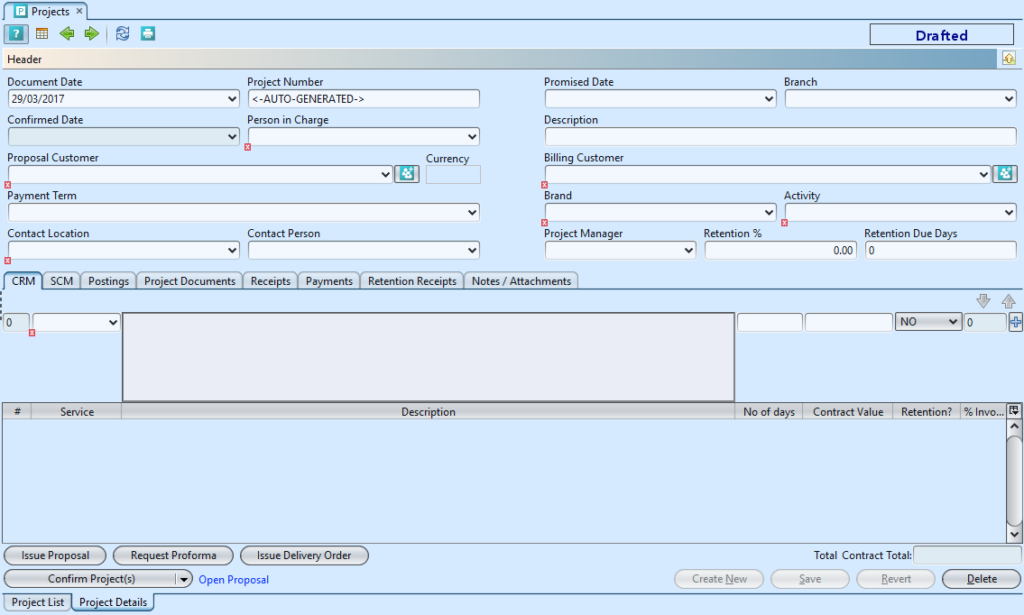
The project document details was partitioned into 9 parts, each having different functions required to manage a project:
![]() Header: information about the project document, customer, promised date of project delivery, name of project manager
Header: information about the project document, customer, promised date of project delivery, name of project manager
![]() CRM tab: details of service(s) to be provided, contract value, how much have been invoiced to customer (revenues)
CRM tab: details of service(s) to be provided, contract value, how much have been invoiced to customer (revenues)
![]() SCM tab: details of service(s) to be obtained from vendor to fulfill the project delivery, budget amount and actual cost (expenses)
SCM tab: details of service(s) to be obtained from vendor to fulfill the project delivery, budget amount and actual cost (expenses)
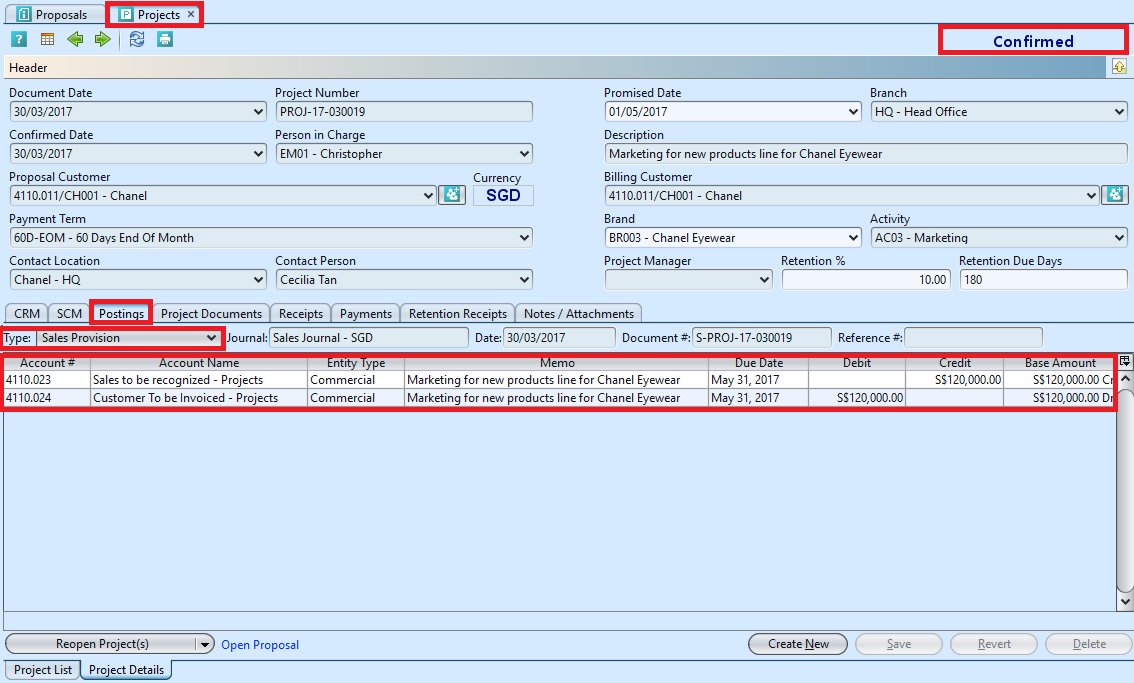
![]() Postings tab: journal entries of the project activities for accounting reviews
Postings tab: journal entries of the project activities for accounting reviews
![]() Project Documents tab: list of documents related to the project, e.g. quotations, delivery order, purchase orders, invoices, retention claim invoices, etc.
Project Documents tab: list of documents related to the project, e.g. quotations, delivery order, purchase orders, invoices, retention claim invoices, etc.
![]() Receipts tab: list of customer receipts related to the project.
Receipts tab: list of customer receipts related to the project.
![]() Payments tab: list of vendors’ payments related to the project.
Payments tab: list of vendors’ payments related to the project.
![]() Retention Receipts tab: list of retention receipts related to the project.
Retention Receipts tab: list of retention receipts related to the project.
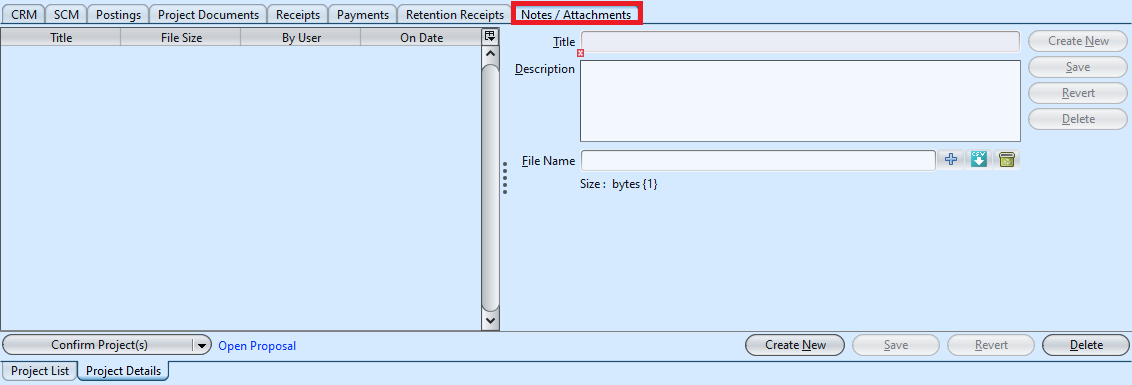
![]() Notes / Attachments tab: documents received from clients and other project related documents which are not issued by the system or received by third party can be uploaded using this tab.
Notes / Attachments tab: documents received from clients and other project related documents which are not issued by the system or received by third party can be uploaded using this tab.
Project Details Fields
| Field Name | Explanation | Mandatory Information |
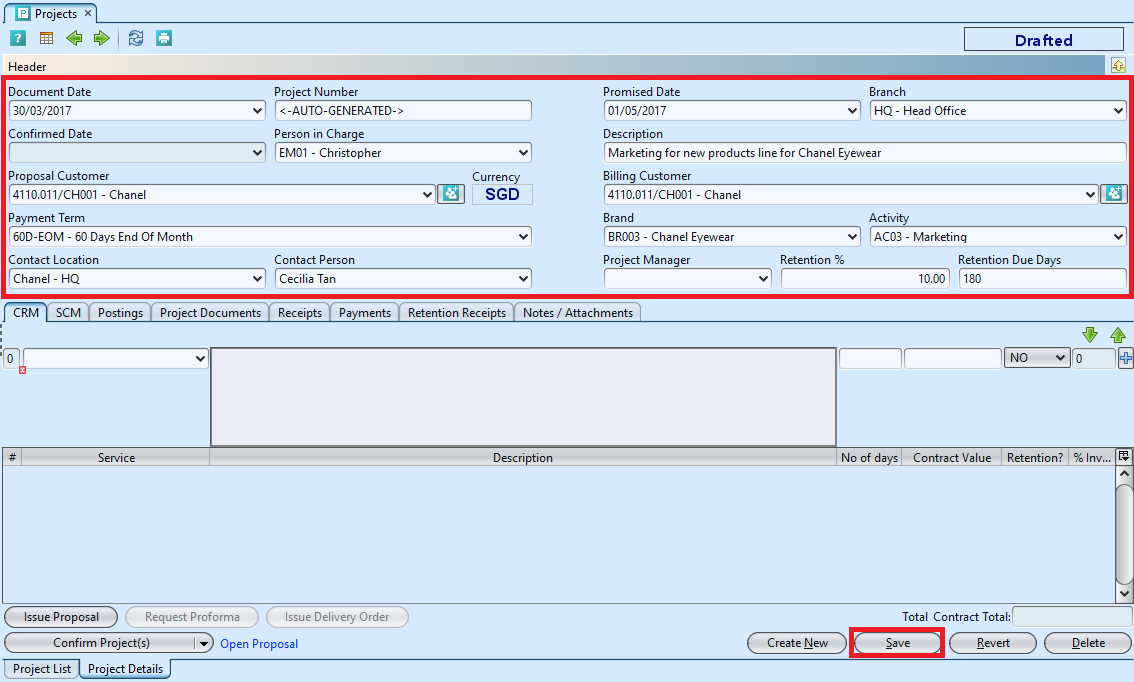
| Document Date | Date of the project document | Y |
| Project Number | Project documents code / number | Y |
| Promised Date | Promised delivery date of the project | Y |
| Branch | Select company’s branch | N |
| Confirmed Date | Date of the project confirmation | Y |
| Client Manager | Select a manager to handle the client | N |
| Description | Description of the project | N |
| Proposal Customer | Select code and name of customer for the project proposal | Y |
| Billing Customer | Select code and name of customer for the project billing | Y |
| Payment Term | Payment term per agreement with customer for the project billing | N |
| Brand | Select a brand | Y |
| Activity | Select an activity | Y |
| Contact Location | Select the customer contact location | Y |
| Contact Person | Select the customer contact person | N |
| Project Manager | Select the company’s employee to manage the project | N |
| Retention % | Percentage value of retention for the project | N |
| Retention Due Days | How many days of due retention for the project | N |
| CRM tab | ||
| Service | Type of service of the project | Y |
| Description | Description of the service | Y |
| No of Days | Number of days to complete the service | Y |
| Contract Value | Contract value of the service | Y |
| Retention? | Is the service line to be assigned for retention? Default value: NO | Y |
| % Invoicing | % of service contract value invoiced to date | Y |
| SCM tab | ||
| Vendor | Select a vendor which provide the service | Y |
| Service | Type of service provided by the vendor | Y |
| Description | Description of the service | Y |
| Budget Amount | Amount budgeted for the service | Y |
| Actual Cost | Actual cost of the service provided by the vendor | Y |
Create New Project Document and Issue Proposal / Quotation:
1. Click on “Create New” at the top right of screen of “Project List” tab, it will open “Project Details” tab with empty form

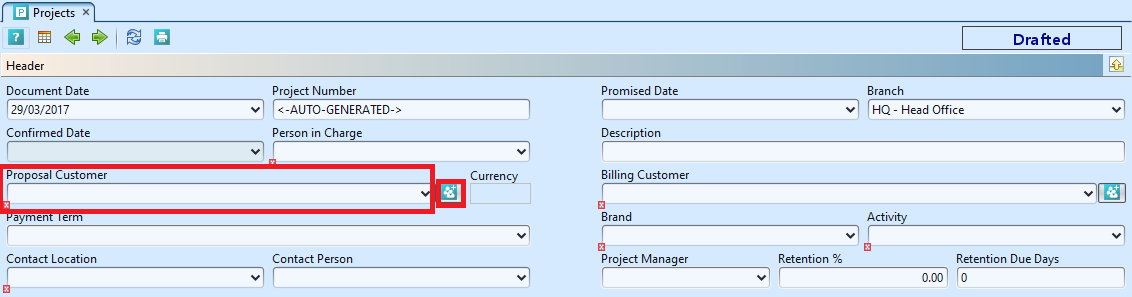
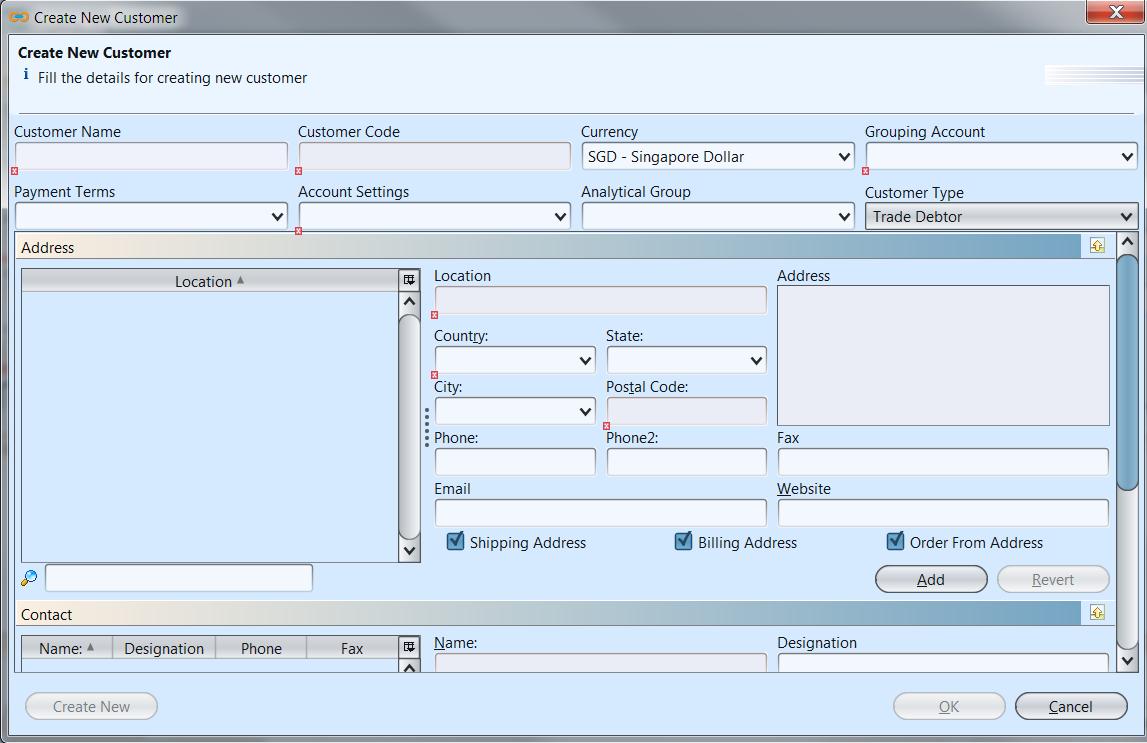
2. Select a customer from the “Proposal Customer” drop-down list on top left side of screen. It will fill up the form with the customer’s info. If it’s new customer / customer not in the list, click on ![]() button to create new record for the customer. It will pop up “Create New Customer” window. Fill up customer’s details and click “OK” button to save the new customer record
button to create new record for the customer. It will pop up “Create New Customer” window. Fill up customer’s details and click “OK” button to save the new customer record
3. Fill up project’s information on the top half of screen.
Enter Retention % value and Retention Due Days (if any), are as per agreed with the customer over the project.
4. Click “Save” button at the bottom right side of screen to save
5. Add a revenue service into the CRM section by searching for the service from the “Service” drop-down list in the table on “CRM” tab
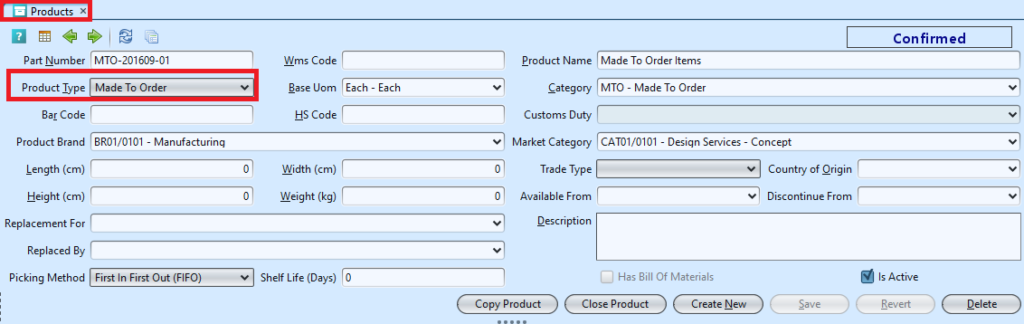
If a delivery order document need to be issued for item delivery to the customer, use “Made To Order Item” type of service (product) in the “CRM” tab. User will be able to Issue Delivery Order document (only) for “Made To Order Item” type line item in the “CRM” tab, when Project document status is Confirmed / On Going.
If an Item / Article type of service (product) is entered in the “CRM” tab, system will generate an expense line item pair for it in the “SCM” tab, of which user can use to enter cost for it, if any.

6. Enter the revenue service’s info* and click ![]() button to add the service into the project document. For free of charge (FOC) service, enter “Contract Value” = 0. Select “Yes” if the service line was assigned for retention of service.
button to add the service into the project document. For free of charge (FOC) service, enter “Contract Value” = 0. Select “Yes” if the service line was assigned for retention of service.
*Note: Description is mandatory field, leave a space (press ENTER) after the last line of your service description to add spacing line. Ensure to use customer’s currency for contract value. These information will be use to generate quotation and invoices
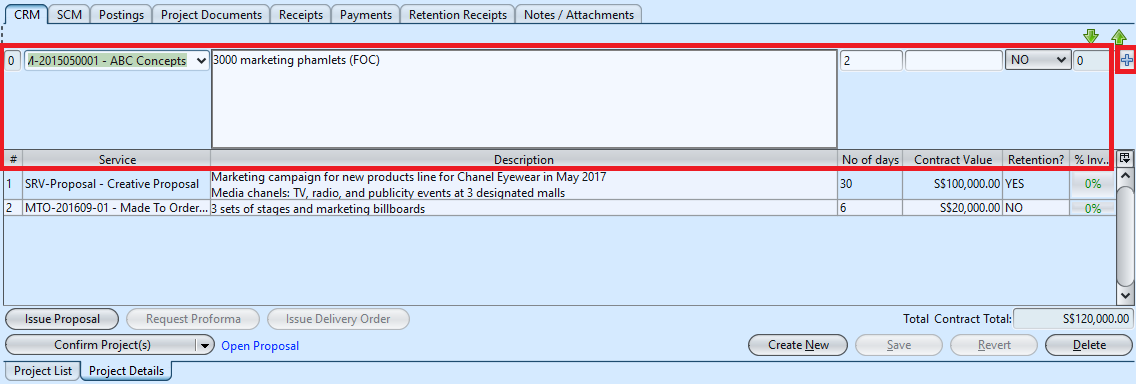
7. Repeat steps 5-6 to add more revenue services into the project document
8. If there is any expense for the project, add a vendor’s service into the SCM section by searching for the vendor and service from the “Vendor” and “Service” drop-down lists in the table on “SCM” tab.
*Note: Vendor is an optional field, this allow user to enter company’s internal cost (i.e. manpower) as part of the project’s costing, without the need to create any purchase order for these.
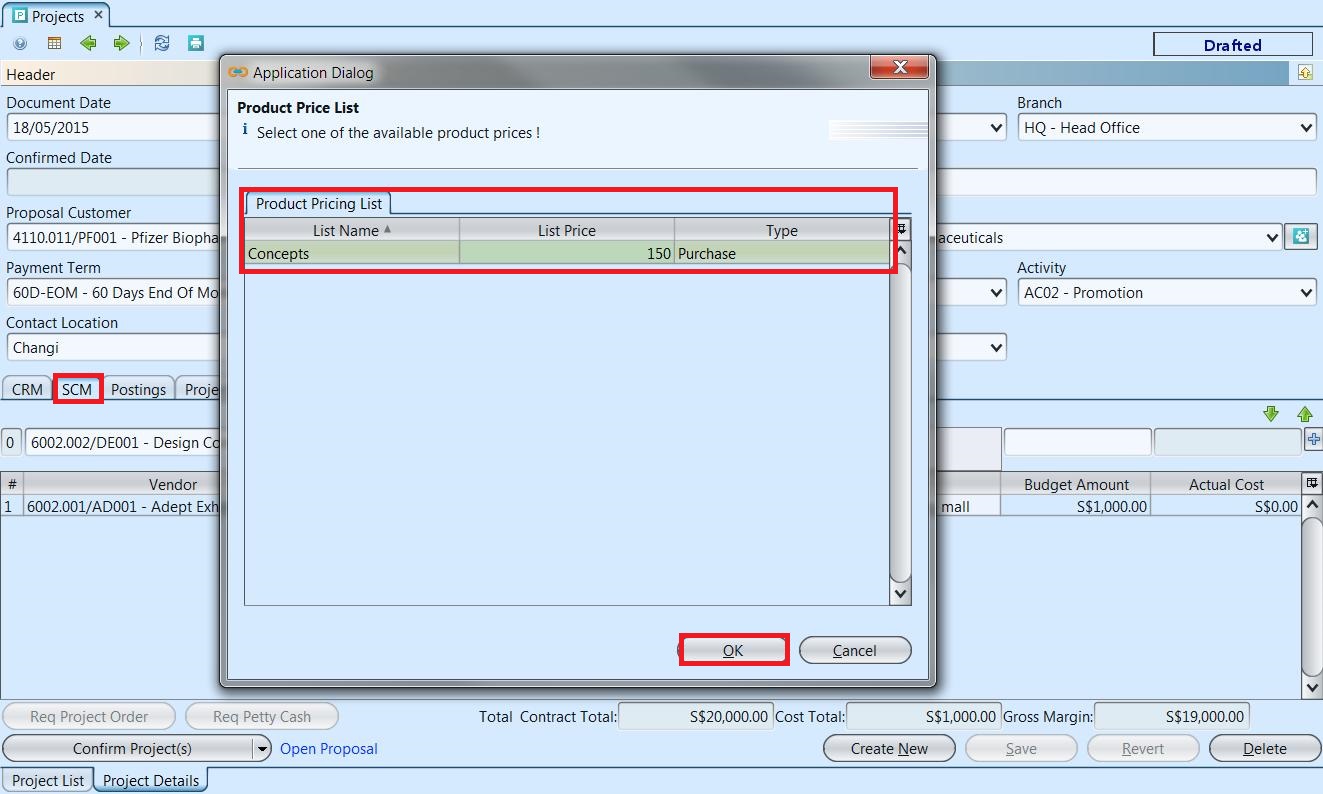
9. Enter the expense service’s info* and click ![]() button to add the vendor’s service into the project document. If purchase price is listed in the system for a vendor’s service or product, it will pop up “Product Price List” window for user to select the list price as the budget amount.
button to add the vendor’s service into the project document. If purchase price is listed in the system for a vendor’s service or product, it will pop up “Product Price List” window for user to select the list price as the budget amount.
*Note: Description is mandatory field, leave a space (press ENTER) after the last line of your service description. Ensure to use customer’s currency for budget amount. These information will be use to generate purchase orders
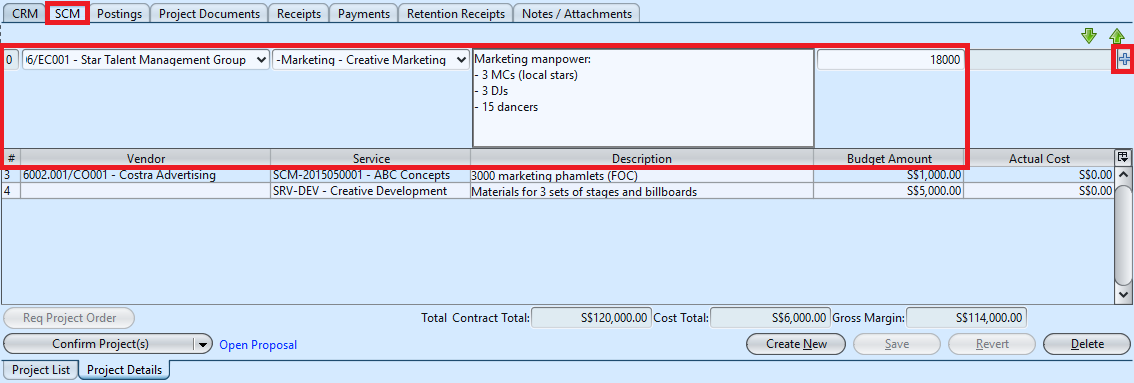
10. Repeat steps 8-9 to add more expense services into the project document
11. Click on “Notes / Attachments” tab at the middle of screen to add notes or files attachment for the project document
12. Click on “Save” button at the bottom right of screen to save
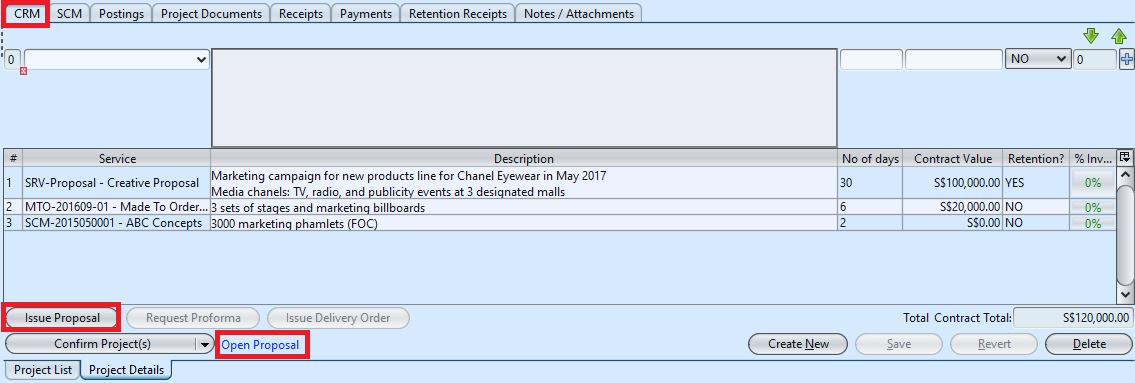
13. Click on “Issue Proposal” button at the bottom of screen to issue project proposal of the project document for the customer to review and accept. It will generate proposal document and open the document for user to review. User can click on “Open Proposal” link at the bottom of screen to view the proposal document details.
Note: Do not change details in the proposal document as it will not be reflected in the project document. To make any changes, delete the old proposal document, and make the changes in project document, then re-issue new proposal
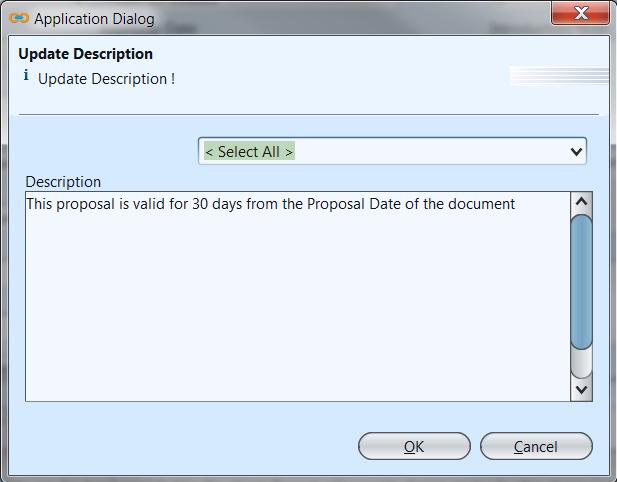
14. On “Proposal Details” tab, click on “Update T and C” link to update term & conditions for the proposal document
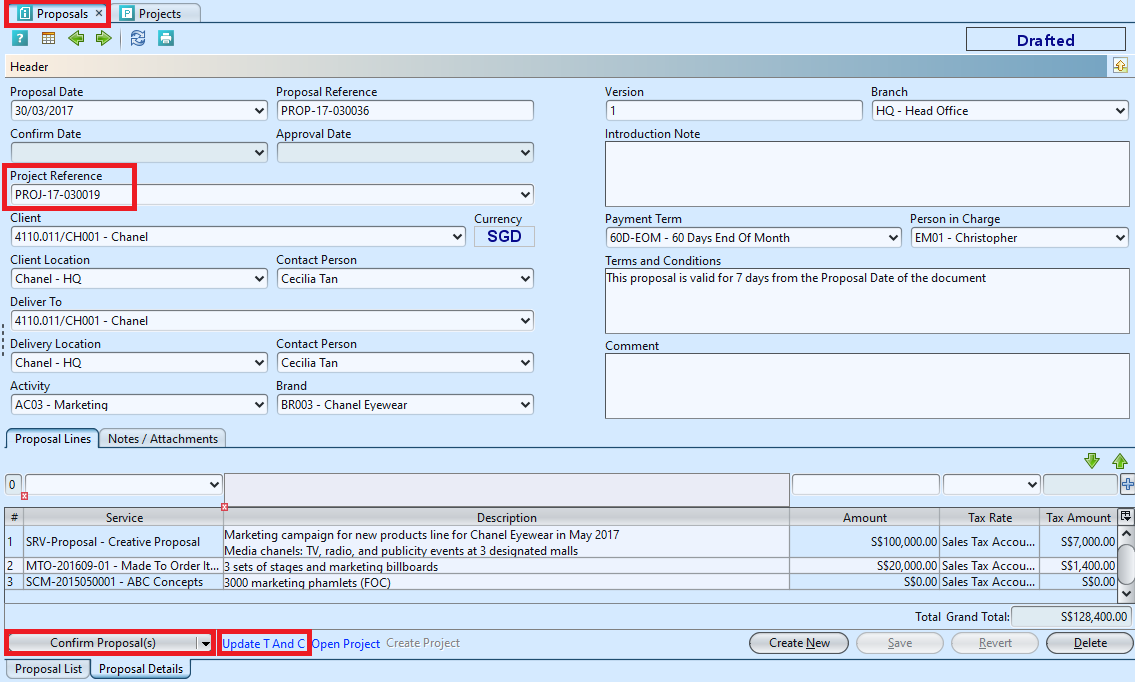
15. On “Proposal Details” tab, click on “Confirm Proposal(s)” button at the bottom of screen after reviewing the proposal contents to confirm the project proposal document. Print and send the proposal document to customer for their review and acceptance
16. On “Proposal Details” tab, click on “Approve Proposal(s)” button at the bottom of screen, AFTER customer have accepted the project proposal, to approve the project proposal document. This will confirm the project document status. User can click on the “Open Project” link at the bottom of screen to view the confirmed project document. Only “Promised Date” can be change by user after project confirmation.

On “Project Details” tab, journal entries applicable for the project will be automatically created under “Postings” tab
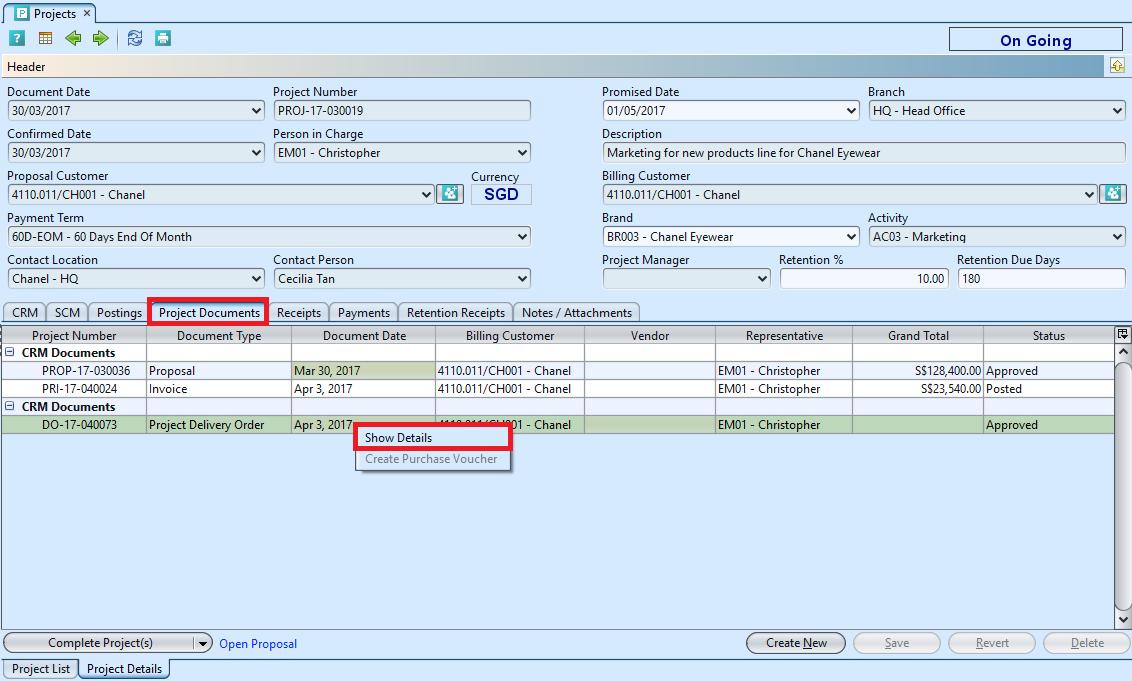
On the project document, user can view list of documents that have been created relating to the project under “Project Documents” tab. Right click on a document to view the details.
17. A new (draft) copy of the project document can be generated from the proposal document. Click on “Create Project” link at the bottom of proposal details document to do so

Update Project Document Details:
1. Click on “Project List” tab at the bottom of screen
2. Double click on project document to be updated, it will bring up the details on “Project Details” tab for the selected document.
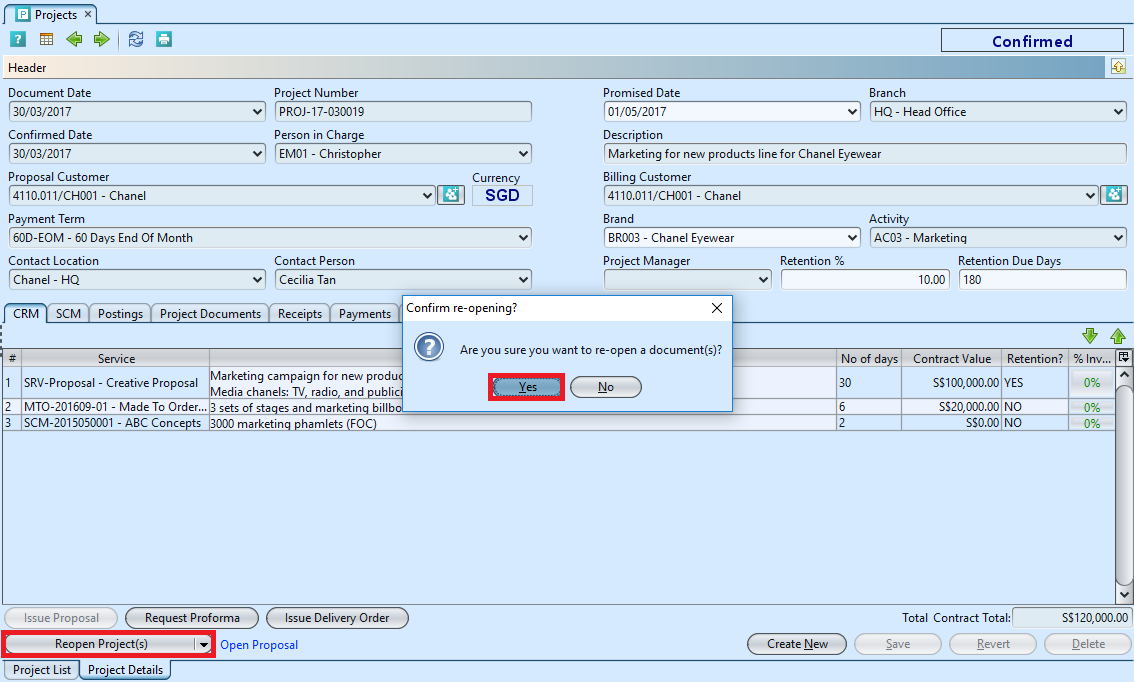
If a project document’s status is “Confirmed”, right click on the document and reopen the project document first. User can do so from the document as well by *clicking on “Reopen Project(s)” button at the bottom left of the document screen. This action will undo the proposal document(s) as well
If a project document’s status is “On Going” or “Completed”, right click on the document and reopen the project document first. This action will undo the recognized invoice(s) as well
3. Make change(s) on the project document information
4. Click on “Save” button at the bottom right of screen to save
5. Click on “Revert” button at the bottom right of screen or refresh icon at the top of the screen to roll back the changes
6. Click on “Issue Proposal” button at the bottom of screen to issue project proposal of the project document for the customer to review and accept.
7. On “Proposal Details” tab, click on “Confirm Proposal(s)” button at the bottom of screen after reviewing the proposal contents to confirm the project proposal document. Print and send the proposal document to customer for their review and acceptance
8. On “Proposal Details” tab, click on “Approve Proposal” button at the bottom of screen, AFTER customer have accepted the project proposal, to approve the project proposal document. This will confirm the project document status. User can click on the “Open Project” link at the bottom of screen to view the confirmed project document.
Issue Proforma Invoice:
1. Click on “Project List” tab at the bottom of screen
2. Double click on project document to be view, it will bring up the details on “Project Details” tab for the selected document.
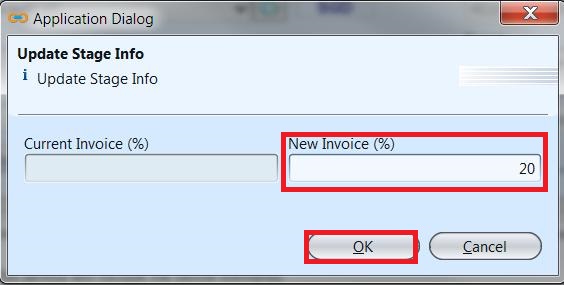
3. On “CRM” tab, right-click on a service to assign % of contract value to invoice, a pop up window will show options, choose “Invoicing (%)” option and enter the new invoice *value in percentage of the contract value. User may select multiple CRM service lines to invoice them in the same document, by holding “CTRL” button while selecting the lines.
If no invoice % value was assigned, the application will generate error when user click the “Request Proforma” button
*Note:
- Invoice progress start at 0%. “New Invoice (%)” value is accumulative. For example, if you need to first charge 20% down payment, enter 20%. Afterwards, if you need to invoice another 30%, enter 50% (20% + 30%). The last invoice for the service is the full amount, so enter 100% as “New Invoice (%)” value.
- If discount is added to a project and proposal with a separate line mentioning the negative value, e.g. (SGD 2000), at the time of requesting invoice, invoicing % value to be allocated to that discount should be the same invoicing % value as given for invoicing. It will automatically allocate the discount to the invoice with its %.
- If there are any FOC (free of charge) service, user does not need to allocate any invoicing % as this shall not be reflected in invoices, this is only for the purpose of mentioning the FOC service in the proposal.
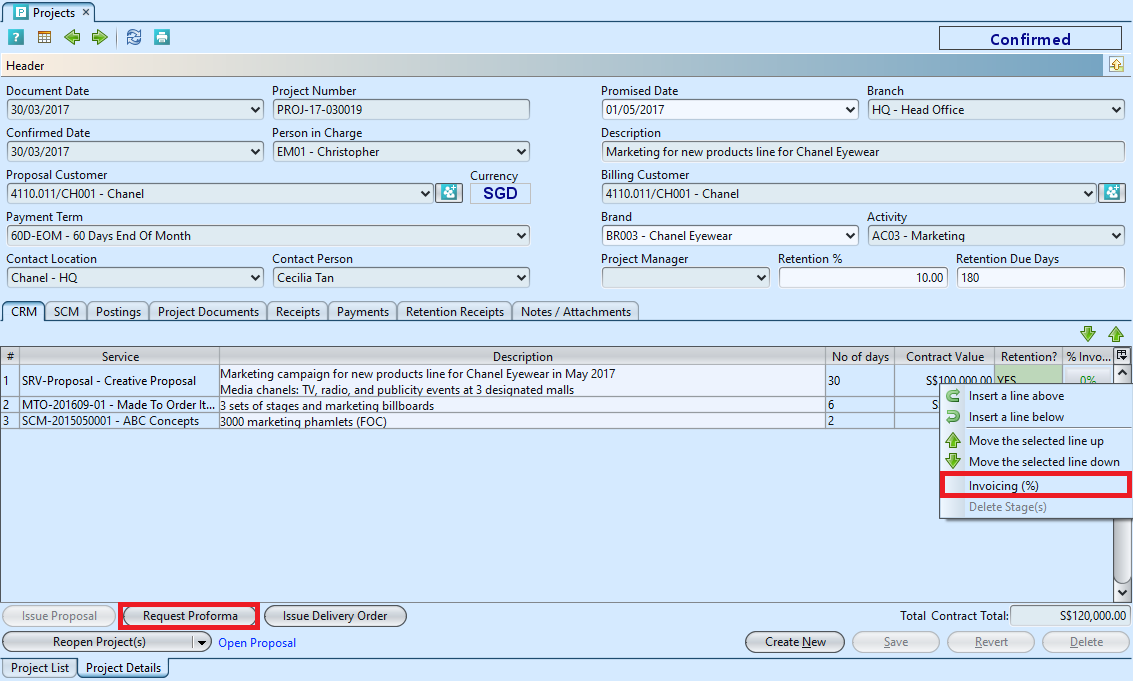
The project document’s invoice line’s “Invoiced (%)” value will be updated with the “New Invoice (%)” value. The first time user assigns invoice % value to a project’s service, the project document status will change from “Confirmed” to “On-Going”

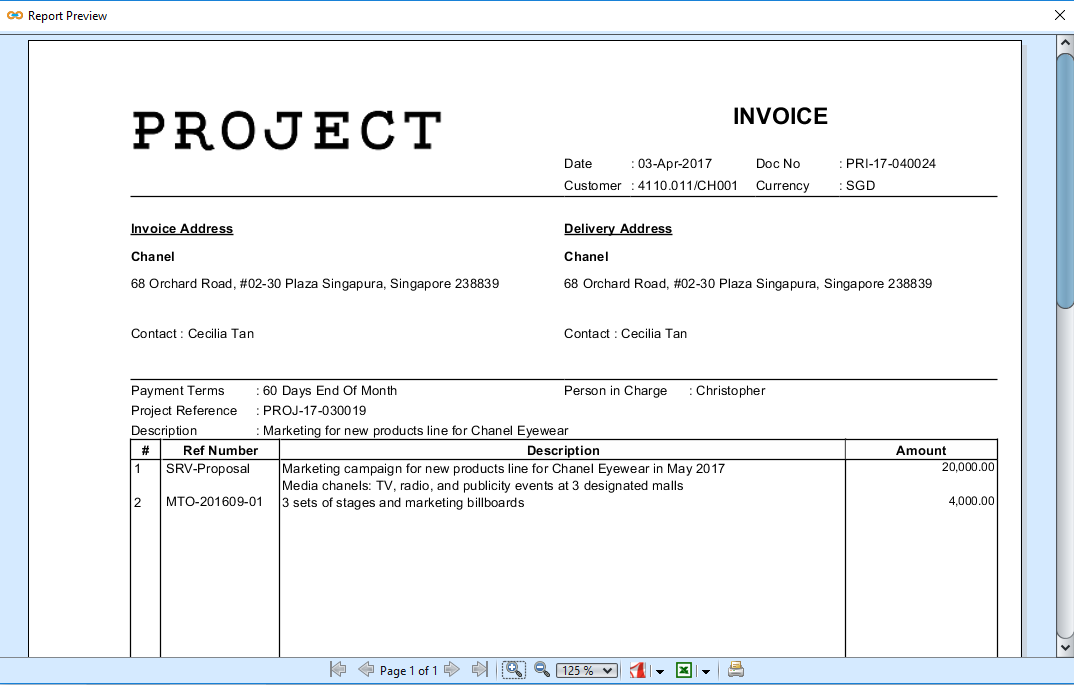
4. Click the “Request Proforma” button to generate proforma invoice for the project’s service(s), it will open the proforma invoice details in “Invoices Details” tab
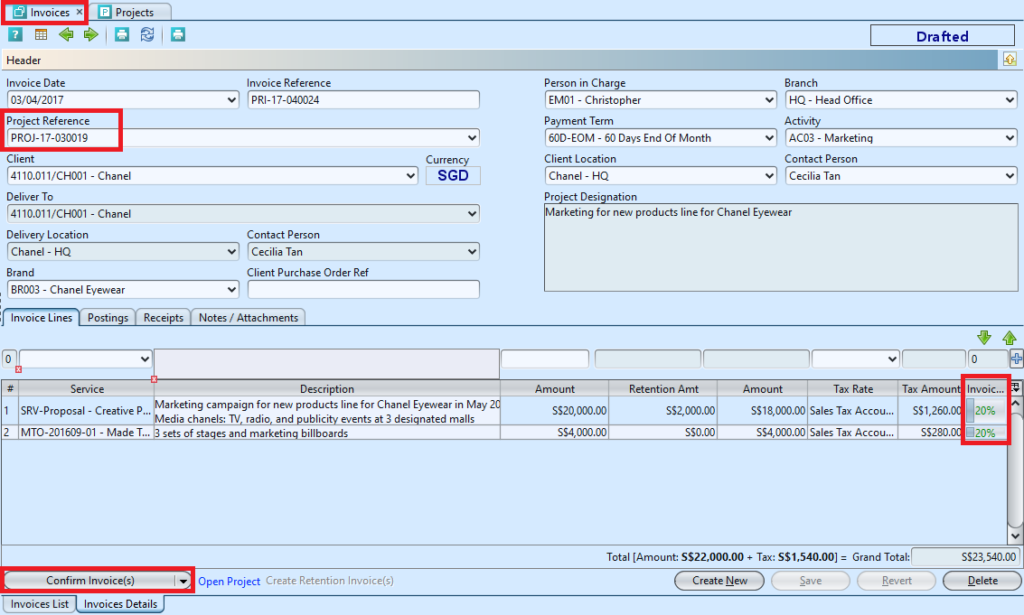
5. On “Invoices Details” tab, click on “Confirm Invoice(s)” button at the bottom left of screen to confirm the invoice
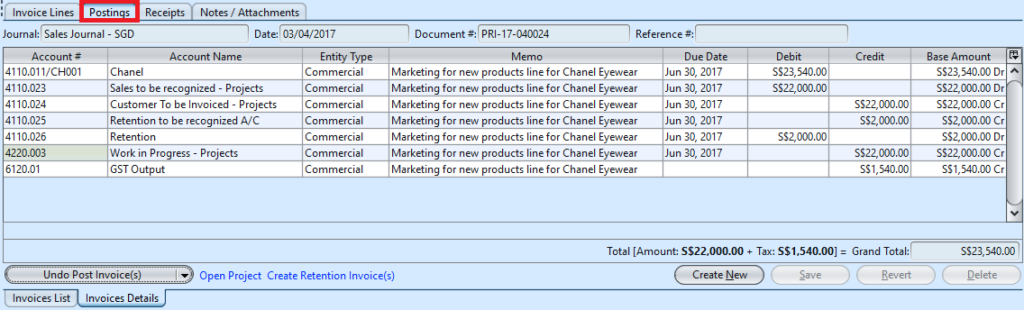
6. On “Invoices Details” tab, click on “Post Invoice(s)” button at the bottom left of screen to post the invoice. Journal entries applicable for the invoice will be automatically created under “Postings” tab

7. On “Invoices Details” tab, click ![]() button to print the invoice to send to customer
button to print the invoice to send to customer
8. On “Invoices Details” tab, user can click on the “Open Project” link at the bottom of screen to view the project document.
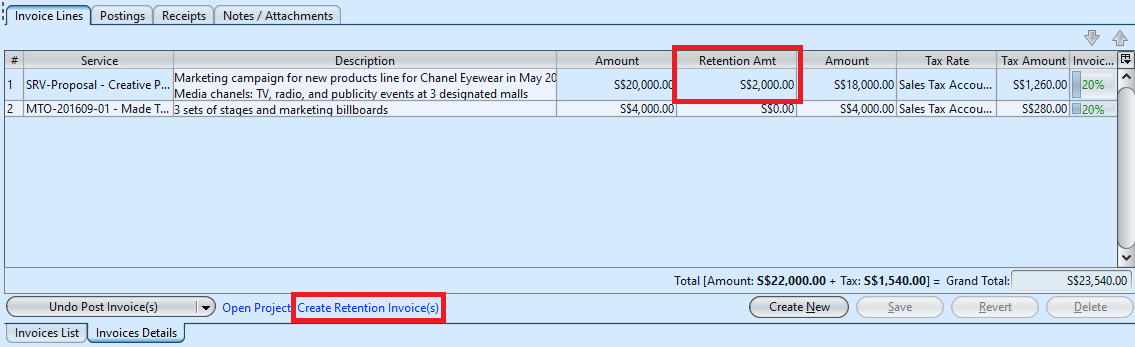
9. If there is retention for the service, user can create Retention Invoice for the Retention Amount by clicking on the “Create Retention Invoice(s)” link at the bottom of screen of the invoice (to issue retention claim invoice: see “Project – Invoices“)
Issue Delivery Order:
1. Click on “Project List” tab at the bottom of screen
2. Double click on project document to be view, it will bring up the details on “Project Details” tab for the selected document.
Note: User will be able to Issue Delivery Order document (only) for “Made To Order Item” type line item in the “CRM” tab, when Project document status is Confirmed / On Going.

3. On “CRM” tab, click “Issue Delivery Order” button, it will generate Delivery Order document with Made To Order line items.
4. Confirm and Approve the the Delivery Order document.
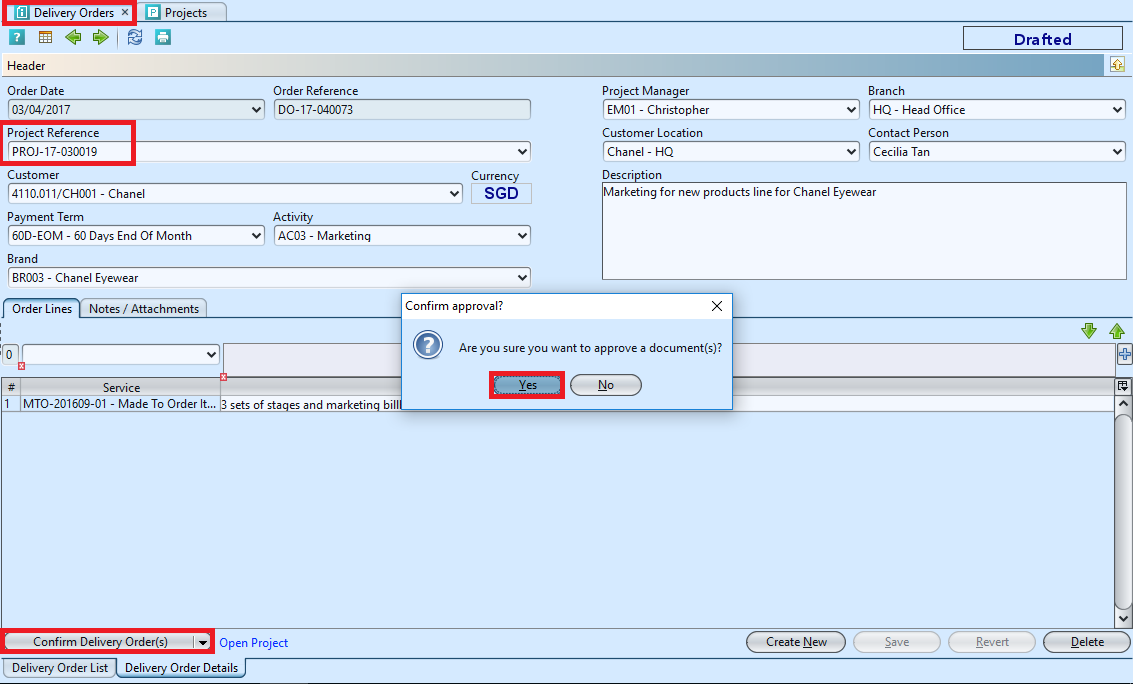
5. Print Delivery Order document for delivery to customer
Issue Purchase Order:
1. Click on “Project List” tab at the bottom of screen
2. Double click on project document to be view, it will bring up the details on “Project Details” tab for the selected document.
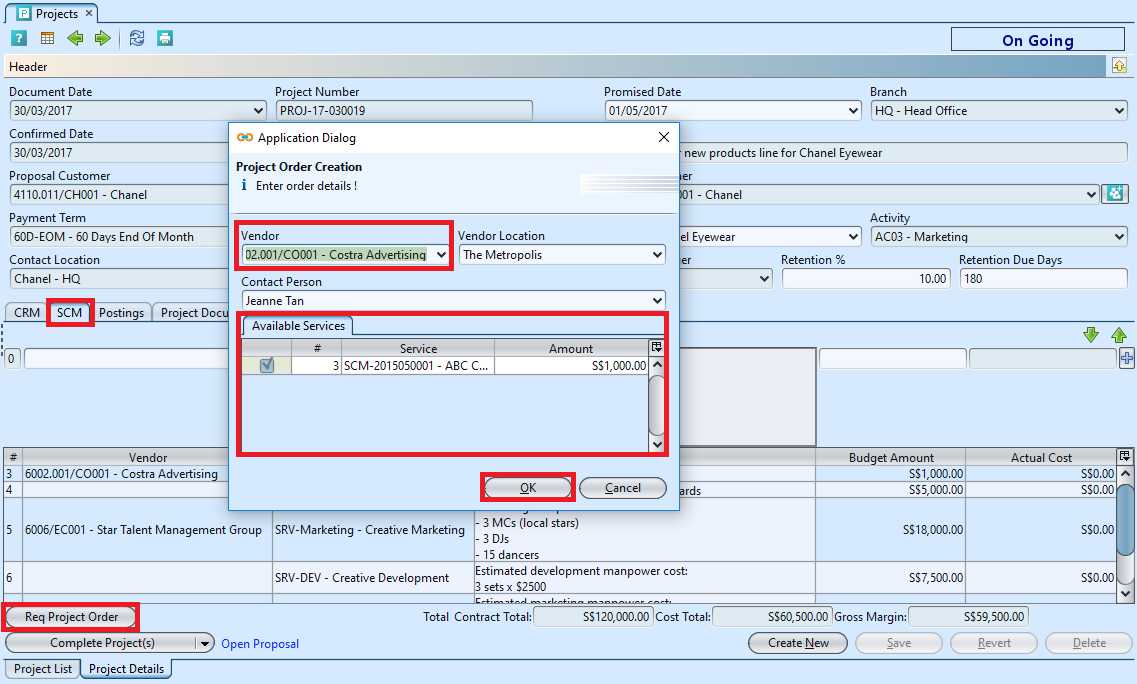
3. On “SCM” tab, click on “Req Project Order” button to request purchase order, it will pop up a window for user to select vendor and service(s) for the order. Select vendor from the “Vendor” drop down list, it will filter the services to show only those provided by the selected vendor. Untick checkbox for service(s) not to be part of the purchase order. Click “OK” button to generate the purchase order, it will open the purchase order document details
4. On “Purchase Order Details” tab, click on “Confirm Order(s)” button at the bottom left of screen to confirm the purchase order
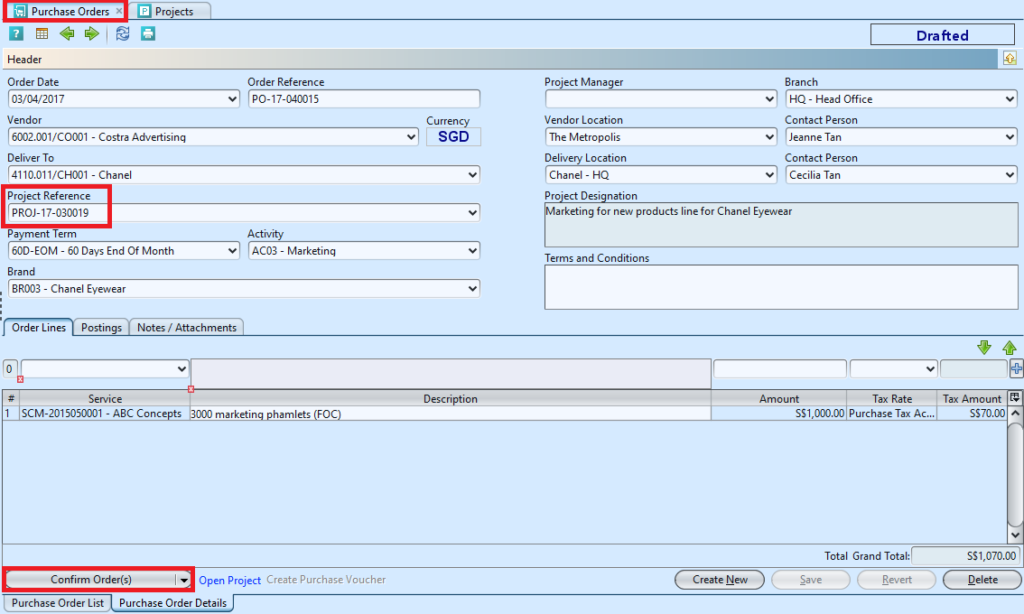
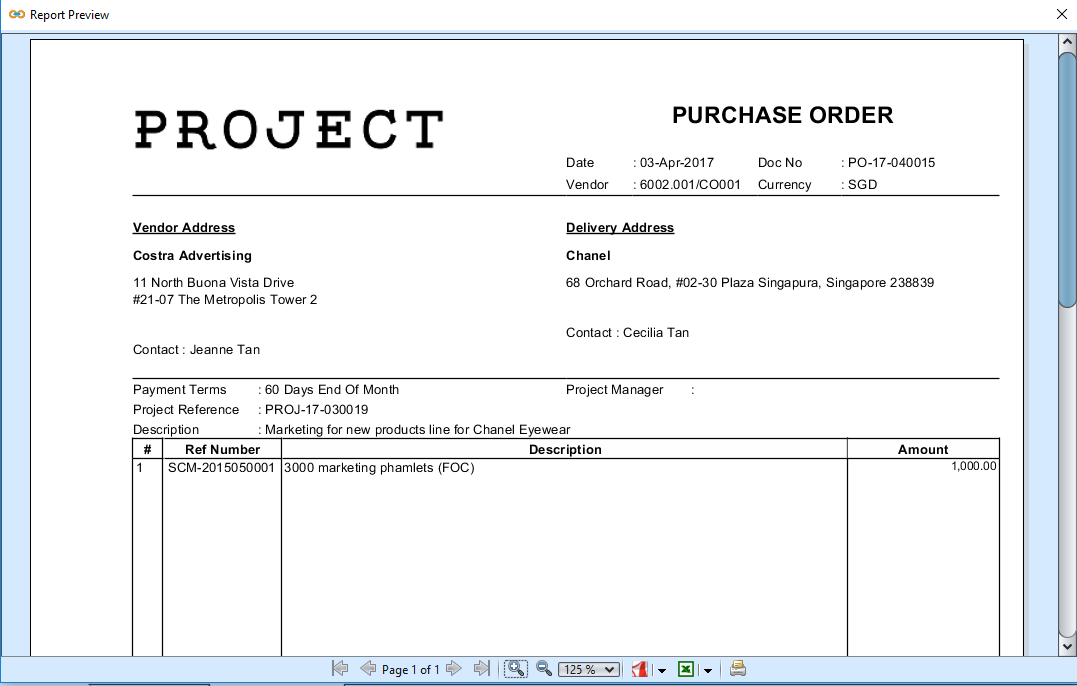
5. On “Purchase Order Details” tab, click on “Approve Order(s)” button at the bottom left of screen to approve the purchase order. User can print the purchase order after the document is approved
6. On “Purchase Order Details” tab, user can click “Create Purchase Vouchers” link at the bottom of screen to generate purchase voucher / invoice. Alternatively user may create the purchase voucher from “Projects” application’s “Project Documents” tab. Right-click on the purchase order, it will pop up option for user to create purchase voucher

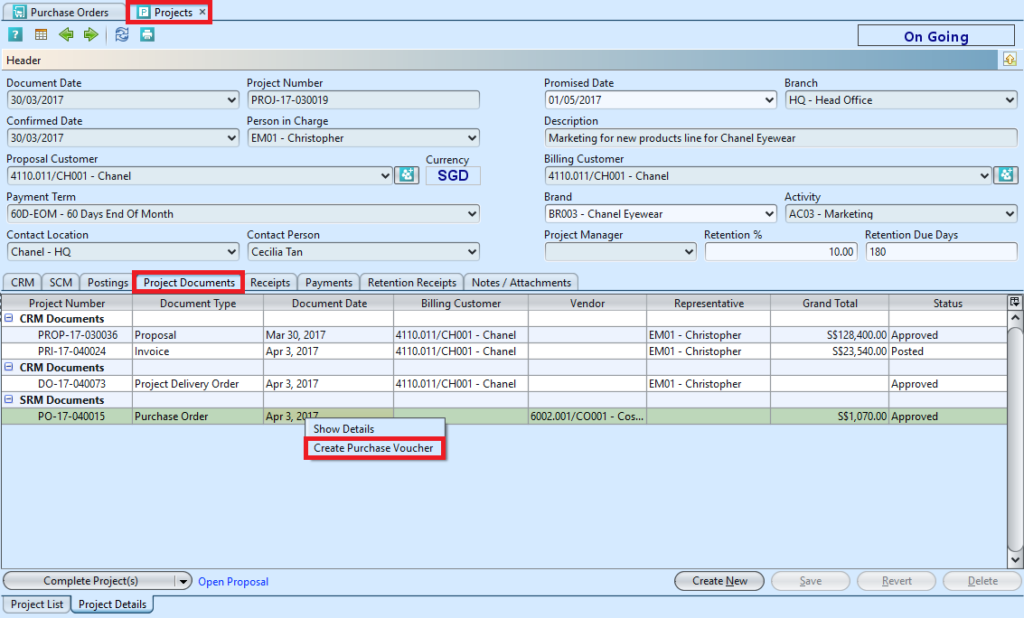
Issue Purchase Invoice / Voucher:
1. Click on “Project List” tab at the bottom of screen
2. Double click on project document to be view, it will bring up the details on “Project Details” tab for the selected document.
3. On “Project Documents” tab, right click on a purchase order document. It will pop up options window, select “Create Purchase Voucher“, it will generate and open purchase voucher for the purchase order
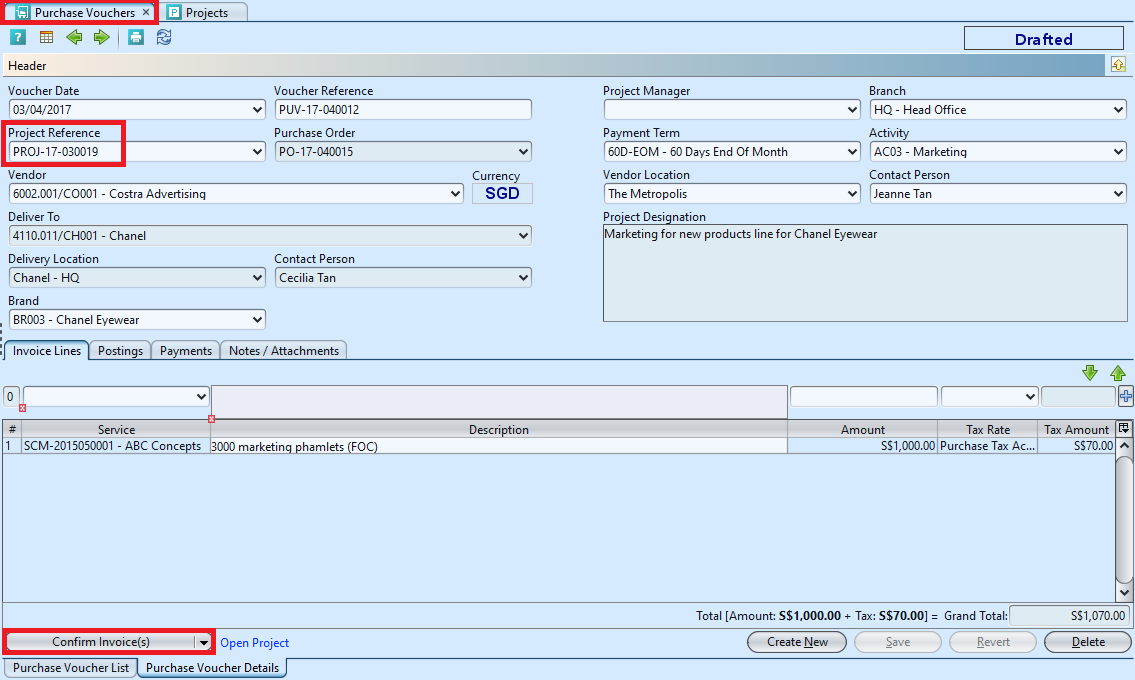
4. On “Purchase Voucher Details” tab, click on “Confirm Invoice(s)” button at the bottom left of screen to confirm the purchase voucher / invoice
5. On “Purchase Voucher Details” tab, click on “Post Invoice(s)” button at the bottom left of screen to post the purchase voucher / invoice. User can print the purchase invoice after the document is posted
6. Journal entries applicable for the purchase voucher will be automatically created under “Postings” tab

Project Realization – For Accounts Only
1. Click on “Project List” tab at the bottom of screen
2. Double click on project document to be view, it will bring up the details on “Project Details” tab for the selected document.
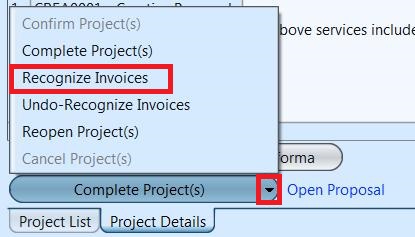
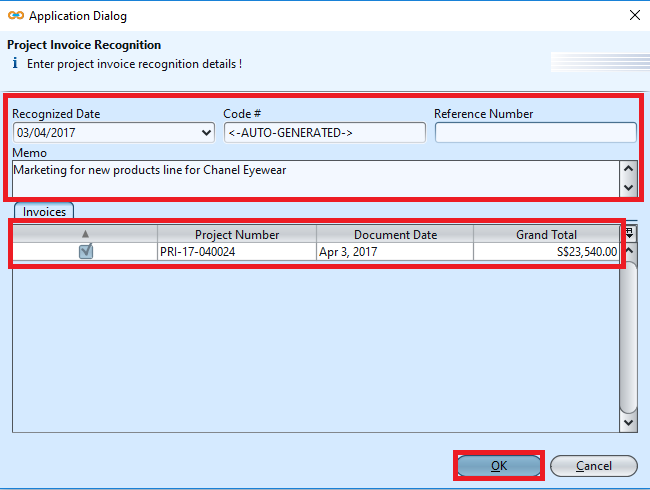
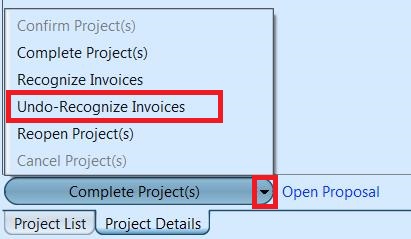
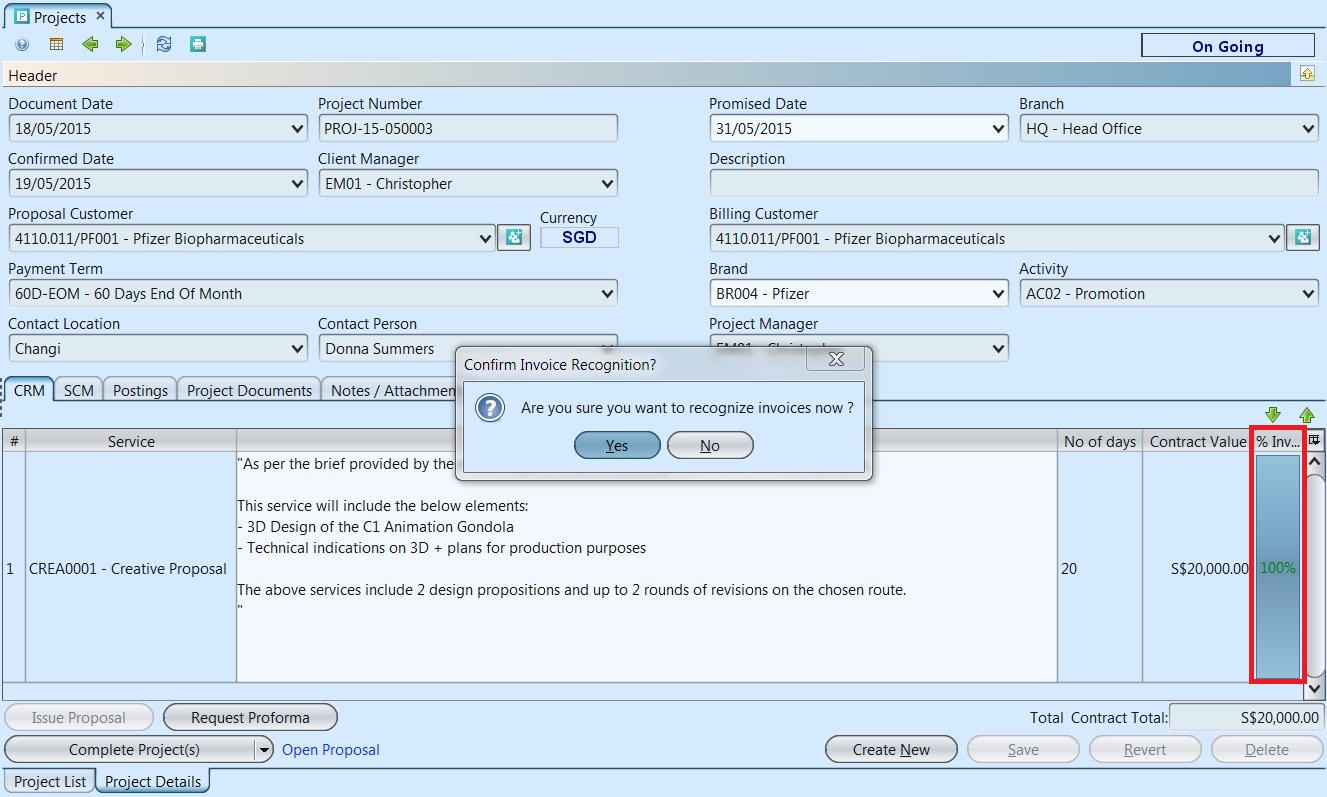
3. Click arrow on “Complete Project(s)” button at bottom left of screen, it will pop up options for user to select. Select “Recognize Invoices” option. It will pop up a window for user to recognize the invoice of the service(s). Enter information on top half of the window. Untick checkbox for invoice(s) not to be recognize. Click “OK” button to recognize the selected invoice(s), a message will appear to confirm the invoice(s) being recognized

4. View the cost / expenses under “SCM” tab and open “Postings” tab to review the journal entries posted
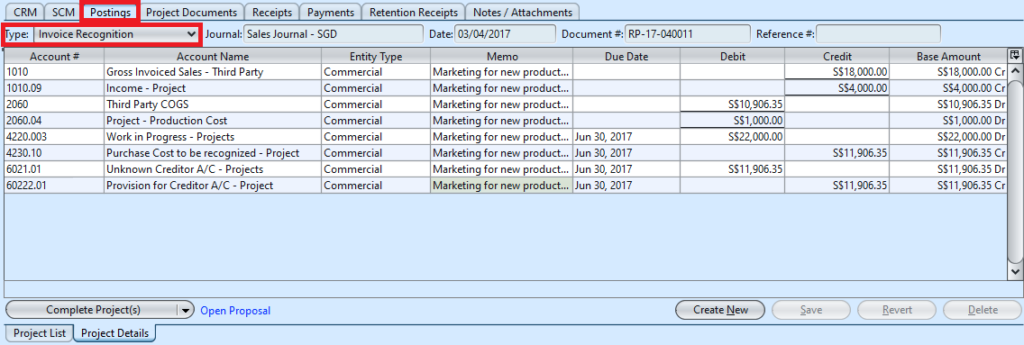
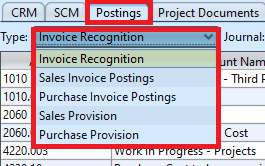
*Note: If previous invoice(s) were recognized at different time (multiple project realizations), user can view these recognized invoice(s) by selecting “Type” drop-down list in “Postings” tab. The corresponding journal entries postings will be shown
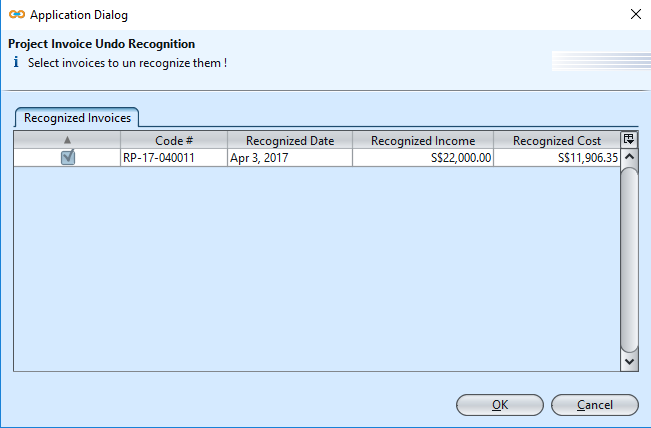
5. To undo recognition of invoice(s), click arrow on “Complete Project(s)” button at bottom left of screen, it will pop up options for user to select. Select “Undo-Recognize Invoices” option. It will pop up a window for user to undo the recognized invoice of the service(s). Tick only checkbox for invoice(s) to undo the recognition then click “OK” button

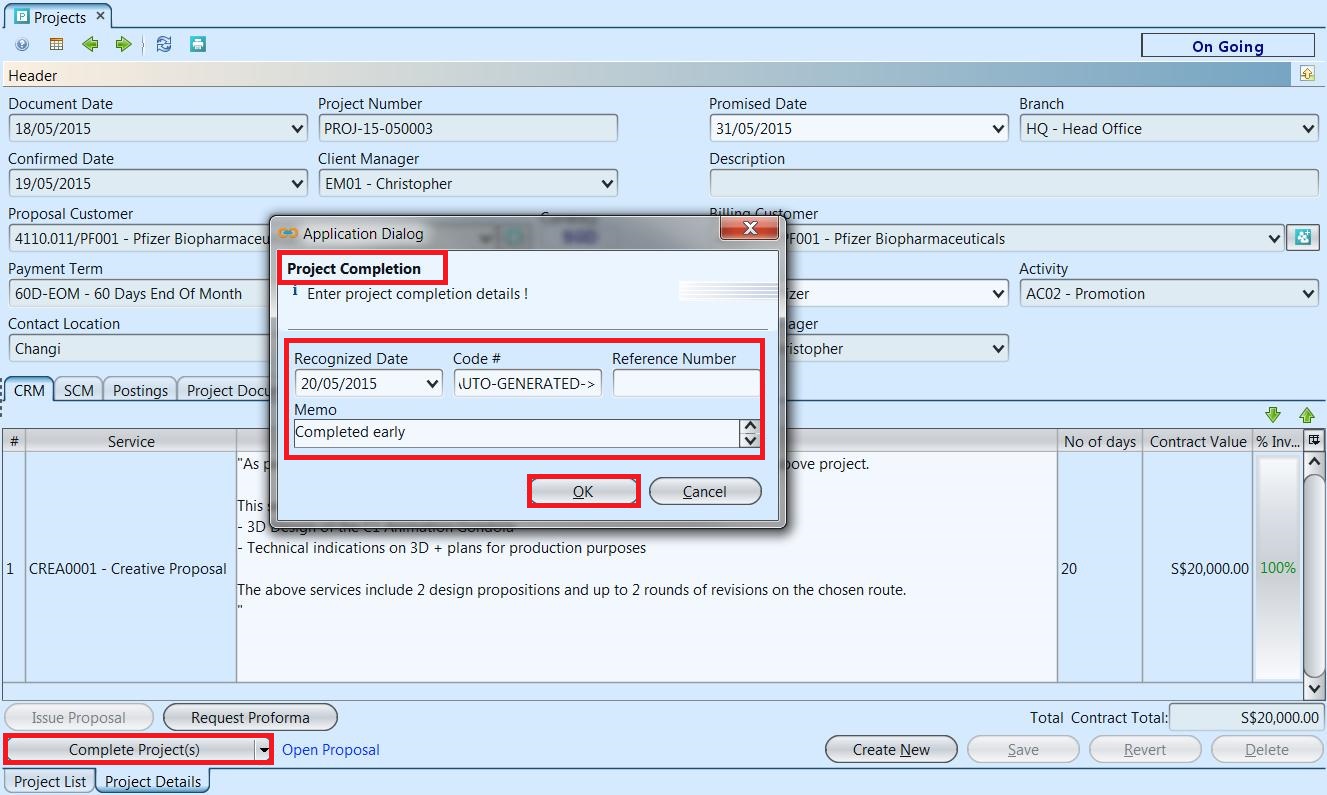
Complete Project:
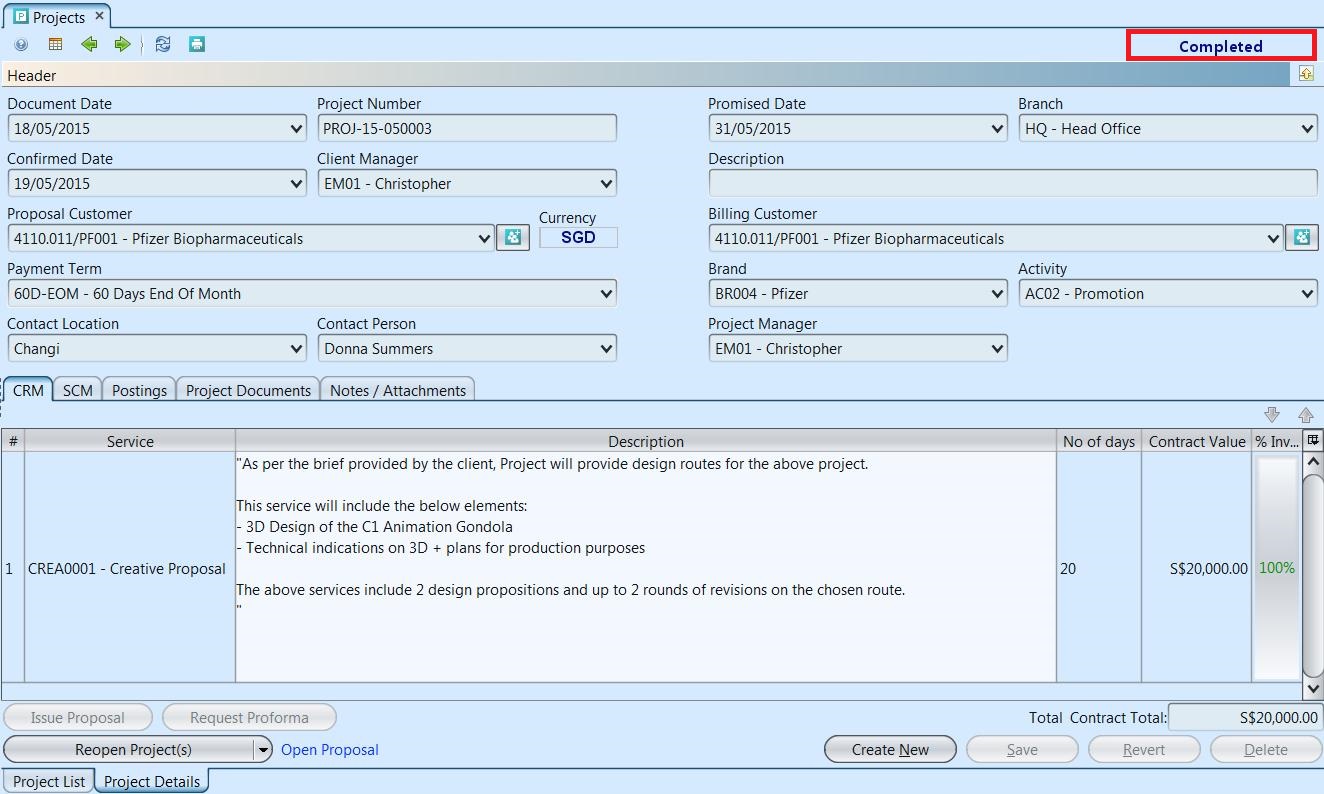
When all project’s services “Invoicing %” values are all 100% (for non FOC services), user will need to close / complete the project.
1. Click on “Project List” tab at the bottom of screen
2. Double click on project document to be updated, it will bring up the details on “Project Details” tab for the selected document.
3. *Recognize the invoices (see “Project Realization – For Accounts Only” procedure above)
*Note: If previous invoice(s) were recognized at different time (multiple project realizations), user can view these recognized invoice(s) by selecting “Type” drop-down list in “Postings” tab. The corresponding journal entries postings will be shown
4. Click “Complete Project(s)” button at bottom left of screen, after all invoice(s) recognized (100%), and click “Yes” to confirm
5. On “Project Completion” window, update the information and click “OK” to complete the project
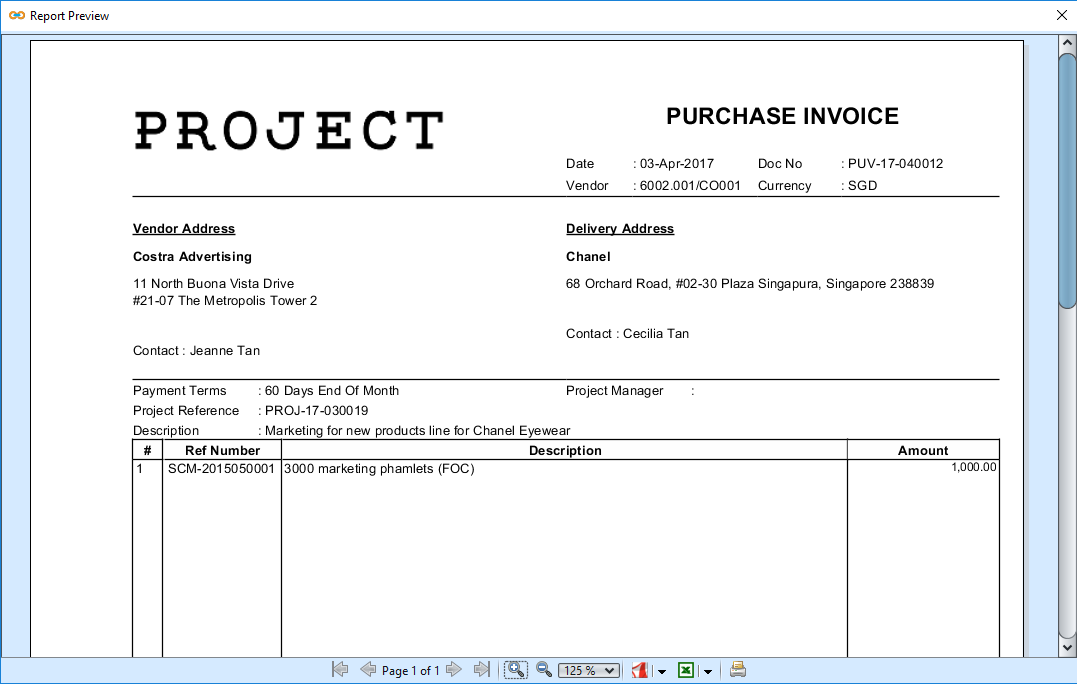
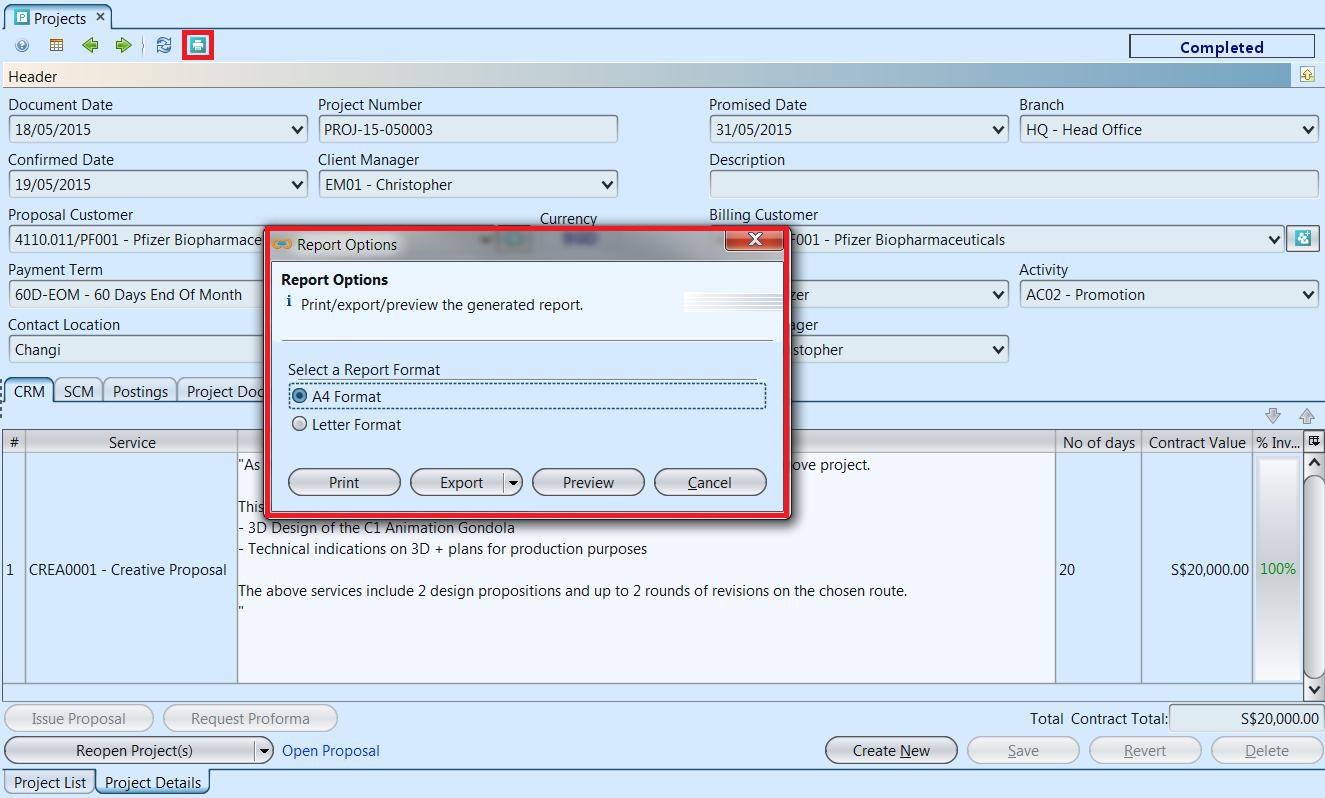
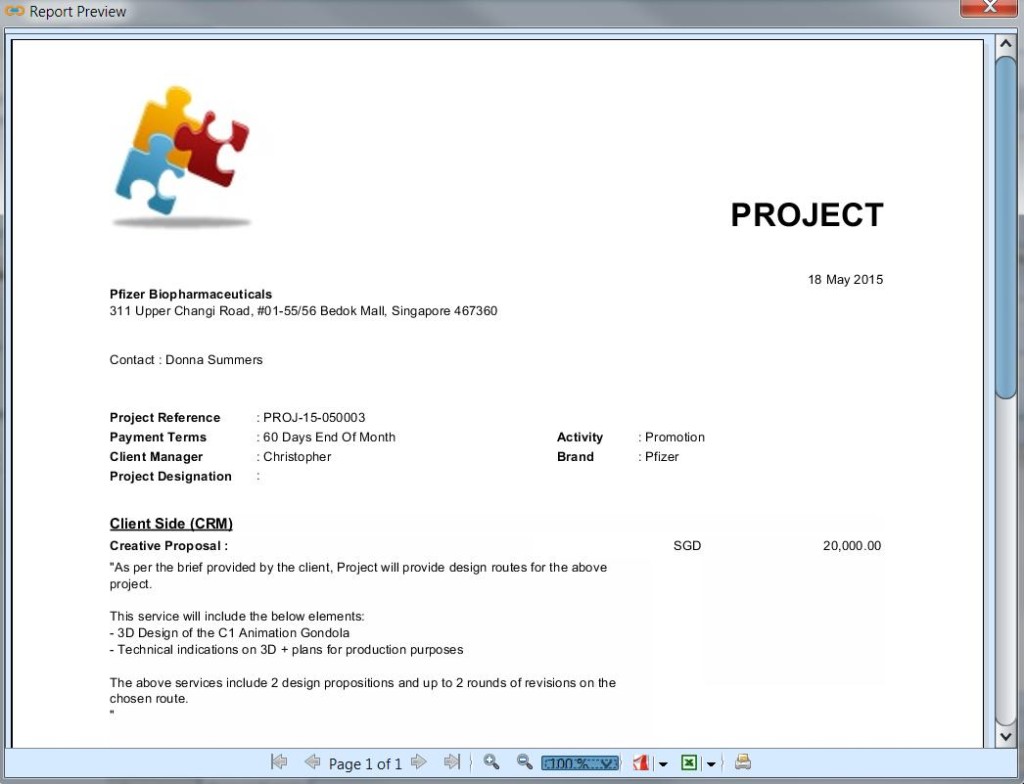
6. To print the project document, click on ![]() button on top of the screen. User also has options to preview the document, and print the document as softcopy (export as pdf or excel file)
button on top of the screen. User also has options to preview the document, and print the document as softcopy (export as pdf or excel file)
View and Search for Project Document Details:
1. Click on “Project List” tab at the bottom of screen
2. Enter search parameter to filter the result, i.e. type in which client to search for in the “Client” text field box or select from drop-down list
3. Result can be sorted alphabetically by clicking the fields’ columns
4. Double click on project document to view full details of the document, it will bring up the details on “Project Details” tab for the selected document
5. On “Project Documents” tab, related project documents issued will be listed for user to view, i.e. proposal document(s), invoices, etc. Right-click on a document (row), it will pop up options window, for user the view the document details or take further action