


A credit note or credit memorandum (memo) is a commercial document issued by a seller to a buyer. User can create and manage credit notes using this transaction.
When customers are sending back goods, they will issue a Vendor Return Note. Once the goods have been picked up by the company, they will issue a Debit Note. This reference is needed to track the Credit Note issued by the company and match them with the reference used by the customers (Customer Reference Number)*
Below actions are available under “Credit Note”:
![]() Create new credit note; update, delete, view and search for credit note details
Create new credit note; update, delete, view and search for credit note details
![]() Adding customer reference number* in credit note
Adding customer reference number* in credit note
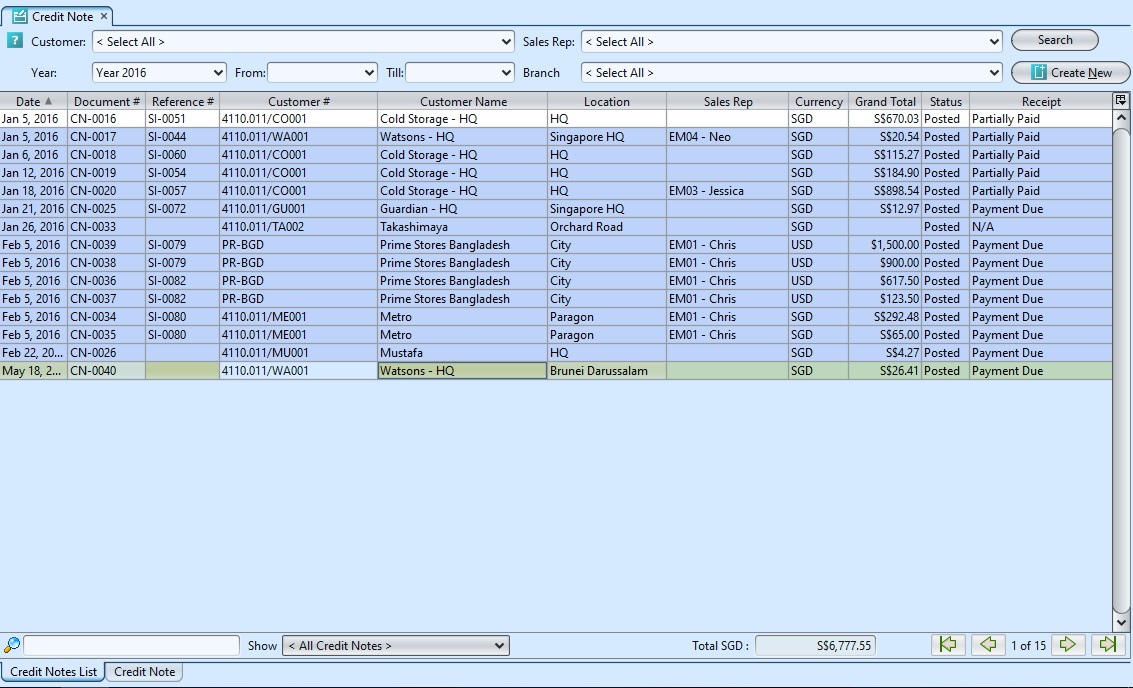
![]() View and search for credit note details
View and search for credit note details
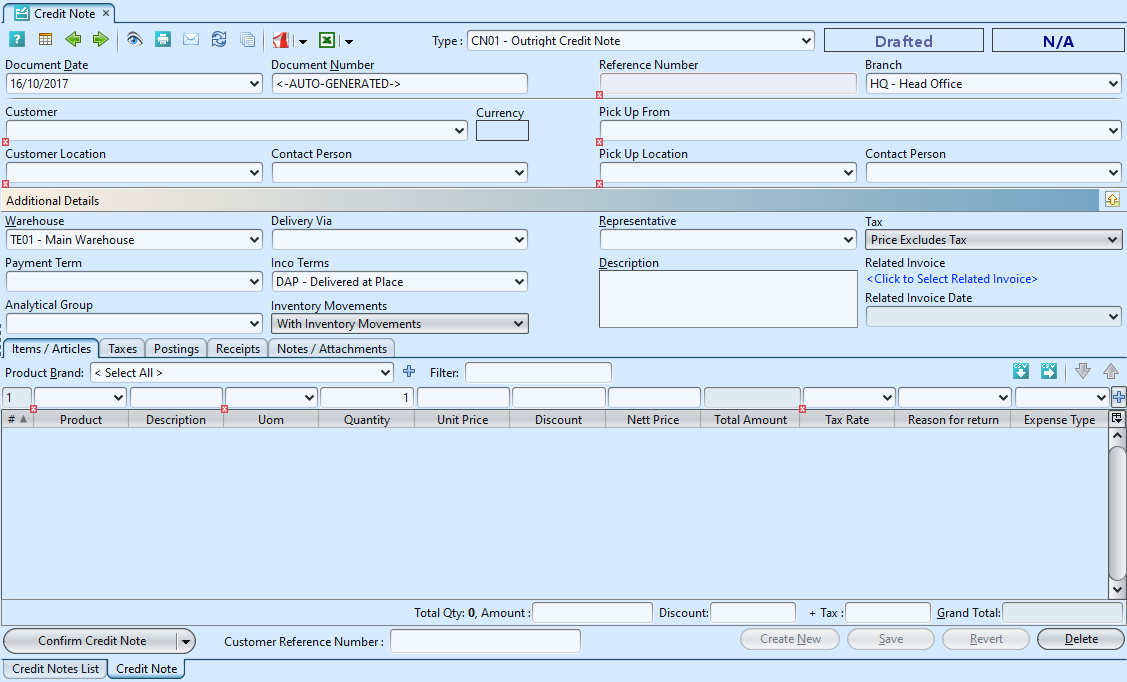
Field Name |
Explanation |
Mandatory Information |
| Document Date | Date of the sales order | Y |
| Document Number | Number of the sales order | Y |
| Reference Number | A unique number on sales order | N |
| Branch | Company’s branch | Y |
| Customer | Company’s customers | Y |
| Customer Location | Customer’s company’s location | Y |
| Contact Person | Contact person at customer’s location | N |
| Deliver To | Self-explanatory | Y |
| Delivery Location | Self-explanatory | Y |
| Contact Person | Contact person at delivery location | N |
| Warehouse | Self-explanatory | Y |
| Ship Via | Transportation method | N |
| Payment Term | Payment rules imposed by suppliers on their customers. | N |
| Inco Term | Commonly used in both international and domestic trade contracts. | Y |
| Analytical Group | N | |
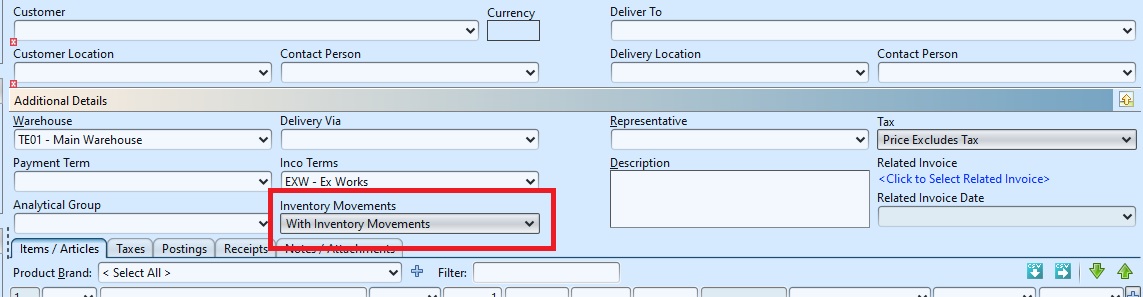
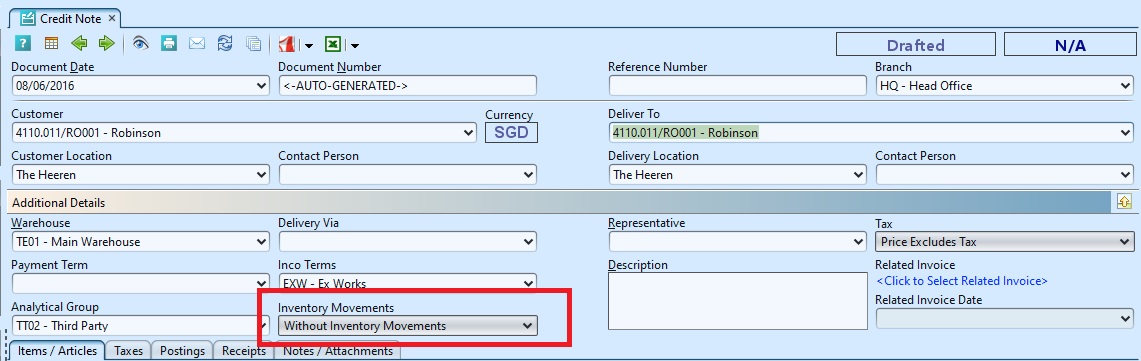
| Inventory Movements | Select if this transaction involves inventory movements or not | N |
| Representative | Internal representative | N |
| Tax | Select if price includes or excludes tax | Y |
| Description | Description | N |
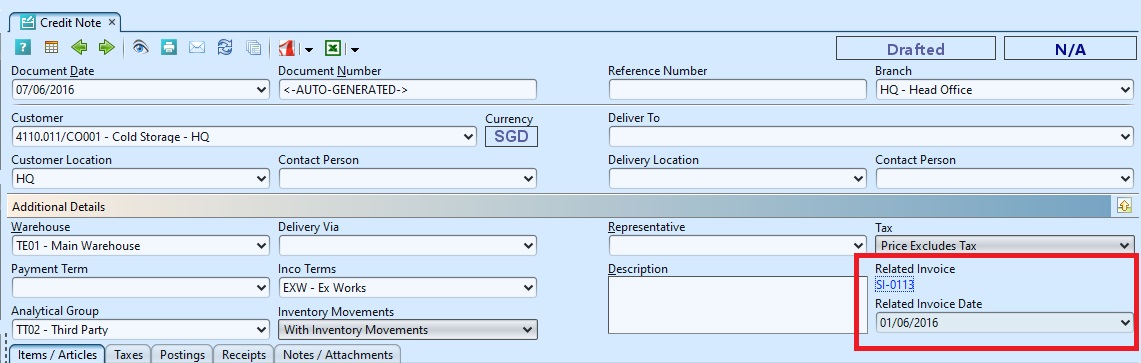
| Related Invoice | Link to related invoice document | N |
| Related Invoice Date | Date of the related invoice document | N |
| Customer Reference Number | Reference number from customer for the credit note (only editable when Credit Note status is posted and when user have access right to edit) | N |
| Items/Articles – Product | Name of product | Y |
| Items/Articles – Description | Description | N |
| Items/Articles – UOM | Type of product – Unit of Measure | Y |
| Items/Articles – Qty | The quantity of product | N |
| Items/Articles – Unit Price | Self-explanatory | N |
| Items/Articles – Discount | A deduction from the usual cost of product | N |
| Items/Articles – Nett Price | Self-explanation | N |
| Items/Articles – Total Amount | Self-explanation | Y |
| Items/Articles – Tax Rate | Self-explanation | Y |
| Items/Articles – Reason for Return | Select a reason for returning the product | Y |
| Items/Articles – Expense Type | Self-explanation | N |
Create New Credit Note with Inventory Movement (Credit Note to Putaway)
1. From “Sales – (Sell In Transactions) Sales Invoice”, double click on a sales invoice in the “Sales Invoices List” tab, it will bring up the selected sales invoice record on “Sales Invoice” tab. Click the arrow on ![]() button at the bottom of the screen and select “Create Credit Note” option to generate a new credit note referenced to the sales invoice.
button at the bottom of the screen and select “Create Credit Note” option to generate a new credit note referenced to the sales invoice.
2. Alternatively from “Sales – (Sell In Transactions) Credit Note” click on “Create New” at the top right of screen of “Credit Note List” tab, it will open “Credit Note” tab with empty form

3. Fill up credit note’s information
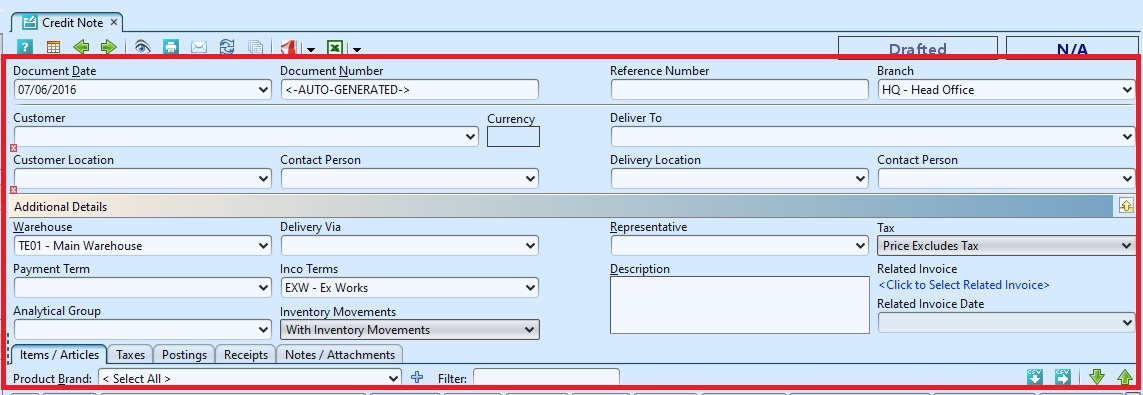
*Note: Inventory Movements need to be selected as “With Inventory Movements” in order to process the document.
4. If any, select a related sales invoice document as reference for the credit note document. Click on “Click to Select Related Invoice” link on the right side of the screen. It will pop up dialog window with sales invoice document for user to select. Click “OK” button to relate to the selected invoice document.
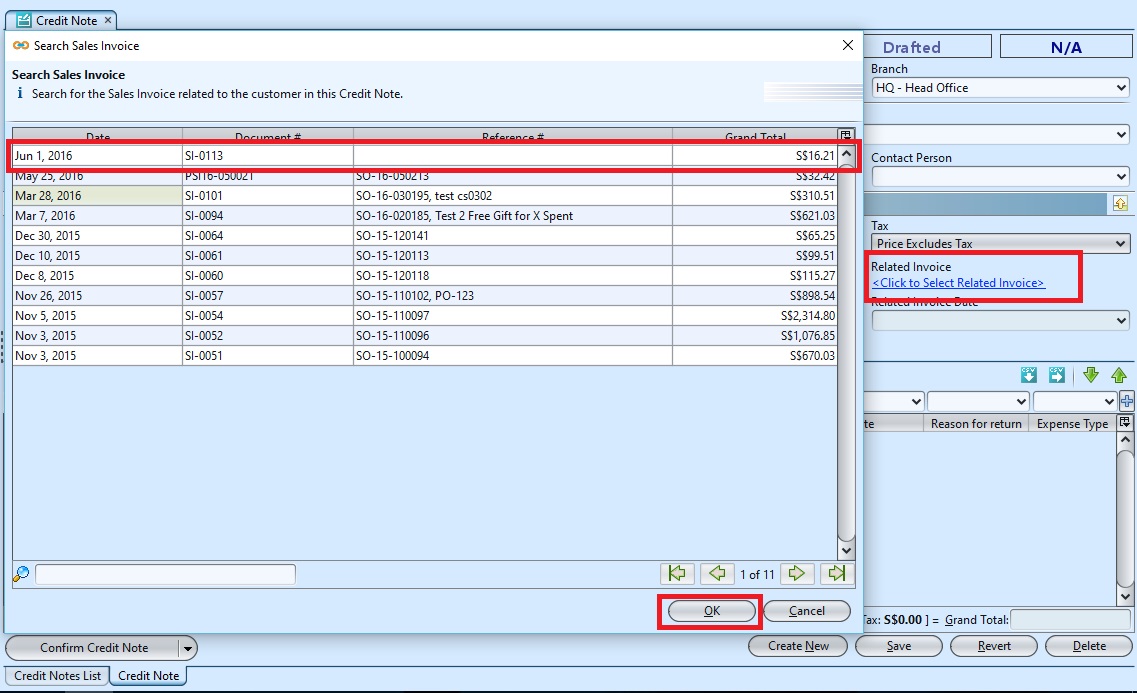
The link will be replaced with the sales invoice document number, and related invoice date updated with the invoice date. User can click on the link to open the dialog window again, if need to change the linking
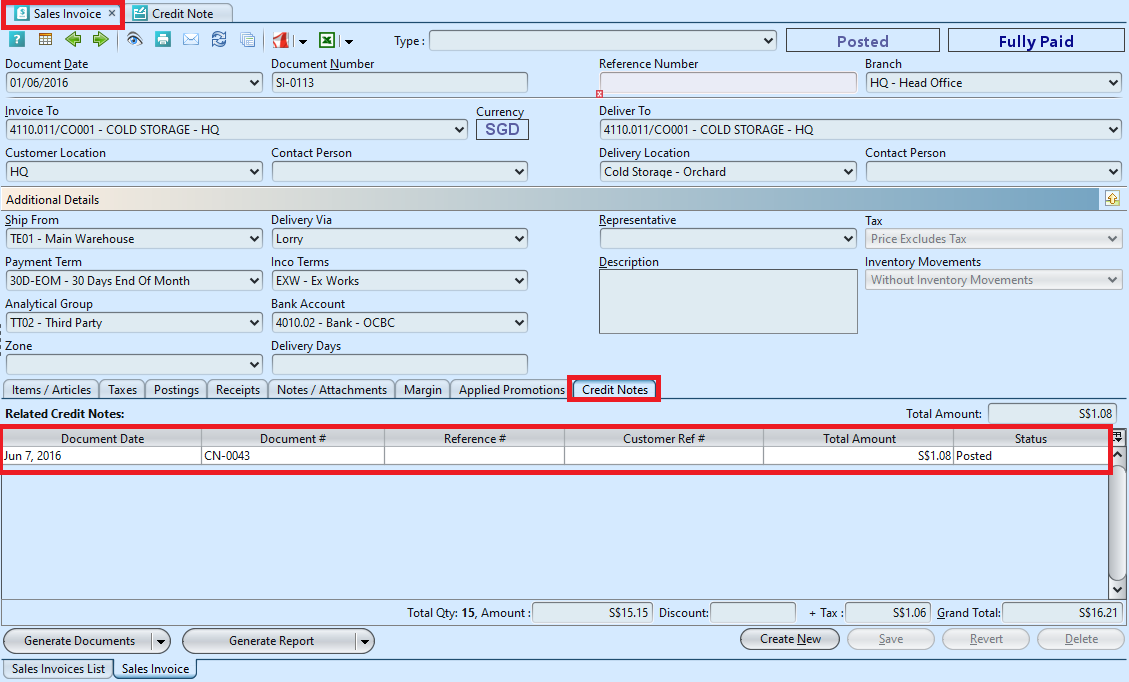
In Sales Invoice document view, user able to view the linked Credit Note document(s) in the “Credit Notes” tab.
5. On “Items / Articles” tab select a product from “Product” drop-down list, fill up product’s information, and click ![]() button
button

6. Click on “Notes / Attachments” tab at the middle of screen to add notes or files attachment for the credit note
7. Click on “Save” button at the bottom of screen to save
8. Click on “Confirm Credit Note” button at the bottom left of screen to confirm the credit note
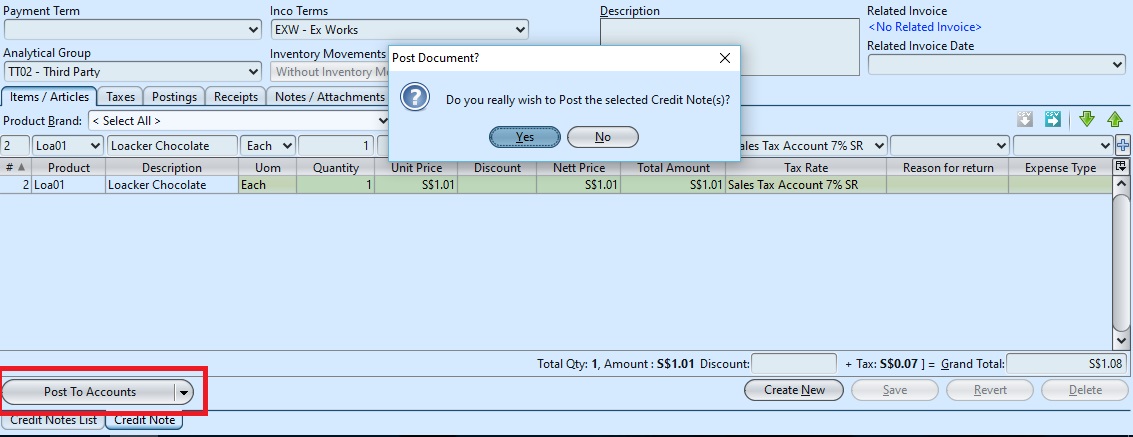
9. Click on “Post To Accounts” button at the bottom left of screen to post the credit note to account

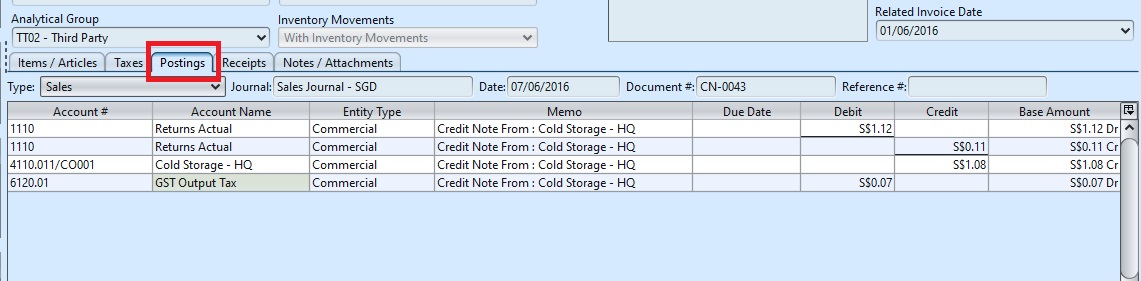
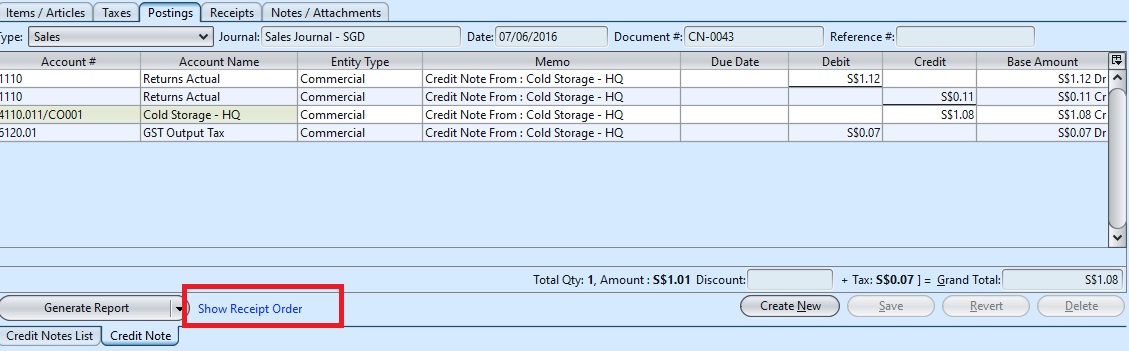
10. Tax entries applicable for the credit note will be automatically created under “Taxes” tab if any. Journal entries of the credit note will be automatically created under “Postings” tab
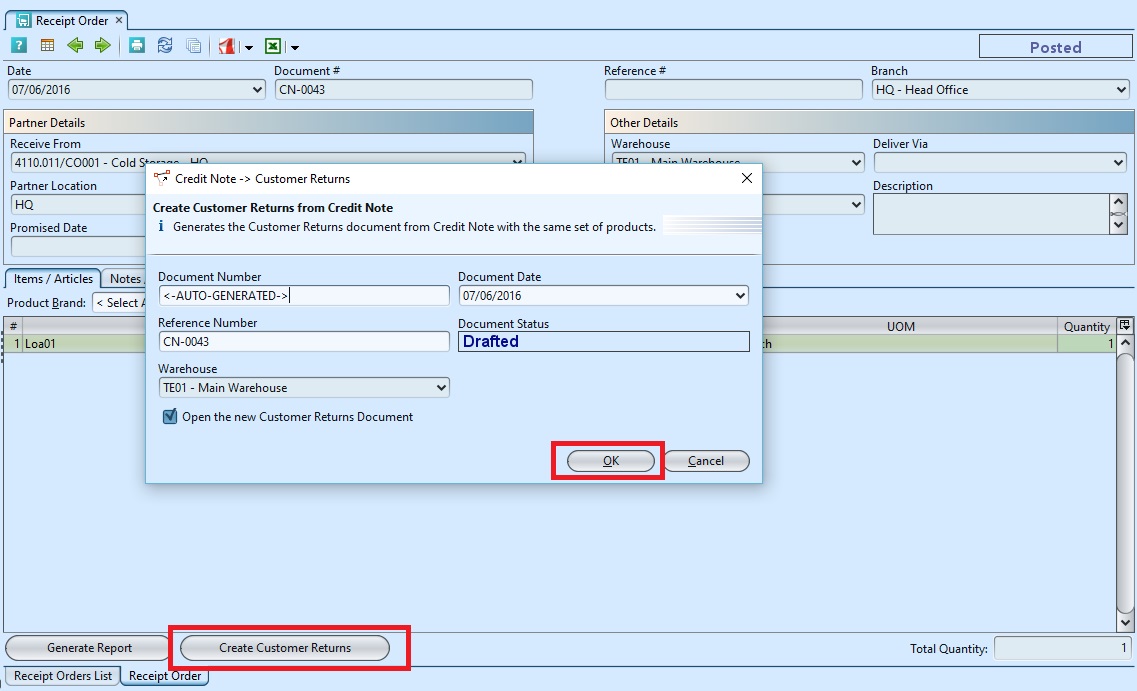
11. Click on “Show Receipt Order” link at the bottom left side of screen to open the corresponding receipt order document for the returned product(s)
12. Click on “Create Customer Returns” tab from the Receipt Order module and click on “OK” to proceed.
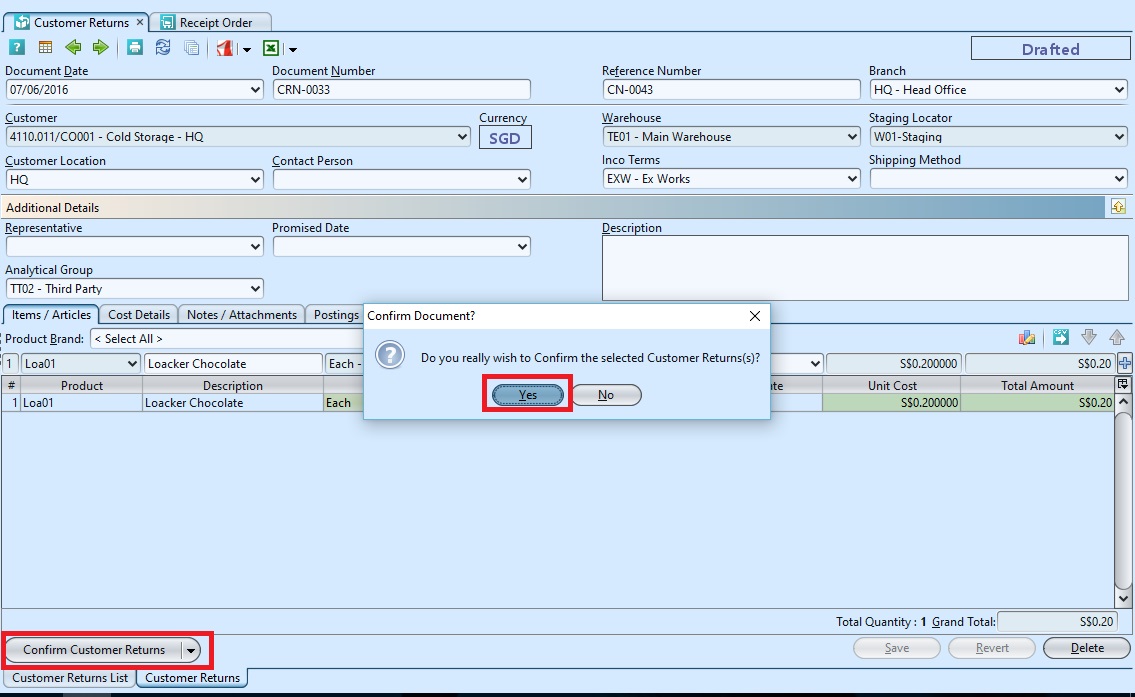
13. Click on “Confirm Customer Returns” button at the bottom left of screen to confirm the credit note
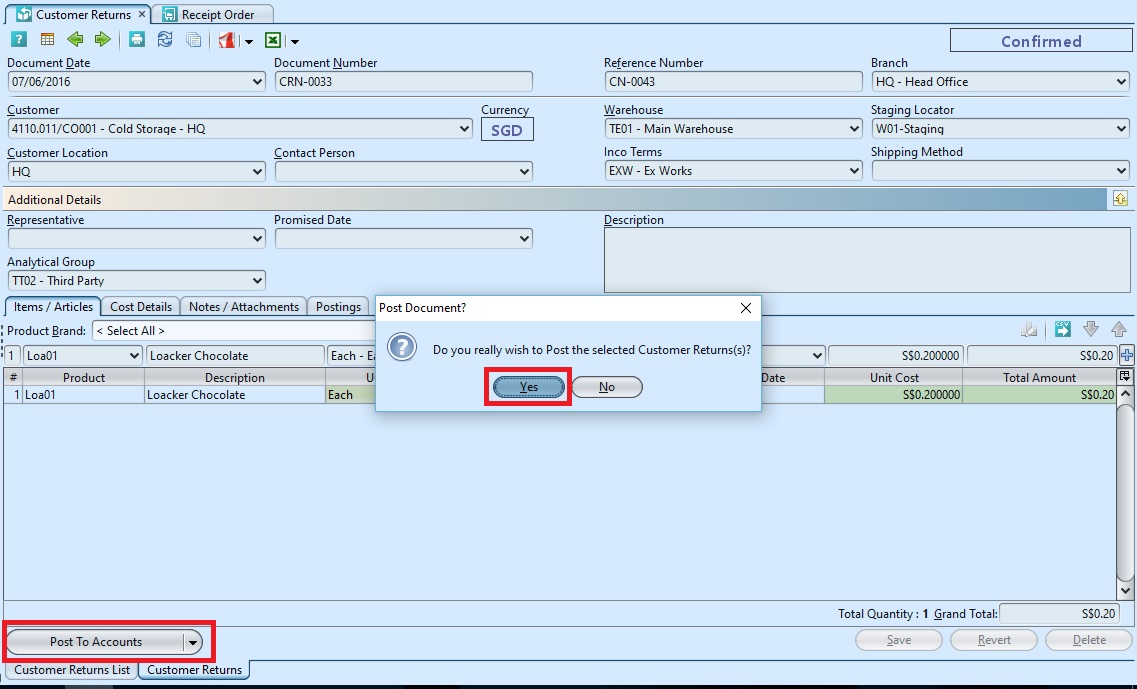
14. Click on “Post To Accounts” button at the bottom left of screen to post the credit note to account
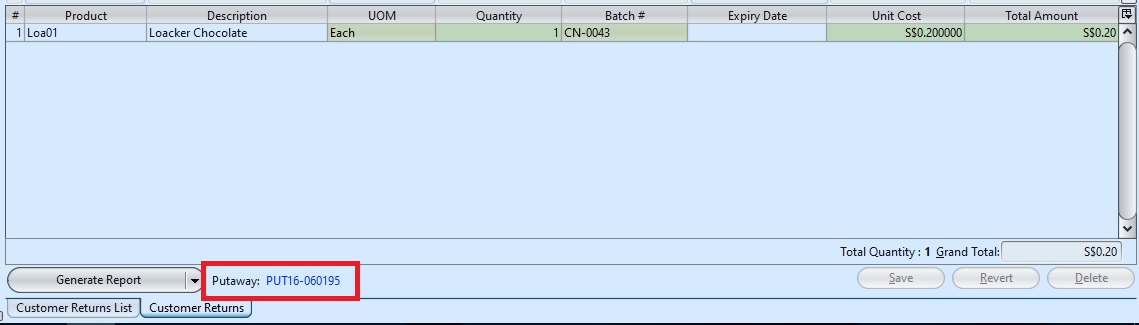
15. Click on “Putaway number” and it will link to the related document
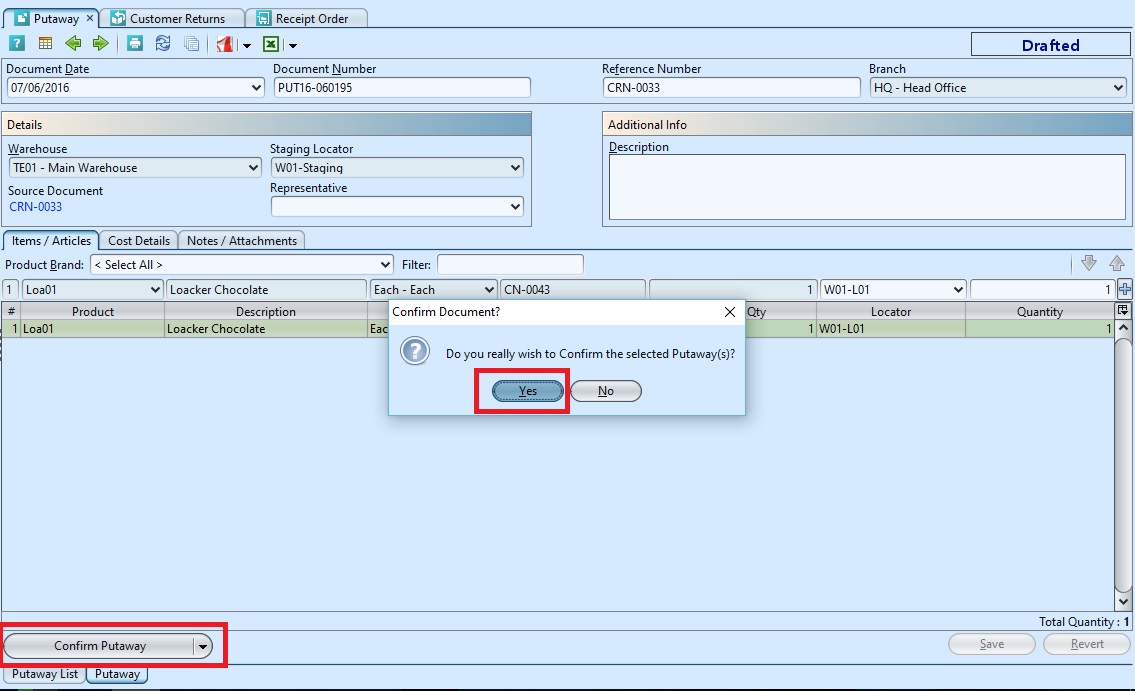
16. Click on “Confirm Putaway” button at the bottom left of screen to confirm the putaway.
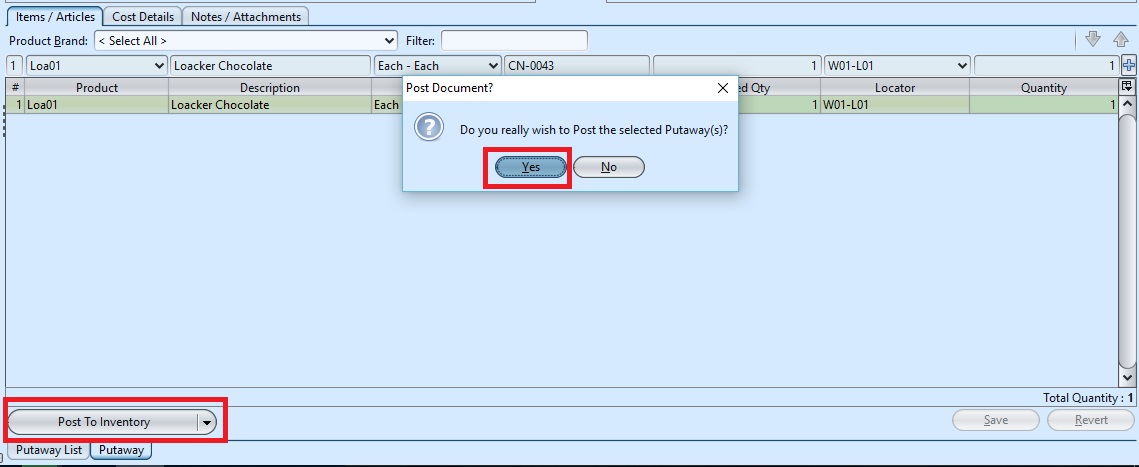
17. Click on “Post To Accounts” button at the bottom left of screen to post the putaway to account.
Create New Credit Note without Inventory Movement
1. From “Sales – (Sell In Transactions) Sales Invoice”, double click on a sales invoice in the “Sales Invoices List” tab, it will bring up the selected sales invoice record on “Sales Invoice” tab. Click the arrow on ![]() button at the bottom of the screen and select “Create Credit Note” option to generate a new credit note referenced to the sales invoice.
button at the bottom of the screen and select “Create Credit Note” option to generate a new credit note referenced to the sales invoice.
2. Alternatively from “Sales – (Sell In Transactions) Credit Note” click on “Create New” at the top right of screen of “Credit Note List” tab, it will open “Credit Note” tab with empty form
3. Fill up the information.
*Note: Inventory Movements need to be selected as “With Inventory Movements” in order to process the document.
4. On “Items / Articles” tab select a product from “Product” drop-down list, fill up product’s information, and click ![]() button
button

5. Click on “Notes / Attachments” tab at the middle of screen to add notes or files attachment for the credit note
6. Click on “Save” button at the bottom of screen to save
7. Click on “Confirm Credit Note” button at the bottom left of screen to confirm the credit note
8. Click on “Post To Accounts” button at the bottom left of screen to post the credit note to account
Update Credit Note Details
1. Click on “Credit Note List” tab at the bottom of screen
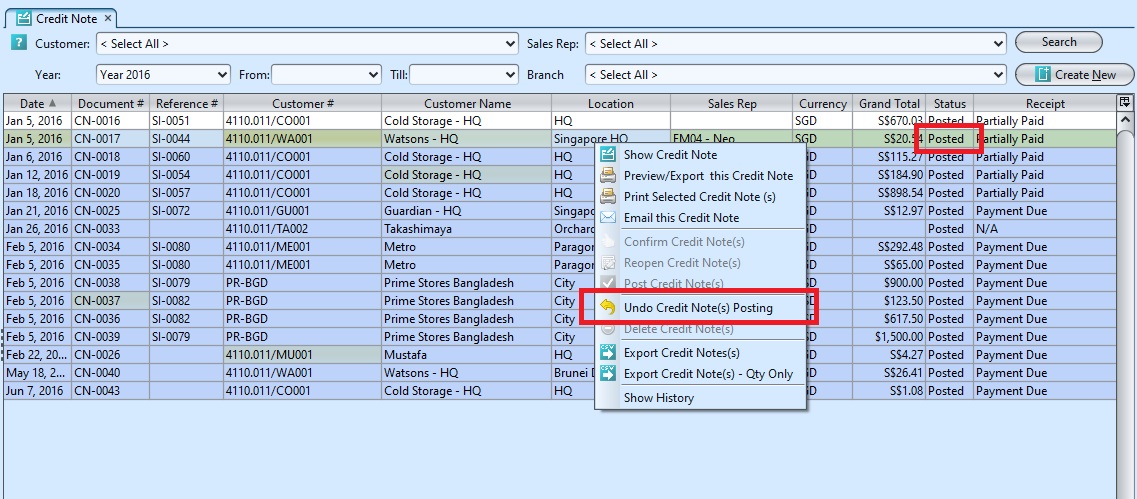
2. Double click on credit note to be updated, it will bring up the details on “Credit Note” tab for the selected note. If a note’s status is “Confirmed” or “Posted”, right click on the note and reopen / undo posting of the note first
3. Make change(s) on the credit note information
4. Click on “Save” button at the bottom of screen to save
5. Click on “Revert” button at the bottom of screen or refresh icon at the top of the screen to roll back the changes
6. Click on “Confirm Credit Note” button at the bottom of screen to confirm the credit note
![]()
7. Click on “Post Credit Note” button at the bottom of screen to post the credit note
Delete Credit Note
1. Click on “Credit Note List” tab at the bottom of screen
2. Double click on credit note to be deleted, it will bring up the details on “Credit Note” tab for the selected note. If a note’s status is “Confirmed” or “Posted”, right click on the note and reopen / undo posting of the note first
3. Click on “Delete” button at the bottom right side of screen
4. Click on “Yes” button on the pop-up window to confirm note deletion
Adding Customer Reference Number in Credit Note
1. Click on “Credit Note List” tab at the bottom of screen
2. Double click on credit note (with “Posted” status) to be updated, it will bring up the details on “Credit Note” tab for the selected note.
3. If user have access right to edit the “Customer Reference Number“, they can add “Customer Reference Number” for Credit Note with “Posted” status. Enter the reference number from customer and click SAVE button to save.
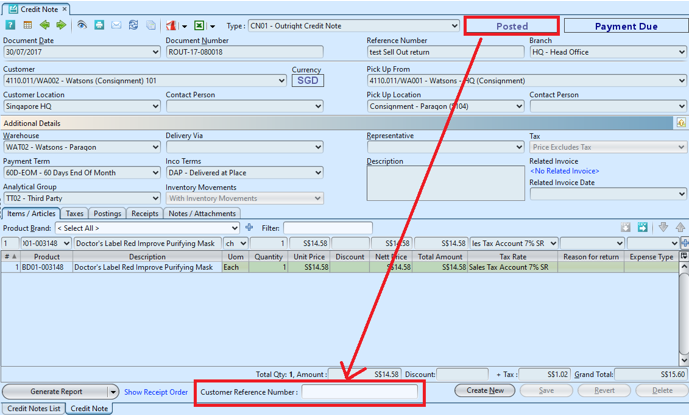
4. If present, this value will replace the Credit Note Reference Number in Receipts and Statement of Accounts report.
5. User also able to add column for this in the Credit Note list view (by default the column is hidden) and use keyword search for this field.
View and Search for Credit Note Details
1. Click on “Credit Note List” tab at the bottom of screen
2. Enter search parameter to filter the result, i.e. type in account of the credit note to search for in the “Account” text field box or select from drop-down list
3. Result can be sorted alphabetically by clicking the fields’ columns
4. Double click on credit note to view full details of the note, it will bring up the details on “Credit Note” tab for the selected note